
HP StoreEver 1/8 G2 Tape Autoloader User and Service Guide (AK377-96024, December 2012)


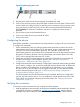


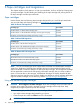

Figure 18 Installing the tabletop conversion cover
3. Tighten the captive screws on the front panel until the cover is secure.
Changing the SCSI address (parallel SCSI drives only)
If you have multiple parallel SCSI devices on the SCSI bus and another device is already using
SCSI ID 4, you must change the SCSI ID of the autoloader.
To change the SCSI ID:
1. Plug the power cord into the power connector on the back panel and then plug the cord into
the power outlet.
2. From the front panel, push the round power button to power on the device.
3. From the front panel, set the new SCSI ID (see “Changing the SCSI address — parallel SCSI
devices (Configuration> Change Drive)” (page 75)).
4. Power off the device by depressing the power button on the front panel.
TIP: The SCSI ID can also be changed from the RMI Configure: Drive screen once the RMI is
configured. See “Changing the drive configuration” (page 50).
Connecting the parallel SCSI cable (parallel SCSI devices only)
NOTE: LTO-3 and LTO-4 tape drives are Ultra 320 SCSI LVD devices. Use only cables and
terminators specified for Ultra 320 or labeled as MultiMode. LTO-2 tape drives are Ultra 160 SCSI
LVD/SE devices; use only cables and terminators specified for Ultra 160 or Ultra 320, or labeled
as MultiMode.
NOTE: For optimal performance, a parallel SCSI tape drive should be the only device on the
bus.
To connect the parallel SCSI cable to the device:
1. HP recommends that the host server be powered off before attaching new devices.
2. Attach one end of the parallel SCSI cable (included in the accessory package) to one of the
connectors on the back panel of the tape drive (see Figure 19 (page 25)).
Figure 19 Attaching the parallel SCSI cable to the tape drive
Changing the SCSI address (parallel SCSI drives only) 25