
HP StoreEver 1/8 G2 Tape Autoloader User and Service Guide (AK377-96024, December 2012)


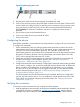


2. Secure the front of one rail to the front of the rack. Extend the rail to the depth of the rack and
secure the rail to the back of the rack. The front of the rails are straight and the back are
angled, as shown in “Installing the rails into the rack” (page 24).
Figure 16 Installing the rails into the rack
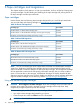
To install the device on the rails and into the rack:
1. Locate the captive screws on the front bezel (see “Securing the autoloader to the rack”
(page 24)).
2. Slide the device onto the rails.
3. From the front of the device, secure the front bezel to the rack using a #2 Phillips screw driver
placed through the small holes in the mounting bracket to tighten the captive screws on each
side of the device.
Figure 17 Securing the autoloader to the rack
Installing the tabletop conversion kit
If you do not have the optional tabletop conversion kit, skip this step and continue with “Connecting
the SCSI cable (parallel SCSI devices only)” (page 25). The rack to tabletop conversion kit supports
the edges of the tape autoloader and is capable of holding 15 kg (33 lb).
To install the cover:
1. Place the cover on a flat, level surface behind the device.
2. Slide the device into the cover until the front panel of the device is aligned with the cover (see
Figure 18 (page 25)).
24 Installing the autoloader