
HP StoreEver 1/8 G2 Tape Autoloader User and Service Guide (AK377-96024, December 2012)


• Remove the cables, drives, and magazines from the autoloader.
• Remove the autoloader from the rack or tabletop conversion cover.
• Replace the base chassis.
• Reinstall the autoloader into the rack or tabletop conversion cover if the support feet have not
been applied.
• Replace the cables, tape drive, and magazines.
• Reconfigure the autoloader.
!
The autoloader weighs 11.5 kg (25.4 lb) without media and 13.1 kg (28.9 lb) with media (8
cartridges). When moving the autoloader, to reduce the risk of personal injury or damage to the
autoloader: 1) observe local health and safety requirements and guidelines for manual material
handing, 2) always remove all tapes to reduce the overall weight of the autoloader, and 3) obtain
adequate assistance to lift and stabilize the autoloader during installation or removal.
Recording configuration settings
If the OCP or RMI works, save the configuration settings to the USB flash drive from the OCP or to
a file from the RMI. You will need these settings to re-configure the autoloader after replacing the
chassis.
Removing the tape cartridge from the tape drive
Before beginning, be sure no cartridges are in the tape drive. To move a cartridge with the OCP,
see “Moving tapes in the Autoloader (Operations > Move Tape)” (page 81). To move a cartridge
with the RMI, see “Moving media” (page 59).
CAUTION: If you cannot remove the tape cartridge from the tape drive, handle the tape drive
gently during the rest of the procedure to avoid damaging the tape and losing data.
Removing the cables, magazines, and tape drive
If the OCP or RMI are operational, remove the magazines using the RMI or OCP.
Power off the autoloader. Remove the power cord and other cables from the autoloader.
If the magazines have not been removed, remove the magazines from the device using the manual
process (see “Releasing the magazines manually” (page 102)).
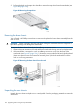
To remove the tape drive:
1. Loosen the blue captive thumbscrews on the drive (see Figure 85 (page 133)).
Figure 85 Captive screws on the tape drive
Removing and replacing the base chassis 133