
HP StoreEver 1/8 G2 Tape Autoloader User and Service Guide (AK377-96024, December 2012)

NOTE: You may use the HP Library and Tape Tools (L&TT) diagnostic utility to perform
diagnostic functions for the autoloader. L&TT is a diagnostic tool designed to aid in the
installation and maintenance of HP tape storage products. L&TT includes several features
designed for use by both HP storage customers and trained service personnel. L&TT is available
for download at the following HP website at no cost: www.hp.com/support/TapeTools.
Frequent firmware image updates to the website are released on the Internet. For optimal
performance, HP recommends that you update your system periodically with the latest device
firmware.
Removing and replacing a tape drive
Install the tape drive from the back of the autoloader.
To remove a tape drive:
1. Using the remote management interface or the operator control panel, unload any tape
cartridge from the tape drive, if present.
2. Power off the drive from the OCP or RMI. (See “Powering a drive on or off (Support > Power
On/Off Drive)” (page 82).)
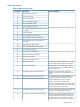
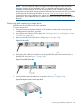
3. Make sure the LED on the tape drive is off (see Figure 76 (page 129)).
Figure 76 Drive LED
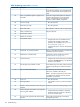
4. Remove the SAS cable from a SAS drive or the parallel SCSI cable and terminator from a
parallel SCSI drive (see Figure 77 (page 129)).
Figure 77 Parallel SCSI cable
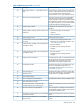
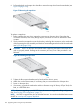
5. Loosen the blue captive thumbscrews on the drive (see Figure 78 (page 129)).
Figure 78 Captive screws on the tape drive
Removing and replacing a tape drive 129