
HP StorageWorks Disk Array XP operating system configuration guide (A5951-96014, August 2004)


Installation 39
Example
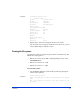
# pvchange -t 60 /dev/dsk/c0t6d0
This result is displayed:
Physical volume "/dev/dsk/c0t6d0" has been successfully changed.
Volume Group configuration for /dev/vg06 has been saved in
/etc/lvmconf/vg06.cof
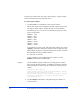
3. Verify that the new I/O timeout value is 60 seconds using the pvdisplay
command:
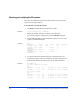
Example
# pvdisplay /dev/dsk/c0t6d0
Current values are now displayed, confirming that the new I/O timeout
value is 60 seconds:
--- Physical volumes ---
PV Name /dev/dsk/c0t6d0
VG Name /dev/vg06
PV Status available
:
Stale PE 0
IO Timeout (Seconds) 60 [New I/O timeout value]
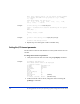
4. Repeat the steps above for each new disk that is connected to the system.
Creating the mount directories
Create a mount directory for each logical volume. Choose a unique name
for each mount directory that identifies the logical volume.
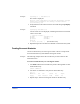
Example The following example shows the root directory as the location for the
mount directories.
To create a mount directory for each logical volume:
1. Use mkdir with the new mount directory name as the argument to create
the mount directory.
# mkdir /AHPMD-LU00
2. Use the ls –x command to verify the new mount directory.
# ls -x
AHPMD-LU00 bin dev device etc export
floppy home hstsboof kadb kernel lib
3. Repeat steps 1 and 2 for each logical volume on the disk array.