
HP StorageWorks XP Disk Array Configuration Guide (T5278-96047, May 2011)

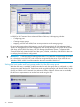
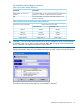
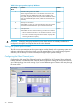

Table Of Contents
- XP Disk Array Configuration Guide
- Contents
- 1 Overview
- 2 HP-UX
- Installation roadmap
- Installing and configuring the disk array
- Installing and configuring the host
- Connecting the disk array
- Configuring disk array devices
- Verifying the device files and drivers
- Creating the device files
- Creating the physical volumes
- Creating new volume groups
- Creating logical volumes
- Creating the file systems
- Setting the I/O timeout parameter
- Creating the mount directories
- Mounting and verifying the file systems
- Setting and verifying the auto-mount parameters
- 3 Windows
- 4 Novell NetWare
- 5 NonStop
- 6 OpenVMS
- 7 VMware
- 8 Linux
- 9 Solaris
- Installation roadmap
- Installing and configuring the disk array
- Installing and configuring the host
- Connecting the disk array
- Configuring disk array devices
- Configuring for use with Veritas Volume Manager 4.x and later
- 10 IBM AIX
- 11 Citrix XenServer Enterprise
- 12 Troubleshooting
- 13 Support and other resources
- A Path worksheet
- B Path worksheet (NonStop)
- C Disk array supported emulations
- D Using Veritas Cluster Server to prevent data corruption
- E Reference information for the HP System Administration Manager (SAM)
- F HP Clustered Gateway deployments
- Glossary
- Index

Figure 3 Multi-cluster environment (Windows)
Connecting the disk array
The HP service representative performs the following steps to connect the disk array to the host:
1. Verifying operational status of the disk array channel adapters, LDEVs, and paths.
2. Connecting the Fibre Channel cables between the disk array and the fabric switch or host.
3. Verifying the ready status of the disk array and peripherals.
Verifying the host recognizes array devices
1. Log into the host as an administrator.
2. Right-click My Computer , and then click Manage.
3. Click Device Manager.
4. Click SCSI and then RAID Controllers.
5. Click the Fibre Channel adapter, and verify all devices are displayed.
6. Click each device, click Properties, and then click Settings.
7. Record the device information using the worksheet in “Worksheet” (page 132).
Configuring disk devices
Disk devices are configured using the following procedures:
• “Writing signatures” (page 36)
• “Creating and formatting disk partitions” (page 37)
• “Verifying file system operations ” (page 37)
NOTE: You must use GPT for disk devices greater than 2TB.
Writing signatures
1. Right-click My Computer and then click Manage.
2. Click Disk Management. A message notifies you that disks have been added.
36 Windows