
HP StorageWorks XP Disk Array Configuration Guide (T5278-96047, May 2011)
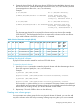
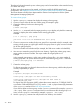
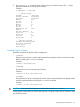
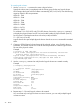
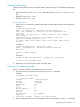
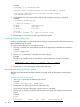
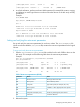
Table Of Contents
- XP Disk Array Configuration Guide
- Contents
- 1 Overview
- 2 HP-UX
- Installation roadmap
- Installing and configuring the disk array
- Installing and configuring the host
- Connecting the disk array
- Configuring disk array devices
- Verifying the device files and drivers
- Creating the device files
- Creating the physical volumes
- Creating new volume groups
- Creating logical volumes
- Creating the file systems
- Setting the I/O timeout parameter
- Creating the mount directories
- Mounting and verifying the file systems
- Setting and verifying the auto-mount parameters
- 3 Windows
- 4 Novell NetWare
- 5 NonStop
- 6 OpenVMS
- 7 VMware
- 8 Linux
- 9 Solaris
- Installation roadmap
- Installing and configuring the disk array
- Installing and configuring the host
- Connecting the disk array
- Configuring disk array devices
- Configuring for use with Veritas Volume Manager 4.x and later
- 10 IBM AIX
- 11 Citrix XenServer Enterprise
- 12 Troubleshooting
- 13 Support and other resources
- A Path worksheet
- B Path worksheet (NonStop)
- C Disk array supported emulations
- D Using Veritas Cluster Server to prevent data corruption
- E Reference information for the HP System Administration Manager (SAM)
- F HP Clustered Gateway deployments
- Glossary
- Index
/ldev/vg00/lvol1 59797 59364 0 100% /
:
/ldev/vg06/lvol1 2348177 9 2113350 0% /AHPMD-LU00
4. As a final verification, perform some basic UNIX operations (for example file creation, copying,
and deletion) on each logical device to make sure that the devices on the disk array are fully
operational.
Example
#cd /AHPMD-LU00
#cp /bin/vi /AHPMD-LU00/vi.back1
#ls -l
drwxr-xr-t 2 root root 8192 Mar 15 11:35 lost+found
-rwxr-xr-x 1 root sys 217088 Mar 15 11:41 vi.back1
#cp vi.back1 vi.back2
#ls -l drwxr-xr-t 2 root root 8192 Mar 15 11:35 lost+found
-rwxr-xr-x 1 root sys 217088 Mar 15 11:41 vi.back1
-rwxr-xr-x 1 root sys 217088 Mar 15 11:52 vi.back2
Setting and verifying the auto-mount parameters
Set up and verify the auto-mount parameters for each new volume. The /etc/checklist file
(which can also be called the /etc/fstab file) contains the auto-mount parameters for the logical
volumes.
To set up and verify the auto-mount parameters:
1. Edit the /etc/checklist (/etc/fstab) file to add a line for each OPEN-x device on the
disk array. This example and the following table show the auto-mount parameters.
Example
#cp -ip /etc/checklist /etc/checklist.standard
#vi /etc/checklist
/dev/vg00/lvol1 / hfs rw 0 1 # root
/dev/vg00/lvol2 swap ignore rw 0 0 # primary swap
:
/dev/vg06/lvol1 /AHPMD-LU00 hfs defaults 0 2 # AHPMD-LU00
/dev/vg06/lvol2 /AHPMD-LU01 hfs defaults 0 2 # AHPMD-LU01
P1 P2 P3 P4 P5 P6 P7
Table 5 Auto-mount parameters (HP-UX)
EnterNameParameter
Block-type device file nameDevice to mountP1
Mount directory nameMount pointP2
Type of file system (for example, hfs, vxfs)File systemP3
“defaults” or other appropriate mount optionsMount optionsP4
0EnhanceP5
Order for performing file system checksFile system check (fsck pass)P6
Comment statementCommentsP7
2. Reboot the system.
Configuring disk array devices 29