
HP StorageWorks XP Disk Array Configuration Guide (T5278-96047, May 2011)
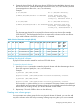
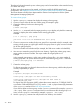
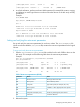
Table Of Contents
- XP Disk Array Configuration Guide
- Contents
- 1 Overview
- 2 HP-UX
- Installation roadmap
- Installing and configuring the disk array
- Installing and configuring the host
- Connecting the disk array
- Configuring disk array devices
- Verifying the device files and drivers
- Creating the device files
- Creating the physical volumes
- Creating new volume groups
- Creating logical volumes
- Creating the file systems
- Setting the I/O timeout parameter
- Creating the mount directories
- Mounting and verifying the file systems
- Setting and verifying the auto-mount parameters
- 3 Windows
- 4 Novell NetWare
- 5 NonStop
- 6 OpenVMS
- 7 VMware
- 8 Linux
- 9 Solaris
- Installation roadmap
- Installing and configuring the disk array
- Installing and configuring the host
- Connecting the disk array
- Configuring disk array devices
- Configuring for use with Veritas Volume Manager 4.x and later
- 10 IBM AIX
- 11 Citrix XenServer Enterprise
- 12 Troubleshooting
- 13 Support and other resources
- A Path worksheet
- B Path worksheet (NonStop)
- C Disk array supported emulations
- D Using Veritas Cluster Server to prevent data corruption
- E Reference information for the HP System Administration Manager (SAM)
- F HP Clustered Gateway deployments
- Glossary
- Index
Creating the file systems
Create the file system for each new logical volume on the disk array. The default file system types
are:
• HP-UX OS version 10.20 = hfs or vxfs, depending on entry in the /etc/defaults/fs
file.
• HP-UX OS version 11.0 = vxfs
• HP-UX OS version 11.i = vxfs
To create file systems:
1. Use the newfs command to create the file system using the logical volume as the argument.
Example 1
# newfs /dev/vg06/rlvol1
newfs: /etc/default/fs determine the file system type
mkfs (hfs): Warning -272 sectors in the last cylinder are not
allocated.
mkfs (hfs): /dev/vg06/rlvol1 - 2400256 sectors in 3847 cylinders
of 16 tracks,
2547.9MB in 241 cyl groups (16 c/g, 10.22Mb/g, 1600 ig/g)
Super block backups (for fsck -b) at:
16, 10040, 20064, 30038, 40112, 50136, 60160, 70184, 80208, 90232, ...
2396176
Example 2
# newfs /dev/vg06/rlvol1 create file system
newfs: / etc/default/fs determine the file system type
mkfs (hfs): ...
:
7188496, 7198520, 7208544
#
Example 3
# newfs -F vxfs /dev/vg06/rlvol1 Specify file system type
:
# newfs -F hfs /dev/vg06/rlvol2
2. Repeat step 1 for each logical volume on the disk array.
Setting the I/O timeout parameter
Set the I/O timeout value for each disk device to 60 seconds.
1. Verify the current I/O timeout value using the pvdisplay command:
Example
# pvdisplay /dev/dsk/c0t6d0
- - - Physical volumes - - -
PV Name /dev/dsk/c0t6d0
VG Name /dev/vg06
PV Status available
Allocatable yes
VGDA 2
Cur LV 1
PE Size (Mbytes) 4
Total PE 586
Free PE 0
Allocated PE 586 [OPEN-9]
Stale PE 0
IO Timeout (Seconds) default [I/O timeout value]
2. If the I/O timeout value is not 60, change the value to 60 using the pvchange -t command:
Configuring disk array devices 27