
HP StorageWorks XP Disk Array Configuration Guide (T5278-96047, May 2011)
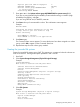

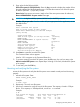
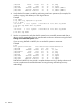
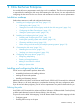
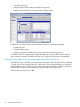
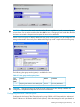
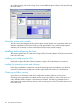
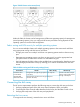
Table Of Contents
- XP Disk Array Configuration Guide
- Contents
- 1 Overview
- 2 HP-UX
- Installation roadmap
- Installing and configuring the disk array
- Installing and configuring the host
- Connecting the disk array
- Configuring disk array devices
- Verifying the device files and drivers
- Creating the device files
- Creating the physical volumes
- Creating new volume groups
- Creating logical volumes
- Creating the file systems
- Setting the I/O timeout parameter
- Creating the mount directories
- Mounting and verifying the file systems
- Setting and verifying the auto-mount parameters
- 3 Windows
- 4 Novell NetWare
- 5 NonStop
- 6 OpenVMS
- 7 VMware
- 8 Linux
- 9 Solaris
- Installation roadmap
- Installing and configuring the disk array
- Installing and configuring the host
- Connecting the disk array
- Configuring disk array devices
- Configuring for use with Veritas Volume Manager 4.x and later
- 10 IBM AIX
- 11 Citrix XenServer Enterprise
- 12 Troubleshooting
- 13 Support and other resources
- A Path worksheet
- B Path worksheet (NonStop)
- C Disk array supported emulations
- D Using Veritas Cluster Server to prevent data corruption
- E Reference information for the HP System Administration Manager (SAM)
- F HP Clustered Gateway deployments
- Glossary
- Index
Physical partition SIZE in megabytes 4
PHYSICAL VOLUME names [hdisk1]
Activate volume group AUTOMATICALLY yes
at system restart?
Volume Group MAJOR NUMBER []
7. Enter yes or no in the Activate volume group AUTOMATICALLY at system restart? field.
If you are not using HACMP (High Availability Cluster Multi-Processing) or HAGEO (High
Availability Geographic), enter yes.
If you are using HACMP and/or HAGEO, enter no.
8. Press Enter when you have entered the values. The confirmation screen appears.
Example
ARE YOU SURE?
Continuing may delete information you may want
to keep. This is your last chance to stop
before continuing.
Press Enter to continue.
Press Cancel to return to the applications.
9. Press Enter again.
The Command Status screen appears. To ensure the devices have been assigned to a volume
group, wait for OK to appear on the Command Status line.
10. Repeat these steps for each volume group needed.
Creating the journaled file systems
Create the journaled file systems using SMIT. This operation is not required when the volumes are
used as raw devices. The largest file system permitted in AIX is 64 GB.
1. Start SMIT.
2. Select System Storage Management (Physical & Logical Storage).
Example
System Management
Move cursor to desired item and press Enter.
Software Installation and Maintenance
Software License Management
Devices
System Storage Management (Physical & Logical Storage)
Security & Users
Communications Applications and Services
Print Spooling
Problem Determination
Performance & Resource Scheduling
System Environments
Processes & Subsystems
Applications
Using SMIT (information only)
3. Select File Systems.
Example
System Storage Management (Physical & Logical Storage)
Move cursor to desired item and press Enter.
Logical Volume Manager
File Systems
Files & Directories
Configuring disk array devices 111