
HP StorageWorks XP Disk Array Configuration Guide (T5278-96047, May 2011)
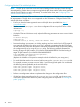
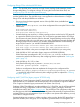
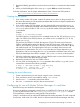
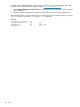
Table Of Contents
- XP Disk Array Configuration Guide
- Contents
- 1 Overview
- 2 HP-UX
- Installation roadmap
- Installing and configuring the disk array
- Installing and configuring the host
- Connecting the disk array
- Configuring disk array devices
- Verifying the device files and drivers
- Creating the device files
- Creating the physical volumes
- Creating new volume groups
- Creating logical volumes
- Creating the file systems
- Setting the I/O timeout parameter
- Creating the mount directories
- Mounting and verifying the file systems
- Setting and verifying the auto-mount parameters
- 3 Windows
- 4 Novell NetWare
- 5 NonStop
- 6 OpenVMS
- 7 VMware
- 8 Linux
- 9 Solaris
- Installation roadmap
- Installing and configuring the disk array
- Installing and configuring the host
- Connecting the disk array
- Configuring disk array devices
- Configuring for use with Veritas Volume Manager 4.x and later
- 10 IBM AIX
- 11 Citrix XenServer Enterprise
- 12 Troubleshooting
- 13 Support and other resources
- A Path worksheet
- B Path worksheet (NonStop)
- C Disk array supported emulations
- D Using Veritas Cluster Server to prevent data corruption
- E Reference information for the HP System Administration Manager (SAM)
- F HP Clustered Gateway deployments
- Glossary
- Index

not need to be installed separately. With VxVM 4.x versions, you need to download and install
the ASL from the Symantec/Veritas support website (http://support.veritas.com):
1. Select Volume Manager for Unix/Linux as product and search the XP array model for Solaris
as the platform.
2. Read the TechFile that appears and follow the instructions to download and install the ASL.
After installing the ASL, verify that the XP array is visible and the ASL is present using the vxdmpadm
listctlr all and vxddladm listsupport all commands.
Example
# vxddladm listsupport all
grep HPlibvxxp256.so HP All
libvxhpxp.so HP 0450, 0451
libhpxp12k.so HP 50, 51
100 Solaris