HP P9000 Volume Shredder for Open and Mainframe Systems User Guide Abstract This guide provides instructions for using the HP P9000 Volume Shredder Software on HP P9000 disk arrays. The intended audience is a storage system administrator or authorized service provider with independent knowledge of HP P9000 disk arrays and the HP Remote Web Console.
© Copyright 2010, 2012 Hewlett-Packard Development Company, L.P. Confidential computer software. Valid license from HP required for possession, use or copying. Consistent with FAR 12.211 and 12.212, Commercial Computer Software, Computer Software Documentation, and Technical Data for Commercial Items are licensed to the U.S. Government under vendor's standard commercial license. The information contained herein is subject to change without notice.
Contents 1 Volume Shredder overview..........................................................................4 Data security practices and Volume Shredder...............................................................................4 Volume types that you can overwrite...........................................................................................4 Example of Volume Shedder use.................................................................................................
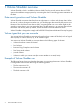
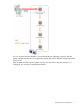
1 Volume Shredder overview Volume Shredder, which is available in Remote Web Console, securely erases data on P9500 open and mainframe storage systems by overwriting the data. Overwriting prevents restoration of the data. Data security practices and Volume Shredder Volume Shredder overwrites data from three to eight times in a volume with dummy data. When the user of a volume changes to another user, you should purge data stored by the previous user.
You can configure Volume Shredder to overwrite data three to eight times, and each time the system overwrites the data you can configure the dummy data to be a different hexadecimal number from 0 to FFFF. After the system finishes overwriting data, you can view the results in the user interface; or, if configured, you can open a compressed results files.
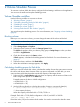
2 Volume Shredder Process To overwrite a volume, block the volume, configure the shred settings, and then run the application. You can view the results and stop the shredding process. Volume Shredder workflow Use 1. 2. 3. 4. 5. the following workflow to overwrite a volume: “Blocking volumes” (page 6) “Calculating shredding passes for flash disks” (page 6) “Shredding a volume” (page 7) “Shredding a volume” (page 7) “Viewing results from the Task window” (page 9) You can also stop the shredding process.
Shredding a volume Configure data overwrite patterns and the number of overwrite passes from the Shredding Param. window. By default the number of overwrite passes is three; but you can change this number from three to up to eight times. The system keeps user-specified settings while the Shred LDEVs window is open. 1. Open the Remote Web Console main window. 2. Select the resource from the Parity Group or an LDEV in LDEVs. The LDEVs tab appears. 3.
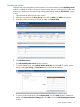
7. Specify the data pattern and then click OK. Select Define Data, and then enter a number that you want to use as dummy data in the text box, and click Add. You can enter a hexadecimal number up to four digits (0 to FFFF). The number is added in the Data Pattern(User Setting) table. Caution: We recommend that you enter three or more numbers to use as dummy data. If you overwrite data with less than three numbers, some or all data might be recoverable.
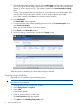
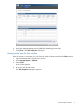
6. 7. Verify the displayed settings and click Yes.The shredding process stops. Click Close in the Task Properties dialog box. Viewing results from the Task window After the volume is overwritten, you can check the results of the process from the Tasks window. 1. Open the Remote Web Console main window. 2. Select Storage System in Explorer. 3. Select Tasks. A list of tasks appears. 4. In the list, click the task name. The Task Properties dialog box appears.
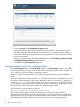
5. Confirm the Result in the Shredding Data pattern table. Check the contents to verify whether all the overwriting operations have ended normally. If an overwriting pass ends abnormally, shredding was not successful. If shredding fails, try to shred the volume again. If shredding fails again, contact HP Technical Support to identify the cause of the failure. If power to the system stops during the shredding process, the Shredding operation canceled or Shredding operation Failed message appears. 6.
The text file contains the following summary information: • Results of a shredding operation • Contents of the dummy data • Shredded volumes • 1. Start and finish time of a shredding operation On the menu bar, select Reports > Shredding Report > and Download Latest Report or Download Other Reports. Select Download Latest Report to download the latest result file. Select Download Other Reports to download the past ten times result files.
3 Troubleshooting This module provides troubleshooting information for Volume Shredder. Troubleshooting 12 • For troubleshooting information about the P9500 storage system, see the HP P9000 Owner Guide. • For troubleshooting information about Remote Web Console, see the HP P9000 Remote Web Console User Guide. • For information about the Remote Web Console error messages, see the HP P9000 Remote Web Console Messages.
4 Support and other resources Contacting HP For worldwide technical support information, see the HP support website: http://www.hp.
HP websites For additional information, see the following HP websites: • http://www.hp.com • http://www.hp.com/go/storage • http://www.hp.com/service_locator • http://www.hp.com/support/manuals • http://www.hp.com/support/downloads • http://www.hp.
Table 1 Document conventions (continued) Convention Element Monospace text • File and directory names • System output • Code • Commands, their arguments, and argument values Monospace, italic text • Code variables • Command variables Monospace, bold text WARNING! CAUTION: IMPORTANT: NOTE: TIP: Emphasized monospace text Indicates that failure to follow directions could result in bodily harm or death. Indicates that failure to follow directions could result in damage to equipment or data.
A Volume Shredder GUI reference Remote Web Console provides windows and dialog boxes for shredding volumes. Shred LDEVs wizard Shred LDEVs window Use the Shred LDEVs window to select the LDEVs to be shredded. Selected LDEVs table The following table lists information about the LDEVs selected. Item Description LDEV ID The ID of the selected LDEV. The ID is a combination of a logical disk controller (LDKC) number, a control unit (CU) number, and a LDEV number. Free indicates free space.
Item Description External: External volume THP: Thin Provisioning of virtual volume Data Output Indicates whether or not the results of the shredding operation will be saved in a file. Click Set Data Output to save the results. Results can be saved for up to three volumes. Click Yes to save results and No to discard results. Set Data Output Click to save results. Cancel Data Output Click to cancel discard results.
Selected LDEVs table The following table lists information about the LDEVs selected for shredding. Item Description LDEV ID A combination of a logical disk controller (LDKC) number, a control unit (CU) number, and a logical device (LDEV) number. Free indicates free space. LDEV Names Names containing 32 alphanumeric characters or fewer. Names are case-sensitive.
Item Description • Shredding data verify error. An error was detected while verifying the file containing the result. • No-data assigned. The Thin Provisioning virtual volume was unused; no dummy data was written to the volume. Edit Shredding Data Pattern window Define the volume shredding settings. Item Description Data Pattern Select the default or custom data pattern: • Default (00-FF-00): Deletes the data in a volume by overwriting the volume three times with dummy data.
Glossary CU Control Unit. Used to organize the storage space attached to the disk controller ( DKC). You can group similarly configured logical devices (LDEVs) with unique control unit images (CUs). CUs are numbered sequentially. The disk array supports a certain number of CUs, depending on the disk array model. Each CU can manage multiple LDEVs; therefore, both the CU number and the LDEV number are required to identify an LDEV. LDKC Logical disk controller.
Index B blocking volumes, 6 C contacting HP, 13 conventions document, 14 storage capacity values, 14 text symbols, 15 D document conventions, 14 related information, 13 documentation HP website, 13 providing feedback, 13 E editing shredding data patterns, 7 F flash disks calculating shredding passes, 6 H pool volume, 4 virtual volume, 4 storage capacity values conventions, 14 Subscriber's Choice, HP, 13 symbols in text, 15 T technical support HP, 13 service locator website, 14 text symbols, 15 typogr