HP XP P9000 Snapshot User Guide Abstract This guide explains how to use HP XP P9000 Snapshot Software to create space-efficient point-in-time copies of data volumes on an HP XP P9000 disk array. Topics include creating, monitoring, and troubleshooting snapshot pools, virtual volumes, and copy pairs. The intended audience is a storage system administrator or authorized service provider with independent knowledge of HP XP P9000 disk arrays and the HP Remote Web Console.
© Copyright 2010, 2014 Hewlett-Packard Development Company, L.P. Confidential computer software. Valid license from HP required for possession, use or copying. Consistent with FAR 12.211 and 12.212, Commercial Computer Software, Computer Software Documentation, and Technical Data for Commercial Items are licensed to the U.S. Government under vendor's standard commercial license. The information contained herein is subject to change without notice.
Contents 1 Overview of Business Copy/Snapshot...........................................................7 Snapshot software....................................................................................................................7 How Business Copy/Snapshot works...........................................................................................7 Volume pairs: P-VOLs and V-VOLs..........................................................................................7 Data pools.............
5 Pair operations.........................................................................................35 Pair operations.......................................................................................................................35 Checking the pair status..........................................................................................................35 Pair creation workflow.............................................................................................................
Conventions for storage capacity values....................................................................................65 Typographic conventions.........................................................................................................65 A RAID Manager command reference............................................................67 RAID Manager commands for Remote Web Console operations...................................................
Monitoring pair operation history.......................................................................................117 Maintaining the system..........................................................................................................117 E Snapshot GUI reference (secondary window).............................................118 Pair Operation window.........................................................................................................118 Volume list......................
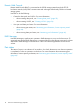
1 Overview of Business Copy/Snapshot With Snapshot (SS), you can create virtual copies of a data volume in the P9500 storage system. This chapter provides instructions for planning and designing, configuring, operating, monitoring, and troubleshooting SS. Snapshot software SS creates a virtual, point-in-time copy, or snapshot, of a data volume. Since only changed data blocks are stored in the SS storage pool, storage capacity is substantially less than the source volume.
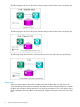
The following figure shows how the V-VOL maintains the point-in-time data when you split the pair. The following figure shows how the V-VOL maintains the point-in-time data when you split the pair. The following image shows how the V-VOL maintains point-in-time data when you split the pair. Data pools When you replace data in the P-VOL, the data pool holds the data. After you split a pair, the V-VOL maintains pointers to point-in-time data.
Components An SS system typically consists of the following components: • RWC • SS and Business Copy (BC/SS) software • RAID Manager (RAID Manager) • A pair of volumes (P-VOL and S-VOL) • A data pool • A consistency group Licenses and capacity To use SS, BC/SS must be installed on the same system. You must provide sufficient licensed capacity for both SS and BC/SS. SS uses a V-VOL management area for managing V-VOLs and data pools.
Remote Web Console Remote Web Console (RWC) is connected to the P9500 storage system through the TCP/IP local-area network (LAN). RWC communicates and exchanges data directly with the connected storage system. Use RWC to do the following: • • Create the data pools and V-VOLs. For more information: ◦ About creating data pools, see “Creating data pools” (page 23). ◦ About creating V-VOLS, see “Creating V-VOLs” (page 24). View pair and data pool status.
2 Business Copy/Snapshot planning and design This chapter describes requirements for setting up and using SS and includes data pool sizing information. Consistency group system requirements The following table includes a list of consistency group system requirements. NOTE: Many of these requirements are augmented with restrictions. Item Requirement Software BC/SS is required to operate SS.
Item Requirement RAID level Supported: RAID1, RAID1+0, RAID5, and RAID6 Restriction: You cannot add a different RAID level to the data pool. LUSE Supported: P-VOL and V-VOL Not supported: pool-VOL CLPR The data pool must contain pool-VOLs belonging to the same cache logical partition. Number of P-VOLs and V-VOLs P-VOL: 16,384 V-VOL: 16,384 For more information about calculating the number of SS pairs, see “Calculating the number of Snapshot pairs” (page 14).
Item Requirement For more information about creating pairs using the paircreate command, see “Creating pairs in a consistency group” (page 109). Data pool requirements and restrictions To use a volume as a data pool, the volume’s LDEV status must be “Normal” or “Normal (Quick Format)”. You cannot use the following volumes as data pools: • LUSE or Cache Residency (CR) volumes, system disks, command devices, quorum disks. • Volumes in “Block” status or volumes in copying process. • SS P-VOLs or V-VOLs.
longer a snapshot is held, and the more snapshots that exist all result in more data accumulating in the data pool. For more information about data pool sizing, see “Sizing the data pool workflow” (page 14). Sizing the data pool workflow Updating the P-VOL replaces and holds the P-VOL data in the data pool. The original data in the data pool is held to maintain the image of the P-VOL at the time of the snapshot. To determine the size of the data pool, do the following: 1.
The maximum number of SS pairs supported on a system is the lowest value based on the following calculations: • The number of differential tables. For more information about calculating based on differential tables, see “Calculating maximum SS pairs based on differential tables workflow” (page 15). • The shared memory capacity for the V-VOL management area. For more information about calculating based on shared memory, see “Calculating maximum SS pairs based on shared memory workflow” (page 16).
Using differential tables, use the following workflow to find the maximum number of pairs allowed on your system: 1. The number of differential tables required for each pair. 2. The maximum number of pairs your system supports based on the number of differential tables in the storage system.
The following table shows a system’s shared memory capacity based on the amount of additional shared memory. This table also shows the V-VOL management area’s memory capacity. Shared memory Shared memory capacity SS 751,619,276 bytes SS Extension 1 4,294,967,296 bytes You can calculate the maximum number of SS pairs that you can create based on the amount of additional shared memory in the V-VOL management area. Use the following workflow to calculate the maximum number of pairs: 1.
The following table shows the pool capacity for shared memory and the P-VOL capacity that you can create. Shared memory Pool capacity (GB) 2,048 4,096 6,144 8,192 10,240 12,288 14,336 20,480 30,720 SS 26 (TB) 11 (TB) - - - - - - - SS Extension 1 224 (TB) 209 (TB) 194 (TB) 179 (TB) 163 (TB) 148 (TB) 133 (TB) 88 (TB) 12 (TB) The total capacity of pool-VOLs registered in a pool is the capacity of that pool.
Use the following formula to calculate the capacity: Capacity (bytes) of shared memory used by the P-VOL = ceil (ceil (P-VOL capacity (KB)/256 (KB))/2,048) X 8,736 + ceil (ceil (ceil (P-VOL capacity (KB)/256 (KB))/2,048)/1,024) X 8,736 Calculating maximum pairs based on pair tables SS and Compatible FlashCopy (FC Z) pairs use pair tables. A pair table keeps track of the status for a pair. You use one pair table for each pair.
Split operation. When I/O does not occur, the storage system timer performs the Split operation. ◦ • If the split operation fails, the status all volumes in the consistency group remains the same as before the At-Time Split operation. If the consistency group contains a pair whose status cannot be changed, the pairsplit command can terminate abnormally (with error code EX-EWSTOT (Timeout)).
1. 2. Place the SS pairs in a consistency group. Split the pair in a consistency group. For more information about splitting pairs in consistency groups, see “Splitting pairs in consistency groups at a pre-determined time” (page 41). The following figure shows the At-Time Split configuration with Cnt Ac-J. The following figure shows the At-Time Split configuration with Cnt Ac-S.
Snapshot secondary volume consistency maintenance If you are sharing the SS P-VOL with one of the following S-VOLs, ensure the following to maintain SS S-VOL consistency: • (BC, Cnt Ac-S, and/or Cnt Ac-J) The pair status must be the same. For more information: • ◦ About sharing BC P-VOLs and S-VOLs with SS P-VOLs, see “Business Copy/Snapshot” (page 29). ◦ About sharing Cnt Ac-S and/or Cnt Ac-J pair volumes with SS P-VOL, see “Continuous Access Synchronous and Continuous Access Journal” (page 31).
3 Business Copy/Snapshot installation and configuration This chapter provides instructions and information for installing and configuring SS. Installing and removing Business Copy/Snapshot 1. 2. In RWC, install BC/SS. Install the SS license key. To remove SS, complete the following: 1. Delete the SS pairs, pools, and V-VOLs. For more information about deleting SS pairs, pools, and V-VOLs, see: 2. • “Deleting pairs” (page 43). • “Deleting pool volumes” (page 49).
1. 2. 3. In the Storage Systems tree, select Pools > Create Pools. In the Create Pools window, for Pool Type, select Snapshot. In the Pool Volume Selection area of the Create Pools window, complete the following items: • For Drive Type/RPM, select your system’s data drive type and RPM. Values: - Mixable - External Storage • For RAID Level, select your system’s RAID level.
system restrictions and the V-VOL requirements, see “Consistency group system requirements” (page 11). For more information about determining how many V-VOLs you must create, how long to hold an SS, and other planning considerations, see “Planning V-VOLs and data pools” (page 13). NOTE: 1. 2. 3. For item descriptions, including character limits, see “Snapshot GUI reference” (page 69). In the Storage Systems tree, select Logical Devices > LDEVs > Create LDEVs.
6. In the Confirm window, do the following and then click Apply: • For Task Name type a name for the task. NOTE: For character and symbol limits and default values, see “Complete SIMs window” (page 93). • For Go to tasks window for status, select to open the Tasks window. More information • For more information about the tasks you can perform using the Create LDEVs wizard and window, see the HP XP P9000 Provisioning for Open Systems User Guide.
4 Sharing Business Copy/Snapshot volumes This chapter discusses the HP software application volumes that you can share with SS P-VOLs. Interoperability with other software applications and functions You can share the following HP software application volumes with SS P-VOLs: • Thin Provisioning For more information about sharing volumes with THP, see “Thin Provisioning” (page 29). • Resource Partition For more information about sharing volumes with Res Par, see “Resource Partition” (page 29).
NOTE: Use the RAID Manager to set the Zero Read Capacity and Invisible attributes. Data Retention and access attributes The SS pair and pool operations that you can perform for volumes depend on the access attributes that you set. Set the access attributes using the RWC Data Ret. You can also set SS pair P-VOLs and S-VOLs access attributes and reserve volumes. NOTE: The SS volume access attributes do not change as a result of an SS operation.
The SS pair status determines whether you can set access attributes for the SS P-VOL and S-VOL. The following table shows the access attributes that you can set for SS P-VOL and S-VOL.
The following tables list the relationship between SS pair operations and BC/SS status.
BC/SS operation Delete pair SS status COPY1 PAIR, PFUL PSUS, PFUS COPY2 RCPY PSUE Yes Yes Yes Yes Yes Yes 1. “COPY” status during initial copy. 2. “COPY” status during resynchronization. The following tables list the relationship between BC/SS operations and SS status.
The following table shows the relationship between SS pair operations and Cnt Ac-S/Cnt Ac-J status. SS operation Cnt Ac-S/Cnt Ac-J status COPY PAIR PSUS PSUE Suspending Deleting Create pair Yes Yes Yes Yes Yes Yes Split pair Yes Yes Yes Yes Yes Yes Restore pair No No Yes Yes No No Delete SS data Yes Yes Yes Yes Yes Yes Delete pair Yes Yes Yes Yes Yes Yes The following table shows the relationship between SS pair operations and Cnt Ac-S/Cnt Ac-J status.
The following table shows the relationship between Cnt Ac-S/Cnt Ac-J pair operations and SS status. Cnt Ac-S / Cnt Ac-J operations SS status COPY1 PAIR, PFUL PSUS, PFUS COPY2 RCPY PSUE Create pair 3 No No No No No No Split pair Yes Yes Yes Yes N/A Yes Resync pair Yes Yes Yes Yes N/A Yes Delete pair Yes Yes Yes Yes N/A Yes Switch operations to the remote site Yes Yes Yes Yes N/A Yes 1. “COPY” is the status during the initial copy. 2.
1. 2. Create the SS pair. Perform the migration plan. To share SS P-VOL, the SS pair status must be “PAIR”. You can delete and cancel the migration plan at any time. For more information about using Auto LUN V2, contact HP Technical Support. Fast Snap You can share FS pair volumes with SS, THP, and THP Z pairs. Note the following regarding pools: 34 • You cannot use FS pools for SS. • You cannot use SS pools for FS. • The more pools that you create for FS, the less pools that are available for SS.
5 Pair operations This chapter provides instructions for performing pair operations. Pair operations You can perform the following operations on pairs: • “Checking the pair status” (page 35). • “Pair creation” (page 35). The V-VOL becomes a virtual duplicate of the PVOL. • “Pair split” (page 40) A point-in-time snapshot of the P-VOL is established in the V-VOL, allowing another software applications to use the V-VOL. • “Pair resynchronization and restoration ” (page 42).
Related topics • “Configuring pairs” (page 36) • “Creating pairs” (page 37) NOTE: After you create the pair, if the number of pairs and other information shown in the Summary tab differs from the number of pairs in the list on the window, configuration changes may be in progress. If configuration changes are in progress, wait until they have completed and then click File > Refresh All to read the configuration information. Prerequisite information • The data pool must exist.
Example 3 You want to create one pair with two S-VOLs and another pair with one S-VOL. For Number of Secondary Volumes, type 2. In this case, the storage system assumes that you are creating two pairs, each having two S-VOLs, as shown in the following figure. Removing and moving volumes 1. 2. 3. 4. 5. In the Storage Systems tree, click Replications > Local Replications > Pairs. In the Pairs tab of the Local Replications window, click Create Pairs.
• For Number of Secondary Volumes, type the number of S-VOLs according to the pair configuration with the largest amount of S-VOLs that you are creating. For more information about setting up the pair configuration, see “Configuring pairs” (page 36). • 3. For Initial MU Number, type an MU number. In the Select Primary Volumes window, for Use Primary Volumes of Snapshot Pairs, select the kind of volumes you want to populate from the Available LDEVs table. Values: 4. • Yes.
5. 6. 7. In the Available LDEVs table, select the LDEV that you want to be the P-VOL and click Add. The LDEV moves to the Selected LDEVs table. Click Next. In the Select Secondary Volumes window, pair the LDEV to the P-VOL LDEV. Repeat this step until all LDEVs are paired with a P-VOL LDEV: 1. Select the S-VOL LDEV ID from the Available LDEVs table. 2. (If you specified multiple P-VOLs) From the Selected Pairs table, select the LDEV ID for the P-VOL to which you want the S-VOL to be paired, and click Set.
10. Click Next. 11. In the Confirm window, for Task Name, type a name and then click Apply. NOTE: For character and symbol limits and default values, see “Complete SIMs window” (page 93). Pair split Splitting a pair creates a virtual point-in-time copy of the P-VOL and stores SS data in the pool. Splitting a pair does the following to the P-VOL: • It continues receiving updates from the host, but updates are not reflected in the V-VOL. • The data blocks are copied to the data pool.
Related topics • “???TITLE???” • “Splitting pairs” (page 41) • “Splitting pairs in consistency groups at a pre-determined time” (page 41) NOTE: If you are performing the pairsplit operation on a pair that shares the same P-VOL, do not run the pairresync -restore command on the pair. Running the command during this operation can result in the pairsplit operation ending abnormally. Prerequisite information • The pair status must have a status of “PAIR”.
Pair resynchronization and restoration Resynchronizing a pair does the following: • Increases capacity in the data pool. • Deletes data in the pool. • Mirrors the V-VOL with the current data in the P-VOL. Reverse resynchronizing a pair restores the P-VOL using data from the V-VOL. Related topics • “Resynchronizing and restoring pairs” (page 42) Prerequisite information • The pair must be in “PSUS” status. • SS does not support high speed mode, even if you specify it.
Related information • “Deleting pairs” (page 43) NOTE: After you delete the pair, if the number of pairs and other information shown in the Summary tab differs from the number of pairs in the list on the window, configuration changes may be in progress. If configuration changes are in progress, wait until they have completed and then click File > Refresh All to read the configuration information. Prerequisite information The pair status must be “PAIR”, “PSUS”, or “PSUE”. Deleting pairs 1. 2. 3.
6 Business Copy/Snapshot monitoring and maintenance This chapter provides information and instructions for monitoring and maintaining SS. Monitoring the storage system Monitoring the storage system helps you to keep track of pairs and volumes in current and past conditions. Monitoring is an ongoing activity.
The following table shows the pair status and descriptions. The P-VOL and V-VOL access columns in the following table indicate whether the volumes accept read/write. Status Description P-VOL access SMPL(PD) The pair is in the process of being deleted. You cannot perform pair Yes operations while the pair is in this status. After the pair is deleted, the status changes to “SMPL”. R/W disabled COPY The storage system has accepted the paircreate initial copy.
Monitoring consistency groups You can check the number and individual properties for consistency groups. 1. In the Storage Systems tree, click Replications > Local Replications. 2. In the Local Replications window, view the number of consistency groups in the Summary table. 3. To view a list of consistency groups with status and number of pairs, click the Consistency Groups tab. 4. On the Consistency Groups tab, click the CTG ID link to view a consistency group’s properties.
You can do the following to monitor pool information: • “Business Copy/Snapshot installation and configuration” (page 23) • “Business Copy/Snapshot monitoring and maintenance” (page 44) • “Changing pool volume names” (page 48) • “Managing data pools” (page 47) Maintaining the storage system You can maintain the storage system while monitoring it. Some of the maintenance tasks you will do are in response to a particular behavior in the storage system.
Increasing data pool volume capacity If the pool threshold is reached more than once or twice, increase the data pool-VOL capacity. The best practice is to prevent the pool from reaching full capacity by monitoring the pool usage rate. You increase the data pool-VOL capacity by adding pool-VOLs to the data pool. You can check the capacity in the Pools window. For more information about monitoring pool information, see “Monitoring pool information” (page 46)). 1. In the Storage Systems tree, click Pools. 2.
2. 3. 4. From the names that appear on the Pools tab, select the pool with the name that you want to change and click More Actions > Edit Pools. In the Edit Pools window, select Pool Name. For Pool Name, type a name for the pool and click Finish. NOTE: 5. For item descriptions, including character limits, see “Create Pools window” (page 79). In the Confirm window, complete the following and then click Apply: • For Task Name, enter the task name.
Within the resulting list on the Logical Devices window, you can do the following: • To select all pool-VOLs in the list, click Select All Pages. • To filter the rows, for Filter, click ON. • To specify the number of rows to show, click Options and make the selection. Changing virtual volume names 1. 2. 3. In the Storage Systems tree, click Logical Devices. From the names that appear, select one or more V-VOL rows with names that you want to change and then click More Actions > Edit LDEVs.
For more information, see: • “Switching off the power supply” (page 51) • “Replacing the microcode offline” (page 51) Switching off the power supply NOTE: Stop the host I/O to the P-VOL before switching off the power supply for the storage system. When you restore the power, SS’s behavior depends on the following: If data in shared memory existed after switching off the power supply If information in the shared memory exists after you have switched off the power supply, you can use the pools and pairs.
7 Business Copy/Snapshot troubleshooting This chapter provides BC/SS troubleshooting information. General troubleshooting The following table shows general SS troubleshooting information. Problem Causes and solutions You cannot install SS. Causes: • Shared memory for the V-VOL management area is not installed. • Shared memory is not set for the V-VOL management area. • Shared memory for the differential tables is not installed.
Problem Causes and solutions Solutions: • Add pool-VOLs to another pool. • Initialize the V-VOL management area. • Check pool-VOLs requirements. For more information, see “Data pool requirements and restrictions” (page 13). You cannot create the SS pairs. Causes: • There are not enough differential tables to create the pairs. • The conditions to create the pair are not fulfilled. • The volumes that are specified to create the pair are in “SMPL (PD)” status and are in the process of being deleted.
Problem Causes and solutions To check whether the host server has access to pair volumes, view the P-VOL/S-VOL access columns. For more information, see “Pair status definitions” (page 44). When the host server tries to access Cause: A port may go offline because access to a volume on another port is rejected. the port, an error occurs and the Solutions: host cannot access the port. • Retry the operation.
Problem Causes and solutions Solution: 1. Find the consistency group number. Use the Snapshot or Pair Operation window in RWC. 2. Create a pair specifying the consistency group number. When you select the data pool, the Cause: The host is copying the pair and writing data. pool capacity and other information Solution: Wait until the pair is copied and the information shown in the Summary table shown in the Summary table is and the Primary Volumes tab is the same.
1. Recover the pool-VOLs. To recover a blocked pool-VOL, contact HP Technical Support. 2. Recover the pool. To recover the pool, do one of the following: 3. • Add additional pool-VOLs to the pool. • Increase unused capacity by deleting the SS data from the pool. • Lower the pool’s usage by deleting the pairs. Recover the pairs by deleting the pairs. You must delete the pairs because the status of all pairs with SS data in a blocked pool changes to “PSUE”.
Troubleshooting with RAID Manager To identify the cause of errors while using RAID Manager, you can use the following logs: • The log is shown in the RAID Manager window. For more information, see “Identifying errors using the log on the RAID Manager window” (page 62). • The RAID Manager operation log file. For more information, see “Identifying errors using the RAID Manager operation log file” (page 63) The following table lists the error codes for SSB1: B901, B9A8, B9A9, B9AD, B9AE, and 2E31.
SSB2 RAID Manager command Cause of error • You specified an MU number (SS ID) that is already in use. • You specified a pool that is unusable. • You have exceeded the license capacity. • The control tables for SS are running out. 58 9721 paircreate, pairsplit, pairresync, pairresync -restore The command ends abnormally because SS or BC/SS is not installed. 9723 All commands The command ends abnormally because additional shared memory (FC Z, TPF, Extension1) does not exist.
SSB2 RAID Manager command Cause of error 973b All commands The command ends abnormally because the LDEV number of the volume you specified as the S-VOL exceeds the range. 973c All commands The command ends abnormally because you specified an unmounted volume as the SS S-VOL. 973d paircreate, pairsplit, pairresync, pairresync -restore The command ends abnormally because you specified a blocked volume as the SS S-VOL.
SSB2 RAID Manager command Cause of error For more information about using Auto LUN V2, contact HP Technical Support. 9758 All commands The command ends abnormally because you specified an Auto LUN V2 target volume as the SS P-VOL. For more information about using Auto LUN V2, contact HP Technical Support. 9759 All commands The command ends abnormally because you specified an Auto LUN V2 reserved volume as the SS P-VOL. For more information about using Auto LUN V2, contact HP Technical Support.
SSB2 RAID Manager command Cause of error 9778 paircreate You cannot create the pair because the SS P-VOL and BC/SS S-VOL share the volume, and the BC/SS S-VOL you specified for the SS P-VOL has consistency group settings. 977a paircreate, pairsplit The command ends abnormally because the SS P-VOL and BC/SS P-VOL share the volume, and the BC/SS pair was in the process of resynchronization.
SSB2 RAID Manager command Cause of error 97A2 paircreate, pairsplit, pairresync, pairresync-restore The command ends abnormally because the volume specified as the P-VOL uses two mirrors in a 3 Cnt Ac-J data center configuration. 97A3 paircreate, pairsplit, pairresync, pairresync-restore The command ends abnormally because the volume specified as the S-VOL uses two mirrors in a 3 Cnt Ac-J data center configuration.
Identifying errors using the RAID Manager operation log file 1. 2. Open the RAID Manager log file. The default location is /HORCM/log*/curlog/ horcmlog_HOST/horcm.log, where: • The asterisk (*) is the instance number. • HOST is the host name. Find the error code. An example error code string is: 11:06:03-37897-10413- SSB = 0xB901,4A96 3. Locate the SSB1 and SSB2 codes. In the following figure: • Error codes appear to the right of SSB=.
8 Support and other resources Contacting HP For worldwide technical support information, see the HP support website: http://www.hp.
Conventions for storage capacity values HP XP P9000 disk arrays use the following values to calculate physical storage capacity values (hard disk drives): • 1 KB (kilobyte) = 1,000 bytes • 1 MB (megabyte) = 1,0002 bytes • 1 GB (gigabyte) = 1,0003 bytes • 1 TB (terabyte) = 1,0004 bytes • 1 PB (petabyte) = 1,0005 bytes • 1 EB (exabyte) = 1,0006 bytes HP XP P9000 disk arrays use the following values to calculate logical storage capacity values (logical devices): • 1 KB (kilobyte) = 1,024 bytes •
CAUTION: IMPORTANT: NOTE: TIP: 66 Indicates that failure to follow directions could result in damage to equipment or data. Provides clarifying information or specific instructions. Provides additional information. Provides helpful hints and shortcuts.
A RAID Manager command reference This appendix describes RAID Manager commands corresponding to actions in RWC. RAID Manager commands for Remote Web Console operations The following table lists a mapping of the operations for logical device and pool that you can perform in RWC to the RAID Manager commands.
RAID Manager pair operation Required status pairresync PSUS/PFUS, PSUE pairresync -restore PSUS/PFUS pairsplit -S PAIR/PFUL, PSUS/PFUS, PSUE If you run a command for a pair with a status other than the one required, you can get mixed results. The following table lists the results for RAID Manager commands that you run that have statuses other than those that are required.
B Snapshot GUI reference This appendix describes SS windows and dialog boxes. Pools window Use the Pools window to view information about pools in your system.
Item Description For each value, if Pool Capacity Estimated Configurable is zero, is shown. • Estimated Configurable For SS: The remaining physical pool capacity that is in SS. V-VOL Capacity* Shows information about THP V-VOL capacity. For SS, a hyphen (-) is shown. Licensed Capacity (Used/Licensed) For SS, the total licensed system capacity for BC/SS and SS, including the capacities of LDEVs and other resources assigned to other users.
Item Description Values: • Total: The pool’s total capacity Unit of capacity: Click Option to select the unit of capacity. One block equals 512 bytes and one page equals 256 kilobytes in SS pool capacity. • Used: The amount of pool capacity that is used. • Used (%): The percentage of pool capacity that is used. If you clicked Option to change the unit of capacity to Cylinder, a hyphen (-) is shown. User-Defined Threshold(%) Information about the pool threshold.
Item Description Values: • If monitoring data exists, the monitoring period of time is shown. Example: 2010/11/15 00:00 - 2010/11/15 23:59 • If monitoring data is being obtained, only the starting time is shown. Example: 2010/11/15 00:00 • If the latest monitoring data does not exist, a hyphen (-) is shown. Pool Management Task The pool management task being performed on the pool. For SS and FS pools, a hyphen (-) is shown. Recent Relocation Progress The rate for recent tier relocation processing.
Summary table Item Description Status Shows the following information about the pool status: Values: • Normal: The pool is in a normal status and is accessible. • Warning: The pool-VOL is blocked. • Exceeded Threshold: The pool’s used capacity exceeds the pool threshold. • Shrinking: Reducing the pool-VOL. • Blocked: The pool is full, or an error occurred in the pool, therefore the pool is blocked and cannot be used. If the pool is in both Warning and Blocked status, only Blocked is shown.
Item Description Number of Pool VOLs The number of pool-VOLs set for the pool, and the maximum number of pool-VOLs that you can set. Number of V-VOLs The number of V-VOLs associated with the pool. For SS, a hyphen (-) is shown. Number of Primary VOLs The number of SS P-VOLs. For pools other than for SS, a hyphen (-) is shown. Pool Capacity (Used/Total) The used and total pool capacity. If the pool consists of multiple pool-VOLs, the sum of their capacities is shown for Total.
Pool Volumes tab Use the Pool Volumes tab to view specific pool-VOL information. Item Description LDEV ID The pool-VOL’s LDEV identifier. LDEV Name The pool-VOL’s LDEV name. Status Shows the following information about the pool status. Values: • • • Normal: The pool-VOL is in normal status and is accessible. Shrinking: Reducing the pool-VOL. Blocked: The pool-VOL is blocked and cannot be accessed. Parity Group ID The parity group ID.
Virtual Volumes tab This tab is shown for all pools except FS and SS pools. Item Description LDEV ID The LDEV’s identifier. LDEV Name The LDEV’s name. Status The LDEV’s status. Values: • Normal: The P-VOL’s LDEV is in normal status and is accessible. • Blocked: The P-VOL’s LDEV is blocked. The host cannot access the volume. • Warning: The host has detected a problem in the P-VOL LDEV. • Formatting: The host is formatting the P-VOL’s LDEV.
Item Description Values: Enabled or Disabled A hyphen (-) is shown if the V-VOL is not a Smart or Smart Z V-VOL. Relocation Priority The tier relocation priority. Values: • Prioritized: You have set the V-VOL priority. • Blank: You have not set the V-VOL priority. A hyphen (-) is shown if the tier relocation functionality is disabled or if the V-VOL is not a Smart or Smart Z V-VOL. Pool Management Task The pool management task being performed on the pool. For SS and FS pools, a hyphen (-) is shown.
Item Description For more information about this window, see the HP XP P9000 Provisioning for Open Systems User Guide. More Actions > Restore LDEVs Click to open the Restore LDEVs window. For more information about this window, see the HP XP P9000 Provisioning for Open Systems User Guide. More Actions > Edit LDEVs Click to open the Edit LDEVs window. More Actions > Reclaim Zero Pages Click to open the Reclaim Zero Pages window.
Item Description • • • • Formatting: The host is formatting the P-VOL’s LDEV. Preparing Quick Format: The host is preparing to quick format the P-VOL’s LDEV. Quick Formatting: The host is quick formatting the P-VOL’s LDEV. Correction Access: The host is correcting the access attribute for the P-VOL’s LDEV. • Copying: The host is copying data in the P-VOL’s LDEV. • Read Only: The P-VOL’s LDEV data is read-only. The host cannot write data. • Shredding: The host is shredding the P-VOL’s LDEV data.
Setting items In the following table, items that are marked with an asterisk (*) require configuration. Item Description Pool Type* The pool’s type. Value: Snapshot System Type The system type. Value: Open You can only select Open if the pool type is Snapshot. Smart Pool THP/Smart only. Drive Type/RPM* The pool-VOL’s hard disk drive type and RPM. Values: • Mixable: This value is shown if the volume is a Smart volume. • External Storage: This value is shown if the volume is an external volume.
Item Description Select Pool VOLs button* Click to open the Select Pool Volumes window. You must select a pool-VOL. Total Selected Pool Volumes The total number of the selected pool-VOLs. Total Selected Capacity The total capacity of the selected pool-VOLs. Pool Name* Set the pool name: • Prefix: Type the alphanumeric characters, which are fixed characters before the pool name. Case-sensitive: Yes • Initial Number: Type the initial number following the prefix name.
Selected pools table Item Description Pool Name (ID) The pool’s nickname and identifier. RAID Level The pool’s RAID level. If multiple RAID levels exist in a pool, Mixed is shown. Capacity The pool’s maximum capacity. Pool Type The pool’s type. Value: Snapshot Drive Type/RPM The data drive type and RPM. If multiple types of drives exist in a pool, Mixed is shown. (External LDEVs) External Storage and the value of the external LDEV tier rank is shown.
Item Description For SS, a hyphen (-) is shown. Number of Pool VOLs The number of pool-VOLs. Smart Pool THP/Smart only. Buffer Space for New page assignment (%) THP/Smart only. Buffer Space for Tier relocation (%) THP/Smart only. Detail When you select a line, the Pool Properties window opens. You must select a line. If you do not select a line or if you select multiple lines, an error window opens. Remove Deletes the pool selected in the Selected Pools window. You must select a line.
Item Description User-Defined Threshold (%) Information about the pool threshold. Values: • Warning: Warning threshold is shown. • Depletion: Depletion threshold is shown. For SS pools, a hyphen (-) is shown. Subscription Limit (%) The pool’s subscription limit. For SS, a hyphen (-) is shown. Number of Pool VOLs The number of pool-VOLs. Smart Pool THP/Smart only. Buffer Space for New page assignment (%) THP/Smart only. Buffer Space for Tier relocation (%) THP/Smart only.
Pool Volume Selection area Use the Pool Volume Selection area of the Expand Pool window to define the drive type and RAID level for LDEVs you are adding to increase the pool capacity. Item Description Drive Type/RPM The drive type and RPM of the selected pool. Values: • Mixable • External Storage: Shows if the volume is an external volume. RAID Level For SS whose RAID level is fixed, this item is unavailable. Select Pool VOLs button Click to open the Select Pool Volumes window.
Selected Pool table Use the Selected Pool table to view the list of pools that are selected. Item Description Pool Name (ID) The pool’s nickname and identifier. Selected Pool Volumes table Use the Selected Pool Volumes table to view the list of pool-VOLs that are selected. Item Description LDEV ID The pool-VOL’s LDEV identifier. LDEV Name The pool-VOL’s LDEV name. Capacity The pool-VOLs's capacity. Parity Group ID The pool-VOL’s parity group ID.
Use the Edit Pools wizard to change a pool name and threshold. For more information about editing pools, see: • “Changing pool volume names” (page 48) • “Changing pool volume threshold” (page 48) Edit Pools window The Edit Pools window is the first window in the Edit Pools wizard. This window shows the Setting items area. Setting items area Use this area of the Edit Pools window to edit the pool’s properties. Item Description Smart Pool For SS, this item is unavailable.
Item Description Default: When you select one pool, for Prefix, the pool name is shown. When multiple pools are selected, the numbers ranging from the specified Initial Number to the maximum number of the same digits are automatically set to the pool name. Examples: • If you set the Initial Number at 1, a number from 1 to 9 is automatically added to each pool name. • If you set the Initial Number at 08, a number from 08 to 99 is added to each pool name.
Selected Pools table Use the Selected Pools table to view the list of pools that are selected. The following tables provides descriptions of the items in the Selected Pools table. Item Description Pool Name (ID) The pool’s nickname and identifier. RAID Level The RAID level. If multiple RAID levels exist in a pool, Mixed is shown. Capacity The pool capacity. Pool Type The type of pool. Value: Snapshot Drive Type/RPM The data drive type and RPM.
Item Description Buffer Space for New page assignment (%) For SS, this item is unavailable. Buffer Space for Tier relocation (%) For SS, this item is unavailable. Total The total number of pools. Delete Pools wizard The Delete Pools wizard consists of the Delete Pools window and the Confirm window. Use the Delete Pools wizard to delete a pool-VOL and make the pool-VOL available for other use. For more information about deleting pools, see “Deleting pool volumes” (page 49).
Item Description If multiple RAID levels exist in a pool, Mixed is shown. Capacity The pool capacity. For LUSE, shows the LUSE capacity. Pool Type The type of pool. Value: Snapshot Drive Type/RPM The pool’s hard disk drive type and RPM. If multiple types of drives exist in a pool, Mixed is shown. (External LDEVs) External Storage and the value of the external LDEV tier rank is shown. User-Defined Threshold (%) Information about the pool threshold. Values: • Warning: Warning threshold is shown.
Selected Pools table Use this table on the Confirm window of the Delete Pools wizard to view the list of pools that are selected. Item Description Pool Name (ID) The pool’s nickname and identifier. RAID Level The pool’s RAID level. If multiple RAID levels exist in a pool, Mixed is shown. Capacity The pool capacity. In LUSE, shows the LUSE capacity. Pool Type The type of pool. Value: Snapshot Drive Type/RPM The hard disk drive type and RPM.
This window shows the Selected Pools table. Selected Pools table Use the Selected Pools table to view the list of pools that are selected. Item Description Pool Name (ID) The pool’s nickname and identifier. RAID Level The pool’s RAID level. If multiple RAID levels exist in a pool, Mixed is shown. Capacity The pool capacity. If the pool is blocked and the pool-VOLs that belong to the pool cannot be identified, 0 is shown. Pool Type The type of pool.
Setting items area Use the Setting items area of the Complete SIMs window to type the task name and add the task to the Tasks queue so that the operation is performed. Item Description Task Name The task name. Character and symbol limit: 32 Allowable characters and symbols: All alphanumeric except / : , ; * ? ” < > | Case-sensitive: Yes Default: date-window name Select Pool window Available Pools table 94 Item Description Pool Name (ID) The pool’s nickname and identifier.
Item Description Values: • Total: The total pool capacity. • Used: The amount of pool capacity that is used. • Used (%): The percentage of pool capacity that is used. Drive Type/RPM The hard disk drive type and RPM. (External LDEVs) External Storage and the value of the external LDEV tier rank is shown. User-Defined Threshold (%) Information about the pool threshold. CLPR The ID and name of the CLPR in the CLPR-name format.
Available Pool Volumes table The following table shows descriptions of the items in the Available Pool Volumes table. Item Description LDEV ID The LDEV’s identifier. LDEV Name The LDEV’s name. Capacity The pool-VOL capacity. Parity Group ID The parity group ID. RAID Level The RAID level. Drive Type/RPM The hard disk drive type and RPM. (External LDEVs) External Storage is shown. Emulation Type The LDEV’s emulation type. Provisioning Type The LDEV type.
The External LDEV Tier Rank specifies the external LDEV tier rank. If an external LDEV does not exists in the Available Pool Volumes table or Selected Pool Volumes table, you cannot select the tier rank. Selected Pool Volumes table You can add a maximum of 1,024 volumes, including volumes that already exist in the pool. For more information about the maximum number of volumes, see “Consistency group system requirements” (page 11). Item Description LDEV ID The LDEVs identifier.
Item Description Cache Mode Shows the cache mode. Values: Enabled or Disabled For non-external volumes, a hyphen (-) is shown. Resource Group Name (ID) The resource group names and identifiers of the LDEV. The ID is provided in parentheses. Pool Property window Pool Properties table Item Description Pool Name (ID) The pool’s name and identifier. Pool Type The pool’s type. Value: Snapshot Capacity The pool capacity by the specified unit.
Item Description For pool-VOLs other than for SS, a hyphen (-) is shown. Pool VOL with System Area (Name) The pool-VOL’s LDEV ID and LDEV name that contains the pool’s management area. For SS, a hyphen (-) is shown. Pool Volumes table Item Description LDEV ID The pool-VOL’s LDEV identifier. LDEV Name The pool-VOL’s LDEV name. Capacity The pool-VOL capacity by the specified unit. Parity Group ID The pool-VOL’s parity group ID. RAID Level The pool-VOL’s RAID level.
Item Description Values: • Business Copy/Snapshot • Business Copy for Mainframe • Fast Snap • Snapshot Emulation Type The emulation type. Value: OPEN-V For FS or SS, you can only specify OPEN-V. Pair Topology Type This item is shown only when you specify BC/SS as the copy type. Specify the BC/SS pair configuration. If you specify the existing pair to open this window, the pair topology type is shown as the pair configuration.
Item Description For BC/SS and Business Copy for Mainframe, this item is blank. Port ID Port name of the LDEV’s LUN path. For Business Copy for Mainframe, this item is blank. Host Group Name Host group name of the LDEV’s LUN path. Default: Any For Business Copy for Mainframe, this item is blank. Select Pool button Click to open the Select Pool window. Use this window to name and identify the pool. If you select Yes as the Use Primary Volumes of BC/SS Pairs, this button in unavailable.
Item Description • Host Group Name: Host group name of the LDEV’s LUN path • LUN ID: LUN ID of the LDEV's LUN path • Emulation type: The volume’s emulation type • Capacity: The volume’s capacity • CLPR: The volume’s CLPR number For BC/SS or BC Z, this item is blank. Mirror unit The mirror unit number. If you are not using the LDEV as a S-VOL for an existing pair, a hyphen (-) is shown. For BC/SS or BC Z, this item is blank. Pool Name (ID) The pool’s name and identifier.
Item Description • Capacity: P-VOL’s capacity • CLPR: P-VOL’s CLPR number. For BC/SS or BC Z, this item is blank. Mirror unit Mirror unit number. If you are not using the LDEV as a S-VOL for an existing pair, a hyphen (-) is shown. For BC/SS or BC Z, this item is blank. Pool Name (ID) The pool’s name and identifier. For BC/SS or BC Z, this item is blank. Select Pool window Available Pools table Item Description Pool Name (ID) The pool’s name and identifier. RAID Level The pool’s RAID level.
Select Secondary Volumes window Item Description Capacity Allows you to filter the available LDEVs according to the capacity you select. The remaining number you have to select Refers to the selected P-VOLs in the Selected Pairs table with no assigned S-VOL. Exclude Paired Volumes When checked, volumes already in a pair are not shown. This item is shown only when BC/SS is specified. Port ID Filters LDEVs in the Available LDEVs table by the Port ID. For BC Z, this item is blank.
Item Description Capacity LDEV’s capacity Provisioning type Provisioning type of the LDEV. Values: • Basic: Internal volume • THP: THP V-VOL • External: External volume • BC/SS: FS or SS volume CLPR LDEV’s CLPR number Detail Click to open the LDEV Properties dialog box, which contains additional information for the selected LDEV. Selected Pairs table Item Description Primary Volume Defines the P-VOL information. Values: • LDEV ID: P-VOL’s LDEV identifier • LDEV Name: P-VOL’s LDEV name.
Item Description Values: • BC-L1: BC/SS L1 pair • BC-L2: BC/SS L2 pair • FS: FS pair • SS: SS pair • BC Z: BC Z pair Mirror unit The pool’s mirror unit number. In FS, this item is blank. Pool name (ID) The pool’s name and identifier. In BC/SS or BC Z, this item is blank. Edit Mirror Units button Click to open the Edit Mirror Units window where you change mirror unit numbers. In FS, this item is blank. Remove button Click to remove the pair from the table.
Selected Pairs table Item Description Primary volume Defines the P-VOL information. Values: • LDEV ID: P-VOL’s LDEV identifier • LDEV Name: P-VOL’s LDEV name • Port ID: Port name of the P-VOL LDEV’s LUN path For BC Z, this item is blank. • Host Group Name: Host group name of the P-VOL LDEV’s LUN path For BC Z, this item is blank. • LUN ID: LUN ID of the P-VOL LDEV's LUN path For BC Z, this item is blank.
C Pair operations (secondary window) This appendix provides instructions on using the previous version of the RWC GUI, which opens in a secondary window, and RAID Manager. You can do all pair operations in the new RWC GUI. For more information about the pair operations, see “Pair operations” (page 35). Pair operations workflow Use the following workflow to perform pair operations: • Check the pair status. The pairs must have a specific status before you can do a pair operation.
• The RAID Manager hide mode (-m noread) is not supported for S-VOLs (V-VOLs). If you specify it, the paircreate completes normally, but the hide mode is ignored. • When using an HP-UX host server, you must create the SS pair before you run the command for recognizing the device or V-VOL on the host server. CAUTION: If a volume is recognized by the HP-UX host server, do not use the volume as a V-VOL. Otherwise an error occurs and the host server can terminate.
• Do not run the pairresync -restore command on a pair while a pairsplit operation is being performed on a related pair (a pair that shares the same P-VOL). Running this command can abnormally end the pairsplit operation. • SS does not support Quick Split mode. For more information about the requirements for consistency group operations, see “Consistency group system requirements” (page 11). To split a pair, from a command prompt, run the RAID Manager pairsplit command.
2. 3. 4. Change to Modify mode by clicking the icon. In the Pair Operations window tree, select the port or host group that contains the pairs you want to delete. In the Volume list, select the SS pairs you want to delete, right-click, and select Pairsplit-S from the menu. Figure 2 Pairsplit-S Dialog box 5. In the Pairsplit-S dialog box, confirm that the pairs you want to delete are shown and selected, then click OK. The selected pairs are shown in the Preview list. 6. 7.
D Business Copy/Snapshot monitoring and maintenance (secondary window) This appendix provides instructions for monitoring SS using the previous version of the RWC GUI, which opens in a secondary window. You can do maintenance and similar monitoring operations in the new RWC GUI. For more information about maintenance on the new RWC GUI, see “Business Copy/Snapshot monitoring and maintenance” (page 44).
Pair status definitions For more information about pair status descriptions, see “Pair status definitions” (page 44). Click File/Refresh to ensure the pair status data is current. The status names are slightly different in the new RWC GUI than in the previous GUI version showing in the secondary window. The following table shows the new and previous status names.
3. In the Detail dialog box, check pair and volume details. The following table shows descriptions of the items in the Detail dialog box. Items Descriptions P-VOL P-VOL LDKC number, control unit (CU) number, and LDEV number. Emulation P-VOL emulation type. Capacity (MB) P-VOL capacity in megabytes. Capacity (blocks) P-VOL capacity in blocks. CLPR (P) P-VOL cache logical partition. Pool ID The pool’s pool ID in which the P-VOL is registered.
Items Descriptions Refresh Updates the information in the Detail dialog box. Close Closes the Detail dialog box. Monitoring S-VOL path information You can view path information for the S-VOL. 1. In RWC, click Actions > Local Replications > BC/SS > Pair Operation. 2. In the Pair Operation window, select a pair in the Volume list, right-click and select S-VOL Path. Figure 3 S-VOL Path dialog box 3. In the S-VOL Path dialog box, check S-VOL information as desired.
Monitoring number of pairs and license information You can review information related to pairs and license capacity using the Information dialog box. 1. In RWC, click Actions > Local Replications > BC/SS > Pair Operation. 2. In the Pair Operation window, right-click and select Information. Figure 4 Information dialog box 3. In the Information dialog box, review pair and license information as desired. The following table shows descriptions of the items in the Information dialog box.
Items Descriptions Snapshot Used volume (TB) SS license information in the X(Y) format, where X is license capacity SS is using and Y is total license capacity reserved for SS. If there is no limit on license capacity, Unlimited is shown. Close Closes the Information dialog box. Monitoring pair operation history You can review the operations that have been performed on a pair using the History window. The History window shows information about copying pairs.
E Snapshot GUI reference (secondary window) This appendix describes SS windows and dialog boxes in the previous version of the RWC GUI, which opens in a secondary window. Note: The P-VOL and S-VOLs listed in RWC may end in special symbols. An LDEV number that ends with a pound or gate symbol (#) indicates an external volume (for example, 00:00:01#). An LDEV number that ends with the letter “X” indicates that THP is using a V-VOL. For example, 00:00:01X.
Item Description : Storage system : Port : Host group : LUN or SMPL volume : SS pair For more information about the BC/SS icons, see the HP XP P9000 Business Copy User Guide. Preview Shows the operations you have specified but have not yet applied to the storage system. You can change or delete the operations by right-clicking the item in the Preview list. Apply Applies the operations shown in the Preview list to the storage system.
Item Description • CCC: LU number • XX:YY:ZZ: LDKC number:CU number: LDEV number Only one path is listed, which is the path connected to the first port in the tree view. A device ID ending in # (e.g., 00:00:3C #), indicates that the LDEV is an external volume. For more information about external volume, see the HP XP P9000 External Storage for Open and Mainframe Systems User Guide. A device ID ending in X (e.g., 00:00:3C X) indicates that the LDEV is a THP V-VOL.
The Preview list opens below the Volume list. The following table shows descriptions of the items in the Preview list. Item Description P-VOL P-VOL information in AAA-BB-CCC(XX:YY:ZZ) format. Values: • AAA: Port ID (cluster and channel number) • BB: Group number of host group • CCC: LU number • XX:YY:ZZ: LDKC number:CU number:LDEV number MU The MU number of the BC/SS pair formed with the P-VOL. S-VOL S-VOL information in AAA-BB-CCC(XX:YY:ZZ) format.
Command Function Information Opens the Information dialog box, which shows the number of pairs or reserved volumes. Grayed-out commands Reserved for BC/SS. Paircreate, Pairsplit Opens the Paircreate and Pairsplit dialog boxes. These dialog boxes are reserved for BC/SS. You cannot create or split SS pairs from these dialog boxes. Use RAID Manager to create or split SS pairs. History window You can view your operation history and its associated data in the History window.
Item Description • mm: minute • ss: second P-VOL The operation’s P-VOL, identified by LDKC:CU:LDEV. A device identifier ending in the pound sign (#) (e.g., 00:00:3C #), indicates that the LDEV is an external volume. For more information about external volumes, see the HP XP P9000 External Storage for Open and Mainframe Systems User Guide. Note: A device identifier ending in ‘X’ (e.g., 00:00:3C X) indicates that the LDEV is a THP V-VOL.
Item Description Tree The pools in the storage system are shown with the following icons: • Pool/volume list : Storage system • Pool:X: Pool in normal status (X indicates pool ID) • Pool:X: Pool whose usage rate exceeds the threshold (X indicates pool ID) • Pool:X: Blocked pool (X indicates pool ID) The content of the main list is either data pools or pair volumes. This depends on whether you have selected Storage System or Pool from the tree.
Item Description • Sync.: Consistency rate of the data of the P-VOL and the S-VOL. • CTG: Consistency group number of the SS pair. When the consistency group is not specified, three hyphens (---) are shown. Pool Association Inf.: X is the capacity in use of pool association information. X GB / Y GB Y is the maximum possible capacity of pool association information.
Glossary BC P9000 or XP Business Copy. An HP application that provides volume-level, point-in-time copies in the disk array. CLPR Cache logical partition. Cnt Ac-J P9000 or XP Continuous Access Journal software. Cnt Ac-S P9000 or XP Continuous Access Synchronous software. command device A volume in the disk array that accepts Continuous Access, Business Copy, or P9000 for Business Continuity Manager control operations, which are then executed by the array. CU Control Unit.
RAID1-level data storage A RAID that consists of at least two drives that use mirroring (100 percent duplication of the storage of data). There is no striping. Read performance is improved since either disk can be read at the same time. Write performance is the same as for single disk storage. RAID1/5 Specific RAID architectures. RAID5-level data storage A RAID that provides data striping at the byte level and also stripe error correction information.
Index A M additional shared memory, 14 At-Time Split operation, 41 Auto LUN, 33 managing pools and V-VOLs, 47 maximum pairs, calculating, 14 monitoring pool information, 46 B O blocked pool, 52 blocked pool, recovering, 55 blocked volume, 53 overview, 7 C CCI, 10 consistency group, monitoring, 46 contacting HP, 64 conventions document, 65 storage capacity values, 65 text symbols, 65 creating multiple pairs in consistency group, 109 pairs, 35, 108 pools, 23 V-VOLs, 24 D deleting pairs, 42, 110 pool
overview, 7 powering off the system, 50 requirements, 11 splitting pairs, 40, 109 status for RAID Manager operations, 67 storage capacity values conventions, 65 subscription service, HP, 64 symbols in text, 65 synchronous rate, viewing, 45 T technical support HP, 64 service locator website, 64 text symbols, 65 Thin Provisioning, 29 typographic conventions, 65 V V-VOL and S-VOL, 7 V-VOLs creating, 24 deleting, 50 managing, 49 sizing, 13 W web sites HP subscription service, 64 websites HP , 64 product manu