
HP StorageWorks 1000i Virtual Library System installation instructions (May 2006)
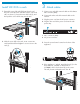

1. Install the two slide rails to the sides of the rack.
a. Adjust the side rail assemblies to the approximate rack
depth.
b. At one side of the rack, align the rail holes with
the holes in the rack and secure with the mounting
hardware provided.
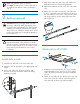
1. Attach the two bezel brackets to the server using the
supplied bracket screws, as shown (1). These will be
used to mount the bezel at the end of the installation
process.
2. Attach an inner slide rail (lock facing out) to each side
of the server. Insert the slide rail screws through the
inner slide rails as shown (2), and then tighten.
c. Align holes at the other end of the rack with the rail
assembly and secure with mounting hardware.
d. Repeat these tasks for the rail on the other side of the
rack.
2. Remove the inner slide rails from the outer slide rails.
To do so, extend the inner slide rails from the front of
the rack until they lock in place. Then press the inner
rail release latch, as shown, and pull the inner slide
rails straight out.
Install rails in rack
2
Racking (optional)
Attach rails to VLS1000i
2
2
1
1
CAUTION! Make sure that the rack and all
equipment mounted in the rack have a reliable
ground connection. Verify that the total current of
the rack components does not exceed the current
rating of the power distribution unit or outlet
receptacles.
WARNING! Before you begin, make sure that
the rack is sufficiently stable. If provided, lower
the rack leveler feet and make sure any required
stabilizers are installed. Extend the rack anti-tip
device. Failure to extend the anti-tip device could
result in personal injury or equipment damage if
the rack tips over.
NOTE: You have the option to rack the
VLS1000i. To rack the VLS, continue with step 2.
To install the VLS without a rack, go directly to
step 3.