
HP StorageWorks Virtual Array va 7000 family - Installation Guide
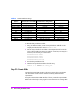

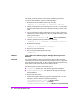
Table Of Contents
- Virtual Array Installation Guide
- Other Information You Will Need
- Operating Environment
- Virtual Array Configurations
- Virtual Array Enclosures
- Hardware Installation
- Configuring the Array Operating Settings
- Step 7. Change the controller default host port behavior
- Step 8. Change the controller port data rate to 2 Gbit/sec
- Step 9. Change the controller port topology
- Step 10. Change the controller loop ID
- Step 11. Change the RAID operating level of the array
- Step 12. Format the array controller enclosure
- Step 13. Power-off the array controller enclosure
- Step 14. Disconnect the RS-232 terminal
- Step 15. Connect fiber optic cables
- Step 16. Power-on all array enclosures
- Installing CommandView SDM Software
- Installing Command View SDM on HP-UX
- Installing Command View SDM on Windows
- Installing Command View SDM on Linux Red Hat
- Final Array Configuration
- Solving Installation Problems

Virtual Array Installation Guide 47
Valid LUN number ranges are listed in the following table.
A Word About LUN 0
It is recommended that you always create LUN 0. When LUN 0 is created, it is
automatically assigned a LUN security permission of configure-write for all
hosts. This ensures that regardless of which host you install the CommandView
SDM software on, it will be able to manage the array. Because LUN 0 will be
accessible to all hosts, you may want to make the size of the LUN small and
not use it to store any data.
Step 21. Build the Secure Manager LUN Security Table
LUN security is required in a heterogeneous environment and may also be
needed in a homogeneous multi-host environment. For information on
managing LUN security, refer to the
HP StorageWorks Secure Manager VA
User Guide
included in the Secure Manager Software Media Kit (T1003A).
Step 22. Connect All Hosts to the Array
If you followed the recommendation of not connecting all hosts to the array
until the LUN structure and LUN security were in place, this is the time to
connect all host to the array.
Installation of the virtual array is now complete!
What’s Next?
■ For information on operating, troubleshooting, servicing, and upgrading
the array, refer to the
HP StorageWorks Virtual Array User & Service Guide
included with your array.
■ For information on managing the array, refer to the
HP StorageWorks
CommandView SDM Installation and User Guide.
Product (Firmware Rev) LUN Number Range
VA 7100 (HP01 and HP02) 0-63
VA 7100 ( HP11 and greater) 0-127
VA 7110/7400/7410 0-1023