
HP StorageWorks Virtual Array va 7000 family - Installation Guide
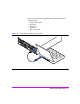
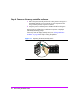


Table Of Contents
- Virtual Array Installation Guide
- Other Information You Will Need
- Operating Environment
- Virtual Array Configurations
- Virtual Array Enclosures
- Hardware Installation
- Configuring the Array Operating Settings
- Step 7. Change the controller default host port behavior
- Step 8. Change the controller port data rate to 2 Gbit/sec
- Step 9. Change the controller port topology
- Step 10. Change the controller loop ID
- Step 11. Change the RAID operating level of the array
- Step 12. Format the array controller enclosure
- Step 13. Power-off the array controller enclosure
- Step 14. Disconnect the RS-232 terminal
- Step 15. Connect fiber optic cables
- Step 16. Power-on all array enclosures
- Installing CommandView SDM Software
- Installing Command View SDM on HP-UX
- Installing Command View SDM on Windows
- Installing Command View SDM on Linux Red Hat
- Final Array Configuration
- Solving Installation Problems

26 Virtual Array Installation Guide
Step 9. Change the controller port topology
1 To change the port topology for controller 1 enter the following command,
selecting 2 for Public Loop or 4 for Direct Fabric Attach:
mgr -t < 2 | 4 > -c 1
2 When prompted to reset, enter no.
3 To change the port topology for controller 2 enter the following command,
using the same topology value used for controller 1:
mgr -t < 2 | 4 > -c 2
4 When prompted to reset, enter no if additional settings must be changed. If
all changes have been made, enter
yes to reset the array.
Step 10. Change the controller loop ID
1 To change the loop ID for Controller 1, enter:
mgr -L loop_ID -c 1
where
loop_ID
is a value from 1 to 125
2 When prompted to reset, enter
no.
3 To change the loop ID for Controller 2, enter:
mgr -L loop_ID -c 2
4 When prompted to reset, enter no if additional settings must be changed. If
all changes have been made, enter
yes to reset the array.
Step 11. Change the RAID operating level of the array
If the customer wants to operate the array in RAID 1+0 mode rather than
AutoRAID, change the level as follows:
1 To change the RAID level to RAID 1+0, enter:
mgr -B raid1
2 When prompted to reset, enter yes to reset the array.