
HP StorageWorks Virtual Array va 7000 family - Installation Guide
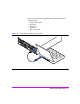
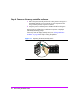
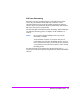


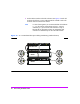
Table Of Contents
- Virtual Array Installation Guide
- Other Information You Will Need
- Operating Environment
- Virtual Array Configurations
- Virtual Array Enclosures
- Hardware Installation
- Configuring the Array Operating Settings
- Step 7. Change the controller default host port behavior
- Step 8. Change the controller port data rate to 2 Gbit/sec
- Step 9. Change the controller port topology
- Step 10. Change the controller loop ID
- Step 11. Change the RAID operating level of the array
- Step 12. Format the array controller enclosure
- Step 13. Power-off the array controller enclosure
- Step 14. Disconnect the RS-232 terminal
- Step 15. Connect fiber optic cables
- Step 16. Power-on all array enclosures
- Installing CommandView SDM Software
- Installing Command View SDM on HP-UX
- Installing Command View SDM on Windows
- Installing Command View SDM on Linux Red Hat
- Final Array Configuration
- Solving Installation Problems

Virtual Array Installation Guide 23
Disk Sector Reformatting
If the disks in the array controller enclosure are formatted with 512-byte
sectors, they are reformatted to 520-byte sectors at this time. Sector
reformatting takes 30 to 60 minutes to complete, depending on disk drive
capacity. Larger capacity disks take longer to reformat. If the disks have 520-
byte sectors, this process is not performed.
The disk activity LEDs will flash during sector reformatting. When all disk lights
are stable, the reformatting process is complete, and the installation can
continue.
Caution Do not proceed with the installation of the array until the
reformatting is complete.
To prevent format corruption, do not remove disk drives or
power-off the array during the reformatting sequence. If a disk
drive is removed or the array is powered off, the array will detect
a corrupt format, re-issue the Format command, and re-start the
formatting process.
The status of the disk can be checked using the virtual front panel dsp -d
command. If a disk fails during the format operation, the amber Disk Fault LED
will be on.