
HP StorageWorks Virtual Array va 7000 family - Installation Guide
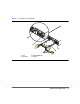
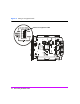

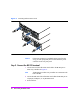
Table Of Contents
- Virtual Array Installation Guide
- Other Information You Will Need
- Operating Environment
- Virtual Array Configurations
- Virtual Array Enclosures
- Hardware Installation
- Configuring the Array Operating Settings
- Step 7. Change the controller default host port behavior
- Step 8. Change the controller port data rate to 2 Gbit/sec
- Step 9. Change the controller port topology
- Step 10. Change the controller loop ID
- Step 11. Change the RAID operating level of the array
- Step 12. Format the array controller enclosure
- Step 13. Power-off the array controller enclosure
- Step 14. Disconnect the RS-232 terminal
- Step 15. Connect fiber optic cables
- Step 16. Power-on all array enclosures
- Installing CommandView SDM Software
- Installing Command View SDM on HP-UX
- Installing Command View SDM on Windows
- Installing Command View SDM on Linux Red Hat
- Final Array Configuration
- Solving Installation Problems

16 Virtual Array Installation Guide
Step 3. Set FC Loop Speed Switch (VA 7400 with DS 2405 Disk System)
When installing a VA 7400 that includes DS 2405 Disk Systems, the FC Loop
Speed switch on the disk enclosure LCCs must be set to 1GB/s. Failure to set
the switch on both LCCs in each disk enclosure will disrupt the FC loop and
cause the entire array to malfunction.
Note This step is not required when installing a VA 7410 or VA 7110.
These products have a 2 Gbit/sec back-end, which is the default
FC Loop Speed switch setting on the DS 2405.
1 Attach an ESD strap to ground.
2 Remove the LCC from the disk enclosure. See Figure 7.
a Loosen the locking thumbscrews on the LCC.
b Pull out on the controller cam latches to remove the LCC.
3 Set the configuration dip switch to 1GB/s link speed. See Figure 8.
4 Reinstall the LCC in the disk enclosure.
a Open the controller cam latches by pulling them away from the center.
b Slide the LCC into the enclosure until it meets the backplane.
c Press the cam latches inward and flat against the center.
d Tighten the locking thumbscrews .
5 Repeat for both LCCs in every disk enclosure.