
HP StorageWorks Virtual Array va 7000 family - Installation Guide
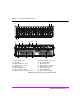
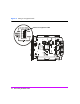

Table Of Contents
- Virtual Array Installation Guide
- Other Information You Will Need
- Operating Environment
- Virtual Array Configurations
- Virtual Array Enclosures
- Hardware Installation
- Configuring the Array Operating Settings
- Step 7. Change the controller default host port behavior
- Step 8. Change the controller port data rate to 2 Gbit/sec
- Step 9. Change the controller port topology
- Step 10. Change the controller loop ID
- Step 11. Change the RAID operating level of the array
- Step 12. Format the array controller enclosure
- Step 13. Power-off the array controller enclosure
- Step 14. Disconnect the RS-232 terminal
- Step 15. Connect fiber optic cables
- Step 16. Power-on all array enclosures
- Installing CommandView SDM Software
- Installing Command View SDM on HP-UX
- Installing Command View SDM on Windows
- Installing Command View SDM on Linux Red Hat
- Final Array Configuration
- Solving Installation Problems
14 Virtual Array Installation Guide
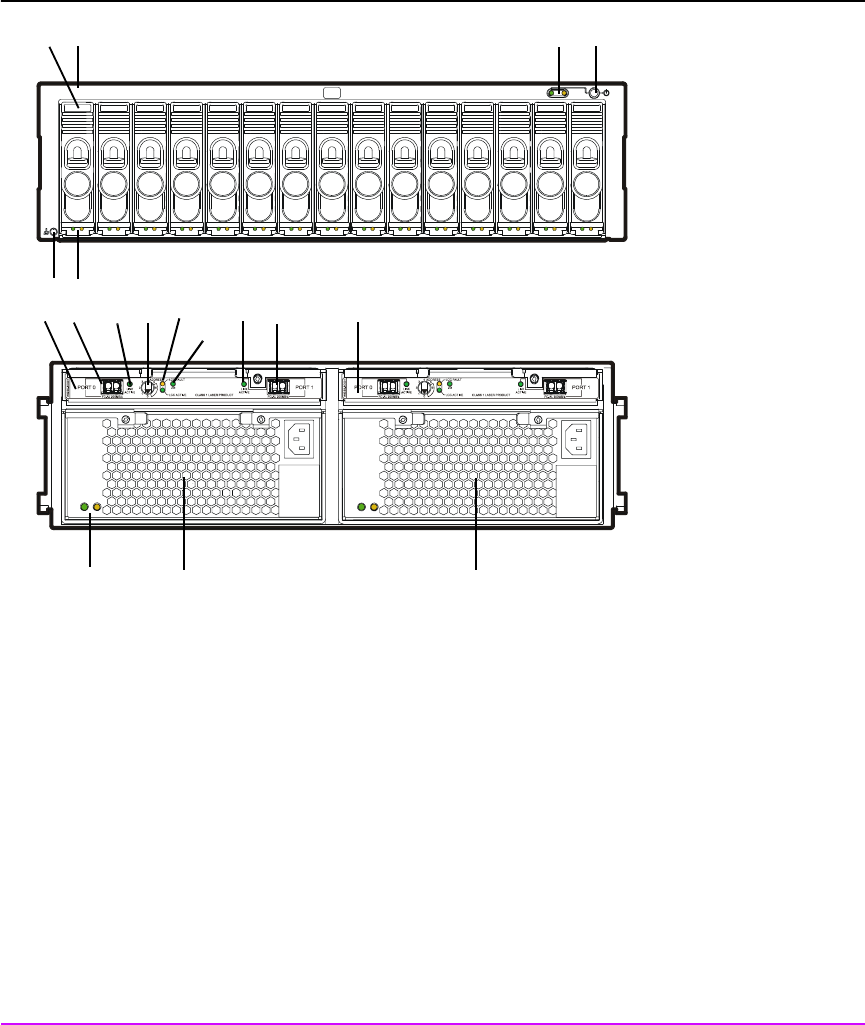
Figure 6 VA 7110/7400/7410 Disk Enclosure (A/AZ)
Note The DS 2400 Disk System and the DS 2405 Disk System are
both used on the VA 7400. The products are identical with the
exception of the 2G LED included on the DS 2405.
123
4
56
9
8
10
11
16
15
18
7
12
13
14
17
1 - Power/Standby Switch 10 - ADDRESS Switch
2 - System LEDs 11 - LCC LEDs
3 - Disk Drive Slot No. 1 (of 15) 12 - PORT 1 LINK ACTIVE LED
4 - Disk Drive 1 (of 15) 13 - PORT 1 FC-AL Connector
5 - Disk Drive LEDs 14 - Link Controller Card 2
6 - ESD Ground Receptacle 15 - Power Module 1
7 - Link Controller Card 1 16 - Power Module LEDs
8 - PORT 0 FC-AL Connector 17 - 2G LED (DS 2405 Disk System only)
9 - PORT 0 LINK ACTIVE LED 18 - Power Module 2