
HP StorageWorks Virtual Array 7000 Family User and Service Guide (January 2005)
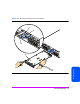
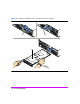

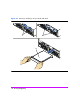
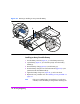
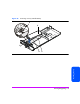
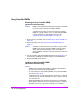
Table Of Contents
- Warranty Information
- Product Overview
- System Configurations
- Lowest Entry Point, Non-HA Minimum Configuration (VA 7100 only)
- Lowest Entry Point, Non-HA Minimum Configuration (VA 7410)
- Entry Level Non-Cluster With Path Redundancy (All VA arrays)
- Entry Level Cluster with Path Redundancy High Availability (VA 7410)
- Midrange Non-Cluster (All VA arrays)
- Midrange Non-Cluster (VA 7410)
- Midrange Non-Cluster with Full Storage Path Redundancy (All VA Arrays)
- Typical Non-Clustered with Path Redundancy (VA 7410)
- Typical Clustered Configuration (All VA models)
- Typical Clustered Configuration (VA 7410)
- HP-UX MC Service Guard or Windows 2000 Cluster (All VA arrays)
- Highly Redundant Cluster (VA 7410)
- Typical Highly Redundant Cluster (All VA models)
- Typical Highly Redundant Cluster (VA 7410)
- Troubleshooting
- Servicing & Upgrading
- Specifications & Regulatory Statements

120 Servicing & Upgrading
Array Controller DIMMs
Removing an Array Controller DIMM
(HP Service Personnel Only)
Caution DIMMs can be damaged by electrostatic discharge. Use the ESD
kit provided when removing and installing DIMMs.
The following procedures are used when removing/installing
DIMMs on a single controller. If you are upgrading the DIMMs
on both controllers, you must shutdown the array. See
"Upgrading Array Controller DIMMs" on page 135.
1 Remove the array controller card. See "Removing an Array Controller" on
page 107.
2 Remove the battery. See "Removing an Array Controller Battery" on
page 117.
Caution The battery must be removed to ensure there is no power to the
DIMMS and to prevent damage to DIMMs caused by voltage
spikes. After removing the battery, wait 2 minutes before
removing DIMMs. This allows any residual charge to drain from
the DIMMs.
3 Use your thumbs to pull out both DIMM extraction levers (Figure 48, 1) at
the same time. The DIMM will automatically pop out of the DIMM slot.
4 Remove the DIMM (2) from the slot.
Installing an Array Controller DIMM
(HP Service Personnel Only)
Caution
— DIMMs can be damaged by electrostatic discharge. Use the ESD kit
provided when removing and installing DIMMs.
— To avoid interference when installing DIMMs, always load the DIMM 1
slot first (see Figure 48, 2).
— Controller firmware 13 and earlier supports a maximum of 1 Gbyte of
cache memory per controller. Installing more than 1 Gbyte of memory
can cause data loss.
— Replacement DIMMs must have the same memory size as the DIMMs
being replaced. Otherwise, the array controller will report a “Memory
Mismatch”. If the array is powered-on after the array controller is