
HP StorageWorks Virtual Array 7000 Family User and Service Guide (January 2005)
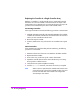
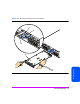
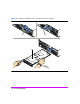

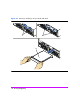
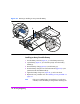
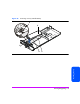
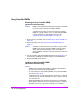
Table Of Contents
- Warranty Information
- Product Overview
- System Configurations
- Lowest Entry Point, Non-HA Minimum Configuration (VA 7100 only)
- Lowest Entry Point, Non-HA Minimum Configuration (VA 7410)
- Entry Level Non-Cluster With Path Redundancy (All VA arrays)
- Entry Level Cluster with Path Redundancy High Availability (VA 7410)
- Midrange Non-Cluster (All VA arrays)
- Midrange Non-Cluster (VA 7410)
- Midrange Non-Cluster with Full Storage Path Redundancy (All VA Arrays)
- Typical Non-Clustered with Path Redundancy (VA 7410)
- Typical Clustered Configuration (All VA models)
- Typical Clustered Configuration (VA 7410)
- HP-UX MC Service Guard or Windows 2000 Cluster (All VA arrays)
- Highly Redundant Cluster (VA 7410)
- Typical Highly Redundant Cluster (All VA models)
- Typical Highly Redundant Cluster (VA 7410)
- Troubleshooting
- Servicing & Upgrading
- Specifications & Regulatory Statements

Servicing & Upgrading 117
Servicing & Upgrading
Array Controller Batteries
Caution Removing an array controller battery may cause data loss. The
battery supplies power to the DIMMs on the array controller
card. To prevent data loss, you must either ensure the array is in
a dual array controller configuration, or you must perform an
array shutdown.
If the array is in a dual array controller configuration, it is
recommended that you replace both array controller batteries.
The array controller battery is a Lithium ion type. When
removed, the battery must be recycled or disposed of properly.
Replace the battery only with the same type.
Shelf life for the array controller battery is rated for up to 6
months at a maximum temperature of 25º C. If this storage
temperature or duration is exceeded, it may be necessary to
recharge the battery during normal operation of the controller.
Removing an Array Controller Battery
1 Remove the array controller card. See "Removing an Array Controller" on
page 107.
2 Loosen the battery clamp screw (Figure 46, 1) with a T-20 driver.
3 Lift the battery clamp (Figure 46, 2) off of the battery.
4 Lift the battery connector (Figure 47, 1) off of the battery terminal (Figure
47, 2).
5 Lift the battery (Figure 47, 3) off of the array controller card.