
HP StorageWorks Virtual Array 7000 Family User and Service Guide (January 2005)
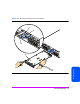
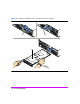

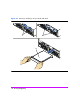
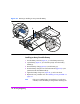
Table Of Contents
- Warranty Information
- Product Overview
- System Configurations
- Lowest Entry Point, Non-HA Minimum Configuration (VA 7100 only)
- Lowest Entry Point, Non-HA Minimum Configuration (VA 7410)
- Entry Level Non-Cluster With Path Redundancy (All VA arrays)
- Entry Level Cluster with Path Redundancy High Availability (VA 7410)
- Midrange Non-Cluster (All VA arrays)
- Midrange Non-Cluster (VA 7410)
- Midrange Non-Cluster with Full Storage Path Redundancy (All VA Arrays)
- Typical Non-Clustered with Path Redundancy (VA 7410)
- Typical Clustered Configuration (All VA models)
- Typical Clustered Configuration (VA 7410)
- HP-UX MC Service Guard or Windows 2000 Cluster (All VA arrays)
- Highly Redundant Cluster (VA 7410)
- Typical Highly Redundant Cluster (All VA models)
- Typical Highly Redundant Cluster (VA 7410)
- Troubleshooting
- Servicing & Upgrading
- Specifications & Regulatory Statements

Servicing & Upgrading 115
Servicing & Upgrading
Array Controller Filler Panels
Removing an Array Controller Filler Panel
Caution Do not operate the array for more than 5 minutes with an array
controller or filler panel removed. Either an array controller or
filler panel must be installed in the slot to maintain proper
airflow.
1 Loosen the cam lever screws (Figure 45, 1) with a T-10 driver or flat-blade
screwdriver.
2 Pull out both cam levers (2) at the same time.
3 Pull the array controller filler panel (3) out of the slot.
Installing an Array Controller Filler Panel
1 Pull out both cam levers (Figure 45, 2) at the same time.
2 Push the array controller filler panel (3) firmly into the slot.
3 Push in both cam levers at the same time.
4 Tighten the cam lever screws (Figure 45, 1).