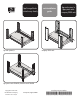
hp StorageWorks virtual array family hp rack system/e rack installation guide hp rack system/e hp system racks compaq 9000 rack compaq 9000 rack hp system racks E3660B, E3661B and E3662B Copyright © 2001-2002 Hewlett-Packard Company Printed in U.S.A 07/02 Manufacturing Part Number www.hp.
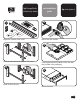
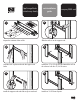
hp StorageWorks virtual array family rack installation guide hp rack system/e 4 1 x6 x2 x6 Inspect the contents of the rail kit. 2 Remove the disk modules. 22 5 21 20 Install the rails and secure with four T25 screws. 3 22 21 Carefully place the disk modules on the anti-static mat provided in the packaging. 6 20 Install the front clip nuts. Remove the bezel.
WARNING! The empty enclosure may weigh over 60 pounds (27.2 kg). Two persons or a mechanical lift should be used to move the enclosure, or serious injury may result. 7 10 Re-install the disk modules. 11 Install the enclosure and secure with two T25 screws. 8 From the rear of the enclosure, install the rear tie down clamps and secure with two 10-32 screws. Install the bezel spacers. 9 Re-install the bezel.
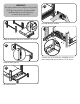
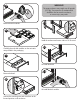
hp StorageWorks virtual array family rack installation guide hp system racks E3660B, E3661B and E3662B 4 1 x 12 x 16 Inspect the contents of the rail kit. 2 Install the rails with four clip nuts and screws. 3 Install the front clip nuts. Remove the disk modules. 5 Carefully place the disk modules on the anti-static mat provided in the packaging. 6 Remove the bezel.
WARNING! The empty enclosure may weigh over 60 pounds (27.2 kg). Two persons or a mechanical lift should be used to move the enclosure, or serious injury may result. 7 9 Install the filler panel. 10 Install the enclosure and secure with two screws. 8 Re-install the bezel. Re-install the disk modules.
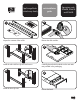
hp StorageWorks virtual array family rack installation guide compaq 9000 rack 4 1 x4 x2 x4 x4 Inspect the contents of the rail kit. 2 Hold the rails in place and mark the support rod holes. 3 Install the support rods and slide a clip to each end. Slide the rails on to the support rods. 5 Install four 5/16-18 clip nuts and attach the rails to the columns with four 5/16-18 screws. 6 Install two 10-32 front clip nuts.
7 Remove the disk modules. WARNING! The empty enclosure may weigh over 60 pounds (27.2 kg). Two persons or a mechanical lift should be used to move the enclosure, or serious injury may result. 11 8 Install the enclosure and secure with two 10-32 screws. Carefully place the disk modules on the anti-static mat provided in the packaging. 12 9 Re-install the bezel. Remove the bezel. 13 10 Re-install the disk modules. Unscrew the mounting ears and move them to the forward position on the enclosure.