Evaluation Guide First Edition (September 2003) Part Number: 338355-001
© Copyright 2003 Hewlett-Packard Development Company, L.P. Hewlett-Packard Company makes no warranty of any kind with regard to this material, including, but not limited to, the implied warranties of merchantability and fitness for a particular purpose. Hewlett-Packard shall not be liable for errors contained herein or for incidental or consequential damages in connection with the furnishing, performance, or use of this material.
Table of Contents 1 Introduction ................................................................................................................................. 1 1.1 Evaluation guide overview ................................................................................................................... 2 1.2 HP OpenView Storage Mirroring Operations .................................................................................. 2 1.2.1 1.2.2 1.2.3 1.2.4 Mirroring .................................
1 Introduction Thank you for your interest in evaluating HP OpenView Storage Mirroring. The purpose of this evaulation is to allow you to become familiar with HP OpenView Storage Mirroring’s core replication and failover technology first hand. HP OpenView Storage Mirroring is a real-time data replication and failover software product.
1.1 Evaluation guide overview In this guide, you will find five sections: 1. Introduction—A brief overview of HP OpenView Storage Mirroring 2. Resources—Resources available during your evaluation 3. Installation—System requirements and step-by-step instructions for installing HP OpenView Storage Mirroring 4. Operation—Step-by-step instructions for basic HP OpenView Storage Mirroring operations 5. Conclusion—Final words on your HP OpenView Storage Mirroring evaluation 1.
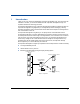
1.2.1 Mirroring Mirroring is the process of transmitting user-specified data from the source to the target so that an identical copy of data exists on the target. When HP OpenView Storage Mirroring initially performs mirroring, it copies all of the selected data including file attributes and permissions. Mirroring creates a foundation upon which HP OpenView Storage Mirroring can efficiently update the target machine by replicating only file changes.
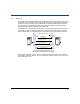
1.2.2 Replication Replication is the real-time transmission of file changes. Unlike other related technologies, which are based on a disk driver or a specific application, HP OpenView Storage Mirroring’s replication process operates at the file system level and is able to track file changes independently from the file’s related application.
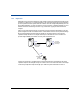
1.2.3 Failure monitoring/failover Failover is a process in which a target machine stands in for a failed source machine. As a result, user and application requests that are directed to the failed source machine are routed to the target machine. HP OpenView Storage Mirroring monitors the status of machines by tracking network requests and responses exchanged between source and target machines.
1.2.4 Restoration Restoration provides an easy method for copying replicated data from the target back to its original location on the source. The process only requires you to select the source, target, and the appropriate replication set. There is no need to select files or to remember where the data came from on the source since that information is maintained by HP OpenView Storage Mirroring.
2 Resources During the evaulation you have access to the same reference and online resources as licensed HP OpenView Storage Mirroring users. ! Getting Started guide—This reference manual is a quick reference guide for the installation and basic steps to get you going quickly with HP OpenView Storage Mirroring. It is available in Adobe Acrobat PDF format in the directory where you installed HP OpenView Storage Mirroring. The file is called instlwin.pdf.
3 HP OpenView Storage Mirroring Setup Your HP OpenView Storage Mirroring setup consists of two tasks: determining that your source and target meet the system requirements of this evaulation and performing the HP OpenView Storage Mirroring installation. 3.1 System requirements HP OpenView Storage Mirroring is an exceptionally flexible product that can be used in a wide variety of network configurations.
! Name Resolution—Your target server and client machine must be configured to use the same primary WINS server NOTE: This limitation is also applied to simplify the evaluation process. ! Disk Space—Minimum of 312 MB on both the source and target servers for the program files, HP OpenView Storage Mirroring pagefile, and the Microsoft installer files.
3.2 Installing HP OpenView Storage Mirroring Use these instructions to install HP OpenView Storage Mirroring on a machine for the first time. Complete installation details are available in the HP OpenView Storage Mirroring Getting Started guide. 1.
5. Enter your User Name, Organization, and Activation Code. The code is a 16-character, alpha-numeric activation code which applies the appropriate HP OpenView Storage Mirroring license to your installation. NOTE: If you do not have an activation code, you must call HP Customer Support. 6. Select the remaining default selections and click Install to complete the installation. 7. After the installation, you must reboot the system prior to starting HP OpenView Storage Mirroring.
4 HP OpenView Storage Mirroring Evaluation HP OpenView Storage Mirroring configuration consists of creating a replication set, which defines the data on the source machine that is to be protected, and then connecting that replication set to a target machine. These two steps, creation and connection of the replication set, are the backbone of the HP OpenView Storage Mirroring processes.
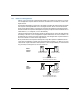
4.1 Creating initial test data 1. Create a directory called testdata at the root of a volume on your source server. 2. Share the new directory by creating a share called testshare. net share testshare=d:\testdata 3. From your client machine, map s: to testshare. net use s: \\source\testshare Microsoft Windows Advanced Server 2000 (C) Copyright 1985-2000 Microsoft Corp. D:\>md testdata D:\>net share testshare=d:\testdata testshare was shared successfully.
4.2 Creating and connecting a replication set The first time you start the HP OpenView Storage Mirroring Management Console (Start, Programs, HP OpenView Storage Mirroring, Management Console), the Welcome screen leads you to the HP OpenView Storage Mirroring Connection Wizard. The Connection Wizard will guide you through the essential steps necessary to establish a basic connection. In the Connection Wizard, you specify: ! Source—The machine containing the data to protect. This is your production server.
3. Select your source machine from the drop down list. This is the machine where the files reside that you wish to protect. Click Next to continue. NOTE: HP OpenView Storage Mirroring will automatically attempt to log on to the selected source using the identification of the user logged on to the local machine. If the logon is not successful, the Logon dialog box will appear prompting for your security identification. The account specified must be a member of the machine’s Double-Take Admin group.
4. Select your target machine from the drop down list. This is your backup machine that will receive the data from the source. Click Next to continue. NOTE: HP OpenView Storage Mirroring will automatically attempt to log on to the selected target using the identification of the user logged on to the local machine. If the logon is not successful, the Logon dialog box will appear prompting for your security identification. The account specified must be a member of the machine’s Double-Take Admin group.
5. Specify the name of the replication set, Eval Rep Set, that you want to create. Click Next to continue. 6. A tree display appears identifying the volumes and directories available on that source machine. Mark the \testdata directory that was created in the last section. This is the data that you will be protecting for this evaluation. Click Next to continue.
7. Select the option Send all data to the same path on the target. This option keeps the directory structure on the source and target identical. For example, d:\testdata is transmitted to d:\testdata. NOTE: This screen also allows you to Send all data to a single path on the target which sends the data to a default location which is defined as /source_name/rep_set_name/volume.
9. Review your selections on the summary screen. 10. After your Connection Wizard settings are correct, continue the evaluation by viewing the Advanced Options. NOTE: You do not have to view the advanced options in order to establish a connection. You can click Finish and you will be prompted to save your replication set and when the Connection Wizard closes, the connection will be established, and miroring and replication will begin immediately. 11.
! Transmit—The Transmit tab allows you to specify transmission limiting critiera including bandwidth throttling, start and stop criteria, and a transmission window. ! Verify—The Verify tab allows you to specify when a verification will be performed and how often. ! Failover—The Failover tab allows you to configure failure monitoring. NOTE: These advanced options are explained in full detail in the HP OpenView Storage Mirroring User’s Guide and are not recommended for this evaluation. 12.
Now that you have created a replication set on the source and connected it to the target, mirroring is initiated. Highlight your source machine on the left pane of the Management Console and you will see your connection in the right pane. For detailed information on understanding the display of the Management Console, see the HP OpenView Storage Mirroring User's Guide.
4.3 Monitoring the activity and completion of the initial mirror View your connection in the Management Console by highlight the source machine on the left pane. The connection will appear on the right pane. Use the horizontal scroll bar at the bottom of the right pane to view the various status columns. Pay attention to the Mirror Status column which shows the status of the mirroring operation. During the mirroring process, you will see a percentage of the mirror that has been completed.
4.4 Changing the test data to cause replication In order to test replication, you need to change the data contained in your replication set. This includes modifying existing files, creating new files, deleting files, and changing permissions and attributes. However, before changing these files, you will need to do a little bit of preparation work for the verification section. 1. From your client machine, browse through the directories of your s: drive. 2.
8. If your Management Console is closed, open it. Tile your Manaagement Console so that you can see it while still having access to your desktop. 9. On your s: drive, edit the file that you viewed in step 6. Save your changes. 10. Modify the other three files from step 5 so that the date, time, and/or size is updated. 11. Watch the Management Console statistics as the file changes cause replication to occur. 12. Just like mirroring, you can monitor the progress of replication through the Management Console.
13. Use the horizontal scroll bars to display additional replication statistics.
4.5 Verifying the changes on the target server Now that you have modified some of the files, you want to be sure that the file modifications were applied correctly. For this evaluation, three different verification scenarios are presented to demonstrate HP OpenView Storage Mirroring functionality and so that you can be certain that the HP OpenView Storage Mirroring functionality is working as described. NOTE: 4.5.
4.5.2 Third-party verification In this section, you will be using the Windows comp command to verify that the changes were applied correctly. 1. Using the command below, you can compare the files on the source and target servers. comp s:\*.* t:\*.* 2. Compare the results of the comp command (using the guildelines below) with the visual and HP OpenView Storage Mirroring verification methods.
4.5.3 HP OpenView Storage Mirroring verification 1. From your client machine, right-click the connection on the right pane of the Management Console and select Verify. You will see two choices on the Start Verification dialog box. ! Verify Only—This option performs the verification process by comparing the date, time and size of each file and generates a verification report identifying the files that are not synchronized.
Just like when you were monitoring the mirror earlier, you can now monitor the verification process. Notice that the Mirror Status column changes to Verifying while the verification process occurs. When the verification is complete, HP OpenView Storage Mirroring will have created a log file for you to review. View the status of your verification process 3. Wait until your Mirror Status has returned to Idle and then open the file DTVerify.
NOTE: 4.6 The remaining sections of this evaluation cover failover, failback, and restore. These processes are used for high availability configurations. These sections are optional, although you are encouraged to step through the procedures. Configuring failover When you were looking at the advanced options in the Connection Manager, you noticed a Failover tab allowing you to configure failure monitoring.
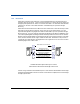
At this point, in terms of your evaluation, your failover configuration is complete because you will be using the default settings. But while you are viewing the Monitor Settings dialog box, notice the flexible configuration options available to you. The following diagram points out the key features of the Monitor Settings dialog box. Check the HP OpenView Storage Mirroring User’s Guide for complete details. Source machine and its IP addresses.
4.7 Monitoring failover Now that failover monitoring is configured and started, you will need to know if and when there is a problem. Since it can be essential to quickly know the status of your machines, HP OpenView Storage Mirroring offers various methods for monitoring the status of failover.
4.8 Initiating a failure If you want to continue with the remaining portions of this evaluation, failback and restore, then you will need to initiate a failure of your source machine. The first few steps of the following procedure will be used as a comparison for after the failover has occurred and then the last steps prepare for the restoration process. 1. Verify that you can view testshare on your source. 2. Ping the source’s IP address from your client machine. 3.
4.9 Performing failback If this was a real-world scenario, you would have the opportunity to fix the problems on the source, without downtime for your end users because the target is standing in for the failed server. When you have resolved the problems on the source, you are ready to perform failback. Failback reverts the target back to its original identity so that the source can be brought online. 1. Before bringing your source machine back online, you will need to disconnect your existing conection.
3. Highlight the failed source and click Failback. 4. You will be prompted to determine if you want the target to continue monitoring the source. Select Stop. 5. Reconnect your network cable on the source machine. Failback is now complete. If you would like you can repeat the share and ping steps from the previous section to verify that your source and target servers have reverted back to their original identities.
4.10 Restoring data These steps walk you through restoring the newer data from the target so that the source and target are again synchronized. Before beginning the restoration, you will delete one of the files on the source to confirm the restoration process. 1. Delete one of your test files from your source. 2. Open the Management Console on your client machine and double-click your target machine to log in. 3. Select Tools, Restoration Manager. 4. Select the Original Source machine.
8. The Source Path and Target Path will automatically be populated when the replication set is selected. HP OpenView Storage Mirroring will allow the data to be placed in a location other than the original, but by default, and for the purposes of this evaluation, restore the data to the same location it came from. 9. For this evaluation, use the default restoration conditionals. For detailed information on the different options, see the HP OpenView Storage Mirroring User’s Guide. 10.
5 Conclusion After you have evaluated the benefits of powerful data protection software from HP, you can explore other ways to enhance and optimize your networking solution. Engage HP's Sales and Training to help you realize your full potential. HP delivers a comprehensive portfolio of services that help you assess, design, plan, and implement effective data availability and disaster recovery solutions. These solutions help you avoid costly data loss and downtime.