User’s Guide Twelfth Edition (March 2009) Part Number: T2558-96325
© Copyright 2009 Hewlett-Packard Development Company, L.P. Hewlett-Packard Company makes no warranty of any kind with regard to this material, including, but not limited to, the implied warranties of merchantability and fitness for a particular purpose. Hewlett-Packard shall not be liable for errors contained herein or for incidental or consequential damages in connection with the furnishing, performance, or use of this material.
Table of Contents Chapter 1 Introduction .........................................................1-1 Storage Mirroring operations ............................................................ 1-3 Mirroring ............................................................................................................. 1-3 Replication ........................................................................................................... 1-4 Failure monitoring and failover ....................................
Chapter 4 Replication Sets ....................................................4-1 Replication capabilities ..................................................................... 4-3 Creating a replication set .................................................................. 4-5 Creating or modifying replication rules manually .............................. 4-6 Modifying a replication set ................................................................ 4-7 Renaming and copying a replication set ............
Chapter 11 Mirroring and Replication .................................11-1 Controlling mirroring ...................................................................... 11-1 Controlling an automatic mirror ...................................................... 11-3 Configuring customized mirroring scripts ....................................... 11-5 Configuring and removing orphan files ........................................... 11-6 Starting replication .....................................................
Chapter 17 Failover for High Availability ............................17-1 Configuration requirements ............................................................ 17-2 All environments ................................................................................................. 17-2 Domain controllers .............................................................................................. 17-2 Routers .................................................................................................
Chapter 20 Server Settings .................................................20-1 General ........................................................................................... 20-2 Licensing ........................................................................................ 20-3 Setup .............................................................................................. 20-4 Network .......................................................................................... 20-5 Queue ......
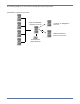
Introduction Storage Mirroring is a real-time data replication and failover software product. Storage Mirroring augments your existing data protection strategy by reducing downtime and data loss, and it provides these services with minimal impact on existing network and communication resources. Storage Mirroring allows you to specify mission-critical data that must be protected and replicates, in real-time, that data from a production server, known as the source, to a backup server, known as the target.
The following diagram is one common Storage Mirroring configuration.
Storage Mirroring operations Storage Mirroring performs four basic types of operations.
Replication Replication is the real-time transmission of file changes. Unlike other related technologies, which are based on a disk driver or a specific application, the Storage Mirroring replication process operates at the file system level and is able to track file changes independently from the file’s related application. In terms of network resources and time, replicating changes is a more efficient method of maintaining a real-time copy of data than copying an entire file that has changed.
Failure monitoring and failover Failover is the process in which a target stands in for a failed source. As a result, user and application requests that are directed to the failed source are routed to the target. Storage Mirroring monitors the source status by tracking network requests and responses exchanged between the source and target. When a monitored source misses a user-defined number of requests, Storage Mirroring assumes that the server has failed.
Restoration Restoration provides an easy method for copying replicated data from the target back to its original location on the source. The process only requires you to select the source, target, and the appropriate replication set. There is no need to select files or to remember where the data came from on the source since that information is maintained by Storage Mirroring.
Sample configurations Storage Mirroring is an exceptionally flexible product that can be used in a wide variety of network configurations. To implement Storage Mirroring effectively, it is important to understand the possible configuration options and their relative benefits. Storage Mirroring configuration options can be used independently or in varying combinations. NOTE: The Storage Mirroring replication and failover features have different server requirements.
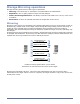
One-to-one, active/active Data from first source Data from second source Source and Target (Active) Target and Source (Active) Description Each server acts as both a source and target actively replicating data to each other. Applications This configuration is appropriate for failover and critical data backup. This configuration is more cost-effective than the Active/Standby configuration because there is no need to buy a dedicated target server for each source.
Many-to-one Source Source Target Source Description Many source servers are protected by one target server. Application This configuration is appropriate for offsite disaster recovery. This is also an excellent choice for providing centralized tape backup because it spreads the cost of one target server among many source servers. Considerations The target server must be carefully managed. It must have enough disk space and RAM to support replication from all of the source systems.
One-to-many Target Source Target Target Description One source server sends data to multiple target servers. The target servers may or may not be accessible by one another. Applications This configuration provides offsite disaster recovery, redundant backups, and data distribution. For example, this configuration can replicate all data to a local target server and separately replicate a subset of the mission-critical data to an offsite disaster recovery server.
Chained Source Target and Source Target Description The source servers sends replicated data to a target server, which acts as a source server and sends data to a final target server, which is often offsite. Applications This is a convenient approach for integrating local high availability with offsite disaster recovery. This configuration moves the processing burden of WAN communications from the source server to the target/source server.
Single server C:\Data Replication set data D:\Data Copy of replication set data on specified target path Source and Target Description Source and target Storage Mirroring components are loaded on the same server allowing data to be replicated from one location to another on the same volume or to a separate volume on the same server. These could be locally attached SCSI drives or Fibre Channel based SAN devices.
Virtual systems Guest Guest Guest Guest Guest Guest Guest Guest Host Host Source Target Virtual to virtual configuration Source Guest Guest Guest Guest Source Host Target Source Physical to virtual configuration Source Description Source and/or target Storage Mirroring components are loaded on the guest operating system allowing data to be replicated between virtual systems. One Storage Mirroring for Virtual Machines license can be used on up to five virtual servers.
Resources You have many resources available to you when using Storage Mirroring. Operating System and application documentation—Make sure that you have complete documentation for your operating system and your applications. Storage Mirroring documentation—All Storage Mirroring products include documentation. Manuals are available on the product CD (in the \docs subdirectories of each set of program installation files) and in the installation directory you selected during the installation.
Installation Review System requirements on page 2-1 and Installation and upgrade notes on page 2-3, and then use the appropriate instructions from the following list to meet your goal. Installing or upgrading Storage Mirroring on page 2-4—Use these instructions if you are installing or upgrading Storage Mirroring. You can also use these instructions to repair or modify an existing Storage Mirroring installation.
File System—Storage Mirroring supports the same file system formats that Microsoft supports: FAT, FAT32, and NTFS. System Memory—There are different memory requirements depending on the operating system you are using. Be sure you have at least the minimum amount of memory for your environment. You may want to consider having at least the recommended amount of system memory.
Installation and upgrade notes Since Storage Mirroring installs device drivers, it is recommended that you update your Windows Recovery Disk, before installing or making changes to your servers. For detailed instructions on creating a recovery disk, see your Windows reference manuals. Make sure that you select the option to backup the registry when building the repair disks.
Installing or upgrading Storage Mirroring Use these instructions to install Storage Mirroring or upgrade an existing Storage Mirroring installation. If you are using the same installation files as your existing Storage Mirroring installation, you can modify or repair the existing installation. 1. Close any open applications. 2. Start the installation program using the appropriate instructions, depending on your media source. CD—Load the CD into the local CD-ROM drive.
If you have entered an evaluation activation code, the expiration date will be displayed and you will be prompted that the source and target modules will not load after that date. Click Next to continue the installation. You must update the activation code to a valid one through the Management Console before the expiration date, otherwise, on the expiration date, functionality will be disabled. 10. Storage Mirroring uses system memory to store data in queues.
Installing or upgrading Storage Mirroring automatically The Storage Mirroring installation program can accept command-line parameters which allow you to automate the installation or upgrade process by running an unattended, or silent, installation. The automatic process allows you to pass parameters through to the installation program instead of entering information manually during the installation or upgrade.
Review the following table to understand the different parameters available in DTSetup.ini. DTSetup.ini Paramters Parameter DTSetupType Valid Values DTNT—Storage Mirroring server and client components will be installed. DTCO—Storage Mirroring client components will be installed. DTSO—Storage Mirroring server components will be installed.
7. Run one of the following case-sensitive commands from the temporary directory, depending on if you have setup.exe or setup_xxxx.exe where xxxx is a four digit build number. setup /s /v"DTSETUPINI=\"c:\dtinstall\DTSetup.ini\" /qn" setup_xxxx /s /v"DTSETUPINI=\"c:\dtinstall\DTSetup.ini\" /qn" NOTE: The command must be run from the directory where the temporary files are located as well as specifying that directory for the .ini file. Spacing is critical with this command.
Uninstalling Storage Mirroring Use these instructions if you want to uninstall an existing Storage Mirroring installation. If you want to use the product installation files to uninstall, you have to use the same installation files as the currently installed version. If you do not have the same installation files as the currently installed version, you will need to use the Windows Add/Remove Programs feature to uninstall the software.
Uninstalling Storage Mirroring automatically Like the Storage Mirroring installation program, you can automate the uninstall of Storage Mirroring and use the default settings for any prompts. Before you can automate the uninstallation, you must identify the installation ID of the version you have installed. 1. Open the Windows registry and locate HKEY_LOCAL_MACHINE\SOFTWARE\Microsoft\Windows\ CurrentVersion\Uninstall. 2. Right-click on that registry folder and select Find. 3.
Clients Storage Mirroring has two clients, the Management Console and the Failover Control Center that control and manage your connections and failover. Both clients can be started from the Windows Start menu. You can also launch the Failover Control Center from the Tools menu in the Management Console. NOTE: Storage Mirroring also has a scripting language which can be used in an interactive client or in scripts. For more information, see the Scripting Guide.
Logging on and off of Storage Mirroring To ensure protection of your data, Storage Mirroring offers multi-level security using native operating system security features. Privileges are granted through membership in user groups defined on each machine running Storage Mirroring. To gain access to a particular Storage Mirroring source or target, the user must provide a valid operating system user name and password and the specified user name must be a member of one of the Storage Mirroring security groups.
Managing the Management Console tree To better manage the servers that appear in the Management Console, you can customize the server display to fit your needs. You can create groups and move servers to those groups to help you organize your environment. Within the groups, you can insert, remove, hide or unhide servers. Each of these functions is detailed in the following sections. Groups The left pane of the Management Console is a tree view of the Storage Mirroring servers.
Servers Within your server groups, you have the ability to further manage the servers that are displayed by using the following functions. Moving Servers—Servers that are auto-populated can be moved to different groups within the Management Console tree. Inserting Servers—If a machine is not displayed on the Management Console, it can be manually inserted. This feature is useful for machines that are across a router or on a different network segment.
Removing servers To remove a server, right-click on the server in the left or right pane of the Management Console and select Remove. You can also select Remove Item from the toolbar. If Active Directory discovery is enabled on the Management Console, those servers that have Active Directory advertisement enabled will automatically be repopulated back in the default Discovered Servers group.
Storage Mirroring workspaces The Management Console workspace contains the display of the panes of the Management Console and any servers that may have been inserted. Multiple workspaces can be used to help organize your environment or to view settings from another machine. Saving a workspace As you size, add, or remove windows in the Management Console, you can save the workspace to use later or use on another Storage Mirroring client machine. Select File and one of the following options.
Failover Control Center From the Failover Control Center, you can manage, monitor, and control failover for your Storage Mirroring servers. The Failover Control Center displays a main window for monitoring failover activity. Control buttons to the right allow you to configure and manage your servers. Configuring communication ports The Failover Control Center uses port 6320, by default for Storage Mirroring communications.
Replication Sets A replication set defines the data on a source machine that Storage Mirroring protects. Replication sets are defined by volumes, directories, files, or wild card combinations. Creating multiple replication sets allows you to customize sets of data that need to be protected. When a replication set is created, a series of rules are defined that identify the volumes, directories, files, and/or wild card combinations that will be replicated to the target.
If you rename the root folder of a connected replication set, Storage Mirroring interprets this operation as a move from inside the replication set to outside the replication set. Therefore, since all of the files under that directory have been moved outside the replication set and are no longer a part of the replication set, those files will be deleted from the target copy of the replication set. This, in essence, will delete all of your replicated data from the target.
Replication capabilities Storage Mirroring replicates file and directory data stored on any Windows file system (FAT, FAT32, NTFS4, and NTFS5). Replicated items also include Macintosh® files, compressed files, NTFS attributes and ACLs (access control list), dynamic volumes, files with alternate data streams, sparse files, and encrypted files. Files can be replicated across mount points, even though mount points are not created on the target.
Empty encrypted files will be mirrored to the target, but if you copy or create an empty encrypted file within the replication set after mirroring is complete, the empty file will not be created on the target. As data is added to the empty file on the source, it will then be replicated to the target. g. When you are replicating encrypted files, a temporary file is created on both the source and target servers.
Creating a replication set Before you can establish a connection, you must create a replication set. 1. Highlight a source in the left pane of the Management Console and select Insert, Replication Set from the menu bar. You can also right-click on the source name and select New, Replication Set. 2. A replication set icon appears in the left pane under the source. By default, it is named New Replication Set.
Creating or modifying replication rules manually There may be times when you cannot browse for data when creating a replication set. For example, you can create a replication set rule for a directory or file that does not exist. Since you cannot browse for the location, you have to create replication set rule manually. At other times, the data you want to replicate cannot be easily selected from the Management Console. For example, you may want to select all .db files from a specific volume or directory.
Modifying a replication set Storage Mirroring allows you to make modifications to a replication set when you want to change the data you wish to protect. This allows you to add, remove, or modify any replication set rules without having to create a new replication set. 1. In the left pane, highlight the replication set you want to modify and expand the volume and directory levels as needed. 2. Modify the items by marking or clearing the volume, drive, directory, or file check boxes.
Calculating replication set size While Storage Mirroring is mirroring, the right pane of the Management Console displays statistics to keep you informed of its progress. If the size of the replication set is determined before the mirror is started, Storage Mirroring can display the percentage of the replication set that has been mirrored in the Mirror Status column. If the size was not calculated prior to starting the mirror, the column displays Mirroring. 1.
Establishing a Connection Using the Connection Wizard The Connection Wizard guides you through the process of protecting your data. It helps you select a source, identify the data from your source that will be included in the replication set, and select a target. The connection itself provides disaster recovery protection. If you want to extend the protection and provide high availability, you can add failover monitoring. 1. Start the Connection Wizard to establish your connection.
7. Select the location on the target where the data will be stored. Send all data to a single path on the target—This option sends all selected volumes and directories to the same location on the target. The default location is \source_name\replication_set_name\volume_letter. Send all data to the same path on the target—This option sends all selected volumes and directories to the same directories on the target.
Establishing a Connection Using the Connection Manager After you have created a replication set, you can establish a connection through the Connection Manager by connecting the replication set to a target. 1. Open the Connection Manager to establish the connection. Highlight the replication set and select Tools, Connection Manager. Right-click on the replication set and select Connection Manager. Drag and drop the replication set onto a target.
Mappings—You must specify the location on the target where the source’s replication set data will reside. Storage Mirroring offers two predefined locations as well as a custom option that allows you to create your own path. All To One—This option replicates data from the source to a single volume on the target. The pre-defined path is \source_name\replication_set_name\source_volume.
3. If desired, you can configure mirror settings before establishing your connection. Select the Mirroring tab on the Connection Manager. Full Mirror—All files in the replication set will be sent from the source to the target. File Differences—Only those files that are different based on date, time, and/or size will be sent from the source to the target. Send data only if Source is newer than Target—Only those files that are newer on the source are sent to the target.
Send data only if Source is newer than Target—Only those files that are newer on the source are sent to the target. NOTE: Full—All files are sent to the target. NOTE: See the table File Differences Remirror Options Compared on page 11-4 for a comparison of how the file difference remirror settings work together, as well as how they work with the global checksum setting on the Source tab of the Server Properties.
Establishing a Connection Across a NAT or Firewall If you are in an IPv4 environment and your source and target are on opposite sides of a NAT or firewall, you will need to configure your NAT or firewall to accommodate Storage Mirroring communications. You must have the hardware already in place and know how to configure the hardware ports. If you do not, see the reference manual for your hardware.
Inserting the servers in the Management Console Manually insert your servers by selecting Insert, Server. Type the IP address of the router the server is connected to and the port number the server is using for communications. Establishing the connection Once your server is inserted in the Management Console, establish your connection using the Connection Manager. See Establishing a Connection Using the Connection Manager on page 6-1 for details.
Establishing a Connection in a Cluster Environment In a MSCS cluster configuration, a single copy of data resides on a SCSI disk that is shared between cluster nodes. Data is available without users knowing which node owns a cluster resource. MSCS handles failover between nodes of the cluster. By adding Storage Mirroring to a cluster environment, you can further protect your data by including it in a replication set and then using a MSCS-capable resource to control transmission of the data to the target.
2. If your target is a cluster, create a virtual server (including resources for an IP address, network name, and physical disk) on the target cluster. With this configuration, if there is a source failure, the data will be available for the users from the target cluster, regardless of which node is currently in control. MSCS will handle failover between the nodes of the target cluster. Storage Mirroring will handle failover between the source (cluster or standalone) and the target cluster.
4. If your source is a cluster, you need to create a duplicate replication set on each of the other nodes in the cluster. Because the other nodes do not currently own the files, you will not be able to browse to select the data like you did on the first node. Therefore, you will have to manually enter the replication set data. NOTE: As an alternative to the following manual steps, you can stop the Storage Mirroring service on the other nodes of the source cluster, copy the file DblTake.
5. On your cluster (source and/or target), you need to disable the standard Storage Mirroring connection controls so that the MSCS resource that you will be configuring later can control the Storage Mirroring connections. a. In the Management Console, right-click a node of the source cluster and select Properties. b. Select the Setup tab. c. By default, the Automatically Reconnect During Source Initialization check box will be selected. Disable this option by clearing the check box. d.
f. Specify your Storage Mirroring connection parameters. Replication Set—Select the Storage Mirroring replication set that you want to use. If the replication set you want to use is not listed, click Update List to refresh the list of replication sets from the source. Double-Take Target—Specify the name or IP address of the target. If your target is a cluster, this is the virtual name or virtual IP address of the virtual server you created on the target cluster.
h. Specify your Storage Mirroring bandwidth limiting parameters. No Bandwidth Limit—Data will be transmitted using all available bandwidth. Fixed Bandwidth Limit—Data will be transmitted according to the user-specified bandwidth configuration. By default, the Unlimited checkbox is enabled. This configuration is identical to selecting No Bandwidth Limit. If you want to limit your bandwidth usage, clear this checkbox.
Simulating a Connection Storage Mirroring offers a simple way for you to simulate a connection in order to generate statistics that can be used to approximate the time and amount of bandwidth that the connection will use when actively established. This connection uses the TDU (Throughput Diagnostics Utility), which is a built-in null (non-existent) target to simulate a real connection. No data is actually transmitted across the network.
Establishing the simulated connection After you have created a replication set, you can establish the simulated connection through the Connection Manager by connecting the replication set to the TDU. 1. Opening the Connection Manager to establish the connection. Highlight the replication set and select Tools, Connection Manager. Right-click on the replication set and select Connection Manager. 2. The Connection Manager opens to the Servers tab.
Managing Connections A unique connection ID is associated with each Storage Mirroring connection. The connection ID provides a reference point for each connection. The connection ID is determined by sequential numbers starting at one (1). Each time a connection is established, the ID counter is incremented. It is reset back to one each time the Storage Mirroring service is restarted.
Monitoring connections When a source is highlighted in the left pane of the Management Console, the connections and their statistics are displayed in the right pane. Additionally, colors and icons are used for the connections, and the Storage Mirroring servers, to help you monitor your connections. Review the Connection Statistics and Connection and Server Display tables for statistics and status descriptions. (Statistics marked with an asterisk (*) are not displayed, by default.
Statistic Mirror Status Description Idle—Data is not being mirrored to the target machine. Paused—Mirroring has been paused. Percentage Complete—If the file size of the replication set has been calculated and the data is being mirrored to the target machine, the Mirror Status will display the percentage of the replication set that has been sent. Waiting—Mirroring is complete, but data is still being written to the target. Restoring—Data is being restored from the target to the source.
Statistic Description Queued Mirror (Ops) * The queue mirror (ops) statistic is the total number of mirror operations in the queue. Sent Mirror (Bytes) The sent mirror (bytes) statistic is the total number of mirror bytes that have been transmitted to the target. Sent Compressed Mirror (Bytes) * The sent compressed mirror (bytes) statistic is the total number of compressed mirror bytes that have been transmitted to the target.
Connection and Server Display Location Icon or Color Icons and colors displayed in the right pane when a server is highlighted in the left pane Description A green checkmark on a connection indicates the connection is working properly. A red X on a connection indicates a connection error. For example, an error may be caused by broken transmission or pending replication. To determine the exact problem, locate the connection data item that appears in red.
Location Left pane icon Icon or Color Description An icon with yellow and blue servers indicates a server that is working properly. A hammer over a server indicates an activation code violation. Check the Storage Mirroring log or Event messages for more information. A red X on a server icon indicates the Management Console cannot communicate with that server or that is a problem with one of the server’s connections. If the connection background is gray, it is a communication issue.
Monitoring the message window In addition to the statistics and status shown in the Management Console, you can also open a message window to view Storage Mirroring processing alerts. These alerts include notifications, warnings, and errors. NOTE: The standard appearance of the message window is a white background. If your message window has a gray background, the window is inactive.
Message Window Control Pause/ Resume Description Toolbar Icon Pauses and resumes the message window. Pausing prevents new messages from being displayed in the message window so that you are not returned to the bottom of the message window every time a new message arrives. The messages that occur while the window is logged are still logged to the Storage Mirroring log file. Resuming displays the messages that were held while the window was paused and continues to display any new messages.
Queuing Storage Mirroring data During the Storage Mirroring installation, you identified the amount of disk space that can be used for Storage Mirroring queuing. Queuing to disk allows Storage Mirroring to accommodate high volume processing that might otherwise fill up system memory. For example, on the source, this may occur if the data is changing faster than it can be transmitted to the target, or on the target, a locked file might cause processing to backup.
Configuring queuing You should configure queuing on both the source and target. 1. Right-click the server on the left pane of the Management Console and select Properties. 2. Select the Queue tab. 3. Specify the Folder where the disk queue will be stored. Storage Mirroring displays the amount of free space on the volume selected. Any changes made to the queue location will not take effect until the Storage Mirroring service has been restarted on the server.
4. Specify the Maximum system memory for queue. This is the amount of Windows system memory, in MB, that will be used to store data in queues. When exceeded, queuing to disk will be triggered. This value is dependent on the amount of physical memory available but has a minimum of 32 MB. By default, 128 or 512 MB of memory is used, depending on your operating system. If you set it lower, Storage Mirroring will use less system memory, but you will queue to disk sooner which may impact system performance.
Configuring automatic reconnections While disk queues are user configurable and can be extensive, they are limited. If the amount of disk space specified for disk queuing is met, additional data could not be added to the queue and data would be lost. To avoid any data loss, the auto-disconnect and auto-reconnect processes occur. Exhausted queues on the source—If disk queuing is exhausted on the source, Storage Mirroring will automatically start disconnecting connections.
Configuring compression To help reduce the amount of bandwidth needed to transmit Storage Mirroring data, compression allows you to compress data prior to transmitting it across the network. In a WAN environment this provides optimal use of your network resources. If compression is enabled, the data is compressed before it is transmitted from the source. When the target receives the compressed data, it uncompresses it and then writes it to disk.
Blocking target paths You can block writing to the paths on the target that contain the copy of the replication set data. This keeps the data from being changed outside of Storage Mirroring processing. To block the replication set data paths on the target, right-click the connection on the right pane of the Management Console and select Block Target Path(s). To unblock the paths, right-click the connection and deselect Block Target Path(s).
Mirroring and Replication Mirroring and replication are the key components of Storage Mirroring. This chapter contains information on the following mirroring and replication capabilities.
File Differences Mirror Options Compared Server Properties Source Taba Block Checksum All ( ) ( ) ( ) Connection Manager Mirroring Tab or Start Mirror Dialog File Differences Only if Source is Newer Action Performed Block Checksum Any file that is different on the source and target based on the date, time, and/or size is transmitted to the target. The mirror sends the entire file.
Controlling an automatic mirror In certain circumstances, for example if the disk-based queues on the source are exhausted, Storage Mirroring will automatically disconnect connections (called auto-disconnect) and then automatically reconnect them (called auto-reconnect). In order to ensure data integrity on the target, Storage Mirroring will perform an automatic mirror (called an auto-remirror) after an auto-reconnect. NOTE: Auto-remirror is a per source option.
NOTE: Database applications may update files without changing the date, time, or file size. Therefore, if you are using database applications, you should use the File Differences with checksum or Full option. See the table File Differences Remirror Options Compared on page 11-4 for a comparison of how the file difference remirror settings work together, as well as how they work with the global checksum setting on the Source tab of the Server Properties. 5. Click OK to save the settings.
Configuring customized mirroring scripts You can customize your mirroring process by running customized scripts on the target at predefined points in the mirroring process. Scripts may contain any valid Windows command, executable, batch, or script file. The scripts are processed using the same account running the Storage Mirroring service, unless you provide specific credentials on the Server Properties Script Credentials tab for the target server. There are three types of mirroring scripts.
Configuring and removing orphan files An orphan file is a file that exists in the target’s copy of the replication set data, but it does not exist in the source replication set data. An orphan file can be created when you delete a file contained in the source replication set while there is no Storage Mirroring connection. For example, if a connection was made and a mirror was completed and then the connection was stopped and a file was deleted on the source, an orphan file will exist on the target.
3. Specify if you want to log the name of the orphan files to the Storage Mirroring log file on the target by marking Log Orphaned Files to Target Log. 4. By default, the orphan files feature is disabled. To enable it, mark Move/Delete Orphan Files. 5. Specify if you want to Delete Orphaned Files or Move Orphaned Files to a different location. If you select the move option, identify the location where these orphan files will be located.
Verification Verification is the process of confirming that the data on the target is identical to the data on the source. Verification creates a log file detailing what was verified as well as which files are not synchronized. If the data is not the same, Storage Mirroring can automatically initiate a remirror. The remirror ensures data integrity between the source and target.
Scheduled verification Verification can be scheduled to occur automatically at periodic intervals. 1. Right-click the connection on the right pane of the Management Console and select Connection Manager. 2. Select the Verify tab. 3. Specify when you want to start the initial verification. Select the immediate date and time by clicking Now, or enter a specific Date and Time. The down arrow next to Date displays a calendar allowing easy selection of any date. Time is formatted for any AM or PM time. 4.
Verification log A verification log is created on the source during the verification process. The log identifies what is verified as well as which files are not synchronized. 1. Right-click the source server on the left pane of the Management Console and select Properties. 2. Select the Logging tab. 3. At the top of the window, Folder identifies the location where the log files identified on this tab are stored.
Sample Verification Log --- VERIFICATION OF CONNECTION 2 (Sales data for alpha --> 206.31.65.40 : 1100) --Start Time: 1/24/2008 12:15:20 PM for connection 2 (Sales data for alpha --> 206.31.65.40 : 1100) File: beta\users\bob\budget.xls DIFFERENT ON TARGET Source Attributes: Timestamp = 1/17/2008 8:21:36 PM Size = 1272 Mask = [0x20] Target Attributes: Timestamp = 1/17/2008 8:21:36 PM Size = 1272 Mask = [0x20] Security descriptors are different. 0 BYTES OUT OF SYNC File: File: beta\users\bill\timesheet.
e. Select Bin and the hexadecimal number will change to the binary equivalent. f. Pad the beginning of the binary equivalent with zeroes (0) so that the number is 16 digits long. For example, hexadecimal number 23 converts to 100011, so the 16-digit binary equivalent would be 0000000000100011. 3. Determine what number appears in each position of the binary number. Because binary numbers count from right to left, start with position 1 on the right.
Data Transmission Storage Mirroring data is continuously transmitted to the target machine. Although the data may be queued if the network or target machine is slow, the default transmission setting is to transmit the data as soon as possible. You can modify the tranmission to suit your environment. Manual transmission control—You can maintain the source/target connection, but still control the transmission of data across the network by using the manual transmission controls.
Scheduling transmission criteria Using the Connection Manager Transmit tab, you can set start and stop criteria along with a schedule window. NOTE: Storage Mirroring checks the schedule once every second, and if a user-defined criteria is met, transmission will start or stop, depending on the option specified. Any replication sets from a source connected to the same IP address on a target will share the same scheduled transmission configuration. 1.
Session Interval—This option begins transmitting Storage Mirroring data at specified intervals of time. This option is used in conjunction with Transmission session start. For example, if the Session Interval is set to repeat transmission every 30 minutes and the Transmission session start is set to begin transmitting at 10 p.m., if the queue is emptied at 10:20 the transmission will stop. The start criteria is again met at 10:30 and Storage Mirroring will begin transmitting any new data in the queue.
Byte Limit—The byte limit specifies the maximum number of bytes that can be sent before ending the transmission session. When the byte limit is met, Storage Mirroring will automatically stop transmitting data to the target. Any data that still remains waits in the source queue until the transmission is restarted. When used in conjunction with a session start option, you can explicitly define how much data is being sent at a given time.
Setting bandwidth limitations Bandwidth limitations are available to restrict the amount of network bandwidth used for Storage Mirroring data transmissions. The network administrator specifies a percentage of bandwidth that is available or an absolute bandwidth limit for Storage Mirroring transmissions and Storage Mirroring never exceeds that allotted amount. The bandwidth not in use by Storage Mirroring is available for all other network traffic. You can schedule when you want bandwidth limiting to occur.
b. To limit the bandwidth usage, enter the maximum amount of data you want to transfer per second. You can indicate it by specifying your Connection Speed and the Percentage of the bandwidth that you want to use or by entering the Transfer Rate value directly. 6. If you want to transmit data according to a schedule using limited bandwidth, select Scheduled Bandwidth Limit. a. Click New Event to create a bandwidth schedule event. 1. Specify a name for the bandwidth schedule event. 2.
Snapshots A snapshot is an image of data taken at a single point in time. Snapshots allow you to view files and folders as they existed at points of time in the past, so you can, for example, recover files that were accidentally deleted or overwritten. You could also compare a current revision of a file with an older revision. Storage Mirroring utilizes snapshot functionality by allowing you to create snapshots of the replicated data stored on the Storage Mirroring target.
Understanding when to take a snapshot A snapshot may not necessarily be useful if the data on the target is in a bad state. You only want snapshots of data that is in a good state. Therefore, you need to understand when the data is in a good or bad state. Action State Description Automatic Action Taken for Scheduled and Automatic Snapshots User Interaction Required for Manual Snapshots Mirror Started Bad Mirroring has started, but is not complete.
Action Target Restarted without Connection Persistance State Bad Automatic Action Taken for Scheduled and Automatic Snapshots Description An automatic snapshot will be taken after the target restarts, if the target data was in a good state prior to the target restart and the connection is configured to auto-remirror on auto-reconnect. The target service has been restarted and was unable to persist connection information, therefore, operations that were in the queue have been lost.
failure. However, if your source is an application server and an operation has been dropped, that one file could cause the application not to start on the target in the event of a failure. In these cases, manual snapshots of a bad state depend on the context of your environment. If you are using the Management Console, check the Target Data State column to see the current state of the data on the target.
Scheduled snapshots You can schedule snapshots of your target data to fit your environment and needs. If the target data is in a bad state at the time of a scheduled snapshot, the snapshot will be delayed until the data on the target reaches a good state. If multiple scheduled snapshots are delayed, only one snapshot will be taken when the data reaches a good state. 1. Right-click the connection on the right pane of the Management Console and select Connection Manager. 2. Select the Snapshot tab.
Archiving Storage Mirroring Archiving Option is an add-on feature of Storage Mirroring that allows you to archive files on your source. By archiving files, you can move the contents of a file from the source to the target leaving only a placeholder file, called a link, on the source. This link file on the source is a pointer to the full contents of the file located on the target. When a file is accessed on the source, the full contents are recalled from the target.
Important archiving requirements and information Review the following requirements and caveats before using the archiving functionality. To access the archiving functionality, your source and target must each have a Storage Mirroring Archiving Option add-on activation code. The archive preview report is available for Storage Mirroring users who do not have an Archiving Option license, to help you see the benefits of Archiving Option.
You must configure you anti-virus software so that the Storage Mirroring application is a low-risk process. Configure the low-risk processes so that they do not scan when writing to or reading from the disk. If you need assistance configuring your anti-virus software, see your virus software documentation. Note that your anti-virus software may refer to archived files differently (for example, offline, migrated, or sparse files). Storage Mirroring will not archive the following file types.
Archiving security configuration Before you can use Storage Mirroring Archiving Option, you must establish a specific security configuration. This is a six step process. 1. Confirm Storage Mirroring is installed on both the source and target with a Storage Mirroring Archiving Option activation code. 2. Create a new service account. (A service account is a user account that is created explicitly to provide security context for a service.) From Active Directory Users and Computers, create a new user.
Archiving report To help you plan archiving and fine-tune your archive settings, you can generate a preview report. The archiving preview report does not actually archive any data but reports how much data would be archived based on the settings you select. The archive preview report is available for Storage Mirroring users who do not have an Archiving Option license, to help you see the benefits of Archiving Option. 1.
Manual archiving Archiving can be performed manually anytime after an initial mirror and when another mirror is not in progress. You can archive files and folders in your replication set, or you can archive groups of files in your replication set based on archive criteria. Individual archiving—To archive files or folders individually, use the following steps. 1. In the left pane of the Management Console, select the replication set that contains the files or folders that you want to archive. 2.
Scheduled archiving Archiving can be scheduled to occur automatically at periodic intervals. 1. Right-click the connection on the right pane of the Management Console and select Connection Manager. 2. Select the Archive Schedule tab. 3. To enable scheduled archiving, enable Automatically run archiving tasks on a schedule. 4. Specify the criteria that you want to apply to your replication set data.
Archive options You have one archiving option available, and you can also validate the recall process. 1. Right-click the connection on the right pane of the Management Console and select Connection Manager. 2. Select the Archive Options tab. 3. Select your Archive Bin Location. You have the choice of putting your archived files on the target on the same volume location as they are on the source, or you can place all of the archived files from all volumes on the source on one volume on the target.
Recalling files from the target When a file has been archived, the link file is still accessible on the source. The link file has an offline file attribute associated with it. When an end-user attempts to access the link file, the contents of the file are recalled from the target back to the source. The file opens to the end-user as if it had always been fully on the source. NOTE: If a link file is moved to a different volume on the source, the file will be recalled and moved.
Restoration for Disaster Recovery If you are not using failover and your connection is for disaster recovery, the Management Console provides an easy method for restoring replicated data from the target back to the original source or to a new source server. You are only required to input the original source, the target, and the name of the replication set you want to restore. Storage Mirroring handles the rest, including selecting the files in the replication set and restoring them to the correct location.
7. Select the Use Backup Replication Set check box to use the target’s copy of the replication set database for the restoration. If this check box is not marked, you will be accessing the replication set information from the source. 8. Select the Restore Replication Set check box to restore the target’s copy of the replication set database to the source during the restoration process. 9. Select the restoration conditionals that you want to use.
Link Restore Archive Tab Current Mix Restore Block Checksum Backup Copy Newer Overwrite Existing Servers Tab What happens to files that were links on the source? What happens to files that were not links on the source? Only those links files that are newer on the target and different based on a block checksum comparison will be overwritten by link files from the target. If the link file is not newer and different, the link file will not be restored.
Failover for High Availability Failover is the process in which a target stands in for a failed source. As a result, user and application requests that are directed to the failed source are routed to the target. Storage Mirroring monitors the source status by tracking network requests and responses exchanged between the source and target. When a monitored source misses a user-defined number of requests, Storage Mirroring assumes that the machine has failed.
Configuration requirements Storage Mirroring failover can be implemented with very little configuration necessary in small or simple networks, but additional configuration may be required in large or complex environments. Because an infinite number of network configurations and environments exist, it is difficult to identify all of the possible configuration steps required for failover.
Cluster configurations If your target is a cluster, you will need to create two failover scripts. 1. On the target cluster, select Start, Program Files, Accessories, NotePad. 2. Type the following case-sensitive command. Cluster resource “IP_Address_Resource_Name” /OFFLINE Substitute the name of the IP Address resource assigned to the target virtual server. 3. Save the file as preback.bat on the shared drive of the cluster. 4. Delete that command replace it with the following case-sensitive command.
Target’s Primary WINS server—116.123.2.50 First secondary WINS server on the network—192.168.1.110 Second secondary WINS server on the network—150.172.114.74 You would add the following to your failover script to register the source’s name with the target’s IP address on the two secondary WINS servers. Sample Post-Failover Script for WINS Registration netsh wins server 192.168.1.110 add name Name=Alpha RecType=1 IP={116.123.2.47} netsh wins server 150.172.114.
DNS When Storage Mirroring failover occurs, DNS is not automatically updated. If the end-users use DNS to resolve server names and the source IP address was not failed over to the target, additional DNS updates will be required because the host records for the source will remain intact after failover. You can automate this process by scripting the DNS updates in the failover and failback scripts. You have two options for scripting the DNS updates.
Full qualified domain name of the source—Alpha.domain.com Source IP address—192.168.1.108 Fully qualified domain name of the target—Beta.domain.com Target IP address—116.123.2.47 Fully qualified domain name of the DNS server—DNSServer.domain.com DNS zone—domain.com You would add the following to your failover script to delete the host and reverse lookup entries and add new entries associating the source to the target.
k. Restart the Windows Management Instrumentation service for the changes to take effect. . 4. Add the same user account that has full control on the WMI DNS namespace to the domain’s DnsAdmins group where the source's primary DNS server is located. a. Select Start, Programs, Administrative Tools (Common), and Active Directory Users and Computers. b. Right-click the DnsAdmins group and select Properties. c.
Options Examples SETPASSWORD user_name password—Stores user credentials in an encrypted file for later use. This option must be run separately from a modify or list activity. GETPASSWORD—Retrieves previously stored user credentials. This option can only be used if the credentials were previously stored with the setpassword option. TRUSTEE trustee_name—The domain account for the source machine (domain\machine$).
Macintosh shares A share is any volume, drive, or directory resource that is shared across a network. During failover, the target can assume or add any source shares so that they remain accessible to the end users. Automatic share failover only occurs for standard Windows file system shares. Other shares, including Macintosh volumes, must be configured for failover through the failover scripts or created manually on the target. 1. On your target, set the File Server for Macintosh service to manual startup.
NFS shares A share is any volume, drive, or directory resource that is shared across a network. During failover, the target can assume or add any source shares so that they remain accessible to the end users. Automatic share failover only occurs for standard Windows file system shares. Other shares, including NFS shares, must be configured for failover through the failover scripts or created manually on the target. 1. On your target, set the NFS service to manual startup.
Configuring failover 1. The Failover Control Center can be started from within the Management Console or from the Windows desktop. From the Management Console, select Tools, Failover Control Center. From the Windows desktop, select Start, Programs, Storage Mirroring, Failover Control Center. 2. Select a failover target from the Target Machine list box. NOTE: If the target you need is not listed, click Add Target and manually enter a name or IP address (with or without a port number).
Repeat this step for each IP address that is being monitored. 9. Highlight an IP address that you have selected for monitoring and select a Monitor Interval. This setting identifies the number of seconds between the monitor requests sent from the target to the source to determine if the source is online. This option is not configurable if your Method to Monitor for Failover is set to No Monitoring. Repeat this step for each IP address that is being monitored. 10.
11. If you are monitoring multiple IP addresses, highlight the source name and specify the Failover Trigger. All Monitored IP Addresses Fail—Failover begins when all monitored IP addresses fail. If there are multiple, redundant paths to a server, losing one probably means an isolated network problem and you should wait for all IP addresses to fail. One Monitored IP Address Fails—Failover begins when any one of the monitored IP addresses fails.
Server Name—Failover is performed on the server name. If you specify the server name to be failed over, first Storage Mirroring checks the hosts file and uses the first name there. If there is no hosts file, Storage Mirroring uses the first name in DNS. (Although, the first name in DNS may not always be the same each time the DNS server is rebooted.) Lastly, if there is no DNS server, Storage Mirroring uses the Failover Control Center monitor name. Shares—Failover is performed on shares.
If you want to pass any arguments to your script, specify the arguments. If you want to delay the failover or failback processes until the associated script has completed, mark the appropriate check box. If you want the same scripts to be used as the default for future monitor sessions, mark the appropriate check box. If you want to specify a user account to run the scripts, specify the credentials for the source and target.
Editing failover configuration If you want to edit the monitor settings for a source that is currently being monitored, highlight that source on the Monitored Machines tree on the main Failover Control Center screen and click Edit. The Monitor Settings dialog box will open. Follow the instructions under Configuring failover on page 17-11.
The following table identifies how the visual indicators change as the status of failover changes. Time to Fail Countdown Source is Online Source Fails and Failover is Initiated Failover is Complete Status Bar Colored Bullets Desktop Icon Tray The Time to Fail counter is counting down and resetting each time a response is received from the source machine. The status bar indicates that the target machine is monitoring the source machine. The bullets are green.
Failover manual intervention If Manual Intervention is enabled, the Failover Control Center will prompt you when a failure occurs. NOTE: If the Failover Control Center is not running at the time the failure occurs, the manual intervention dialog box will appear the next time the Failover Control Center is started. When a failure occurs, an alert is forwarded to the Windows Event Viewer. You can then start the Failover Control Center and respond to the manual intervention prompt.
Restoration and Failback for High Availability With a high availability connection, failover occurred because the target was monitoring the source for a failure, and when a failure occurred, the target stood in for the source. User and application requests that were directed to the failed source are routed to the target. While the users are accessing their data on the target, you can repair the issue(s) on the source.
Your target is standing in for your source because of failover, and users are accessing their data from the target. Your source is back online with a unique IP address and no network name conflicts. The source and target can communicate with each other. All applications on the source are stopped. 9. From your target, confirm the Management Console is communicating with the source using the new IP address. a.
f. The Restore To and Restore From paths will automatically be populated when the replication set is selected. The restore to path is the directory that is the common parent directory for all of the directories in the replication set. If the replication set crosses volumes, then there will be a separate path for each volume. The restore from path is the path on the target server where the replicated files are located.
c. When failback is complete, the post-failback script, if configured, will be started. When the script is complete, you will be prompted to determine if you want to continue monitoring the source, do not select either option. Leave the prompt dialog box open as is. 13. Back in the Management Console, watch the restoration connection until activity has ended and replication is in a Ready state. This will happen as the final data in queue, if any, is applied on the source.
Failback then restoration Failback before restoration can be a simpler process, but it may require additional downtime. The amount of downtime will depend on the amount of data to be restored. Users must be kept off of the source and target during this entire process. 1. Resolve the problem(s) on the source that caused it to fail. Make sure in resolving the problems, that you do not bring the source on the network at this time because the target currently has the source’s identity because of failover. 2.
7. Now you can begin your restoration process. a. From the Management Console on the target, select Tools, Restoration Manager. b. Identify the Original Source machine. This is your source machine where the data originally resided. c. Select the Restore From machine. This is the target machine where the copy of the data is stored. d. Replication Set contains the replication set information stored on the target machine (the machine in Restore From).
Only if backup copy is more recent—This option restores only those files that are newer on the target than on the source. The entire file is overwritten with this option. NOTE: j. If you are using a database application, do not use the newer option unless you know for certain you need it. With database applications, it is critical that all files, not just some of them that might be newer, get mirrored.
Monitoring Tools In addition to the monitoring capabilities within the Storage Mirroring clients, you can monitor Storage Mirroring processing using other tools. Log files are generated for various Storage Mirroring components recording alerts (notifications, warnings, and errors). These log files can be viewed using a standard text viewer, and their output can be filtered using the Storage Mirroring LogViewer utility. See Log files on page 19-2.
Log files Various Storage Mirroring components (Storage Mirroring service, Management Console, Failover Control Center, and the Command Line Client) generate a log file to gather alerts, which are notification, warning, and error messages. The log files are written to disk. They can be viewed, from the location where Storage Mirroring is installed, with a standard text viewer. The log file output can be filtered using the Storage Mirroring LogViewer utility.
Viewing the log files The log files can be viewed, from the location where Storage Mirroring is installed, with a standard text viewer. Sample Storage Mirroring Service Log File 01/15/2008 14:14:18.3900 01/15/2008 14:14:18.4200 01/15/2008 14:14:18.5350 01/15/2008 14:14:18.6760 01/15/2008 14:14:18.9870 01/15/2008 14:24:15.2070 ip://206.31.4.305 01/15/2008 14:24:16.3090 01/15/2008 14:24:40.9680 01/15/2008 14:25:22.4070 01/15/2008 14:25:22.5030 ip://206.31.4.305. 01/15/2008 14:25:22.6060 ip://206.31.4.
Using LogViewer Log file output can be filtered using the Storage Mirroring LogViewer utility. Use the LogViewer command from the directory where Storage Mirroring is installed. Command LOGVIEWER Description The Storage Mirroring logging utility that records alerts (processing notifications, warnings, and errors) that occur during Storage Mirroring processing.
Log messages The following table describes some of the standard Storage Mirroring alerts that may be displayed in the log files. The ID appears in column 7 of the log file, and the message appears in column 8. NOTE: In the following table, con_id refers to the unique connection ID assigned to each connection between a source replication set and a target. ID Message 0 N/A 7 Synchronous ioctl returned STATUS_ PENDING Failed to reset Replication Flags. Replication may not be performed correctly.
ID Message Description 78 Auto-disconnect threshold has been reached. The Storage Mirroring queue has exceeded its limit, and the auto-disconnect process will disconnect the source and target connection. The auto-reconnect process will automatically reestablish the connection if the auto-reconnect feature is enabled.
ID Message Description 95 Verification ended con_id The verification process of confirming that the Storage Mirroring data on the target is identical to the data on the source has ended. 97 Restore started con_id The restoration process of copying the up-to-date data from the target back to the original source machine has started. 98 Restore completed con_id The restoration process of copying the up-to-date data from the target back to the original source machine has been completed.
ID 52000 Message Unfinished Op error Description This error message contains various Microsoft API codes. The text Code - Internal appears at the end of this message. The code value indicates why the operation failed, and the internal value indicates the type of operation that failed. The most common code values that appear in this error message are: (5) Permission denied: The account running the Storage Mirroring service does not have permission to update the file specified.
ID 600002 700000 800000 Message Unified login provides ADMIN access User user has level access (x) The source machine source_machine is not responding to a ping. Description Using the current login grants ADMIN access. The listed user has listed access level and access level ID. This occurs when all monitored IP addresses on the source machine stop responding to pings.
Windows Event Viewer In the Windows operating system, an event is a significant occurrence in the system or in an application that requires administrators to be notified. The operating system writes notifications for these events to a log file that can be displayed using the Windows Event Viewer. Three different log files are generated: system, security, and application logs. Storage Mirroring related events are sent to the application log and are available for viewing through the Event Viewer. 1.
ID Category Severity Event Message Required Response 1000 DTCounters Error An exception occurred: %1 Run the installation and select Repair. Contact technical support if this event occurs again. 1001 DTCounters Error The Double-Take counter DLL could not initialize the statistics handler object to gather performance data. Run the installation and select Repair. Contact technical support if this event occurs again.
ID Category Severity Event Message Required Response 4008 Service Info. Auto-disconnect has succeeded for %1 (%2) for Replication Set %3, ID: %4 No action required. 4009 Service Info. Auto-reconnecting Replication Set %1 to %2 (%3) No action required. 4010 Service Info. Auto-reconnect has succeeded connecting Replication Set %1 to %2 (%3) No action required.
ID Category Severity Event Message Required Response 4027 Service Info. The target has been resumed due to user intervention. No action required. 4028 Service Warning Registration of service class with Active Directory failed. Verify that the Active Directory server is up and the service has the proper permissions to update its entries. Verify that the Active Directory server is running and that the Storage Mirroring service has permission to update Active Directory.
ID Category Severity Event Message Required Response 4038 Service Error Error verifying the product code. The product functionality has been disabled. Reinstall the software, using the installation Repair option, to install a new copy of the RSResource.dll. Contact technical support if this error persists. 4039 Service Error Error while reading RSResource.dll. The product functionality has been disabled.
ID Category Severity Event Message Required Response 4050 Service Info. Service has resumed a delete orphans task to %1 (%2) for Replication Set %3, ID: %4 No action required. 4051 Service Info. Service has stopped a delete orphans task to %1 (%2) for Replication Set %3, ID: %4 No action required. 4052 Service Info. Service has completed a delete orphans task to %1 (%2) for Replication Set %3, ID: %4 No action required. 4053 Service Info.
ID Category Severity Event Message Required Response 4067 Service Error No replication ops have been received from the driver for an extended period of time. Check other messages for errors with the Storage Mirroring drivers, and correct as required. If there are no driver messages, verify that your drives are connected to the source. If this error persists, contact technical support. 4068 Service Error Failed to write to a replicating volume. Reboot the source server.
ID Category Severity Event Message Required Response 4100 System Error The versions of the driver and the filter driver do not match. Replication will not occur. Reboot your server. If this error occurs again, reinstall the software. Contact technical support if this error occurs after the software has been reinstalled. The last three Words in the Data window are the NT status code and the driver version numbers. Reboot your server. Reinstall the software if this event occurs again.
ID Category Severity Event Message Required Response 4201 Service Warning In band task %1 discarded (submitted from %2 by %3 at %4) A task may be discarded in the following scenarios: all connections to a target are manually disconnected, replication is stopped for all connections to a target, or an auto-disconnect occurs. If one of these scenarios did not cause the task to be discarded, contact technical support. 4202 Service Info.
ID Category Severity Event Message Required Response 4400 Service Error Failed to create snapshot set for source %1 (%2) Connection ID: %3. Error: %4 The snapshot could not created. This may be due to a lack of disk space or memory or another reason. The error code is the Microsoft VSS error. Check your VSS documentation or contact technical support. 4401 Service Error Failed to delete automatic snapshot set for source %1 (%2) Connection ID: %3.
ID Category Severity Event Message Required Response 5001 Service Info. Server Monitor service was successfully stopped. No action required. 5002 Service Info. Placeholders were modified to %1. No action required. 5100 Failover Info. Failover completed for %1. No action required. 5101 Failover Info. IP address %1 with subnet mask %2 was added to target machine's %3 adapter. No action required. 5102 Failover Warning %1 has reached a failover condition.
ID Category Severity Event Message Required Response 5304 Monitoring Info The application monitor script has finished successfully. No action required. 5305 Monitoring Warning The application monitor has found the %1 service stopped. Storage Mirroring Application Manager will attempt to restart the service. 5306 Monitoring Warning The application monitor has restarted the %1 service. No action required. 5307 Monitoring Error The application monitor cannot contact the server %1.
ID Category Severity Event Message Required Response 5506 Service Warning One or more required e-mail settings have not been specified (error code: %1). At a minimum, you must specify the e-mail server, the From and To addresses, and at least one type of event to include. 5507 Service Warning E-mail notification could not be initialized. Check to make sure WMI is installed and available (error code: %1). If you are using Storage Mirroring 4.4.2.1 or earlier and Windows NT 4.
ID Category Severity Event Message Required Response 8198 Resources Warning The driver registry path could not be saved. The default registry path will be used. No action required. 8200 Resources Warning The driver failed to allocate a buffer for a file name longer than 260 characters. The file will be skipped. The last Word in the Data window is the NT status code. Reboot the server and contact technical support if this event occurs again.
ID Category Severity Event Message Required Response 9105 RepKap Error The driver encountered an error querying for file security from the service input buffer. Check the Event Viewer Application log for additional service information or contact technical support. The last Word in the Data window is the exception code. Check for related service messages. Contact technical support if this event occurs again.
ID Category Severity Event Message Required Response 9112 RepKap Error The driver encountered an error writing a directory query to the service input buffer. Check the Event Viewer Application log for additional service information or contact technical support. The last Word in the Data window is the exception code. Check for related service messages. Contact technical support if this event occurs again.
ID Category Severity Event Message Required Response 9120 RepKap Error The driver encountered an error querying for file information from the service input buffer. Check the Event Viewer Application log for additional service information or contact technical support. The last Word in the Data window is the exception code. Check for related service messages. Contact technical support if this event occurs again.
ID Category Severity Event Message Required Response 10102 RepKap Error The driver could not recall the file. The last Word in the Data window is the exception code. 11000 Service Info. Service has started an archive to %1 (%2) for Replication Set %3, ID: %4 No action required. 11001 Service Info. Service has completed an archive to %1 (%2) for Replication Set %3, ID: %4, %5 No action required. 11002 Service Info.
ID Category Severity Event Message Required Response 12005 DTRecall Error Service encountered SetServiceStatus error (Error %1) Restart the Storage Mirroring Archiving Option service. Reinstall the software if this event occurs again. 12006 DTRecall Error Service could not get handle to driver for security update. (Error %1) The Storage Mirroring Archiving Option service could not connect to the Storage Mirroring archiving driver.
DTStat Statistics logging is the process of taking snapshots of Storage Mirroring statistical data. The data can be written to a file for future use. Changes to the DTStat file configuration are detected and applied immediately without restarting the Storage Mirroring service. The statistics log file created is a binary file. To view the log file, you must run DTStat from the command prompt.
Configuring the statistics file 1. Right-click a machine in the left pane of the Management Console and select Properties. 2. Select the Logging tab. 3. At the top of the tab, specify the Folder where the log files for messages, alerts, verification, and statistics will be saved. 4. Under Statistics, specify the following information: Filename—The name of the statistics log file. The default file name is statistic.sts. Maximum Length—The maximum length of the statistics log file.
Running DTStat from the command prompt From a command prompt, use the DTStat command from the location where Storage Mirroring is installed.
DTStat statistics The following statistics appear in the default statistic.sts file. NOTE: The categories you see will depend on the function of your server (source, target, or both). If you have multiple IP addresses connected to one target server, you will see multiple Target sections for each IP address. If you convert your statistics output to an ASCII, comma-delimited file using the dtstat -s option, keep in mind the following differences.
Category Kernel Target Statistic Description MirOps Generated The number of mirror operations transmitted to the target. Mirroring is completed by transmitting the file system operations necessary to generate the files on the target. This statistic indicates the number of file system operations that were transmitted during the initial mirror. It will continue to increase until the mirror is complete. Any subsequent remirrors will reset this field to zero and increment from there.
Category Target Source Connection Statistic Description Bytes In Target Disk Queue The number of bytes currently in the disk queue on the target Tasks Succeeded The number of task commands that have succeeded on the target TasksFailed The number of task commands that have failed on the target Tasks Ignored The number of task commands that have been ignored on the target auto DisConnects The number of automatic disconnects since starting Storage Mirroring.
Category Statistic Description Connection conOpsInMir Queue The number of mirror operations currently waiting to be executed on the target conBytesIn RepQueue The number of replication bytes remaining to be transmitted to the target conOpsTx The number of operations transmitted to the target. This is the total number of operations that Storage Mirroring has transmitted as a source. In other words, the cumulative number of operations transmitted by this source to all connected targets.
Windows Performance Monitor Performance Monitor is a graphical tool for measuring the performance. It provides charting, alerting, and reporting capabilities that reflect both current activity and ongoing logging. Storage Mirroring statistics are available through the Performance Monitor. 1. To access the Performance Monitor, select Programs, Administrative Tools, Performance. 2. Add data to monitor by right-clicking and selecting Add or using the add button from the toolbar. 3.
Object Statistic Description Connection Tasks succeeded The number of task commands that have succeeded on the source Kernel Activation code failures The number of activation code failures when loading the source or target, since the last time the Storage Mirroring service was restarted on the source Double-Take queue memory usage The amount of system memory in use by the Storage Mirroring queue Driver Queue Percent The amount of throttling calculated as a percentage of the stop replicating limi
Object Target a Statistic Description Orphan Bytes The number of orphan bytes removed from the target Orphan Directories The number of orphan directories removed from the target Orphan Files The number of orphan files removed from the target Retries The number of retries performed on the target since the last time the Storage Mirroring service was restarted on the target Tasks failed The number of task commands that have failed on the target.
SNMP SNMP, Simple Network Management Protocol, is the Internet's standard for remote monitoring and management of hosts, routers and other nodes and devices on a network. Storage Mirroring provides an SNMP sub-agent that monitors Storage Mirroring and can be managed from an SNMP Management Console. Storage Mirroring installs two components to work with SNMP. The sub-agent is a program that installs and runs on the same machine as Storage Mirroring and gathers statistics, data, and traps.
Object Type General Source Statistic Description dtAutoDisCount The number of auto-disconnects dtAutoReCount The number of auto-reconnects dtDriverQueue Percent The amount of throttling calculated as a percentage of the stop replicating limit dtSourceState 0—Source is not running 1—Source is running without the replication driver 2—Source is running with the replication driver.
Object Type Connection Statistic Description dtconOpsInMir Queue The number of mirror operations (create, modify, or delete) in the queue dtconBytesInRep Queue The number of bytes in the replication queue dtconBytesInMir Queue The number of bytes in the mirror queue dtconOpsTx The total number of operations (create, modify, or delete) transmitted to the target dtconBytesTx The total number of bytes transmitted to the target dtconBytes CompressedTx The total number of compressed bytes transmitt
Object Type Trap Connection dttrapConnection Pause The source to target connection has paused dttrapConnection Resume The source to target connection has resumed dttrapConnection Failed The source to target connection was not successful dttrapConnection Lost The source to target connection has been disconnected dttrapMemory LimitReached The Storage Mirroring memory pool limit has been reached dttrapMemory LimitRemedied The memory pool usage is below the maximum limit specified dttrapAuto Reco
Object Type Restoration Trap Description dttrapRestore Started Restoration has started dttrapRestore Complete Restoration is complete Replication Sets dttrapRepSet Modified Replication has been modified Failover dttrapFailover ConditionMet Manual intervention is required because failover has detected a failed source machine dttrapFailoverIn Progress Failover is occurring dttrapTargetFull The target is full 19 - 43
Server Settings Most of the Storage Mirroring server settings are located in the Management Console Server Properties dialog box. To access this dialog box, right-click a server in the left pane of the Management Console and select Properties. The Server Properties dialog box contains multiple tabs with the Storage Mirroring server settings. For information on the server settings not available through the Management Console, see the Scripting Guide.
General The General tab identifies the server. Nickname—A nickname is saved in the Management Console workspace, therefore, it only appears in the Management Console on this server. It is not communicated across the network. If you export a workspace and use it on another Storage Mirroring server, the server nickname will appear there also. Machine—This is the actual server name. This field is not modifiable.
Licensing The Licensing tab identifies the Storage Mirroring license(s) applied to the server. The display for this tab will vary depending on different licensing requirements. Activation Code—This is the Storage Mirroring license which is required on every Storage Mirroring server. There are different licenses available. Evaluation—An evaluation license has an expiration date built into the activation code. When the license expires, the software will no longer function.
Setup The Setup tab contains various setup options. Log Statistics Automatically—If enabled, Storage Mirroring statistics logging will start automatically when Storage Mirroring is started. Enable Task Command Processing—Task command processing is a Storage Mirroring feature that allows you to insert and run tasks at various points during the replication of data. Because the tasks are user-defined, you can achieve a wide variety of goals with this feature.
Full—All files are sent to the target. NOTE: Database applications may update files without changing the date, time, or file size. Therefore, if you are using database applications, you should use the File Differences with checksum or Full option.
Queue The Queue tab contains settings for Storage Mirroring queue usage. Folder—This is the location where the disk queue will be stored. Storage Mirroring displays the amount of free space on the volume selected. Any changes made to the queue location will not take effect until the Storage Mirroring service has been restarted on the server. Select a location on a non-clustered volume that will have minimal impact on the operating system and applications being protected.
Maximum system memory for queue—This is the amount of Windows system memory, in MB, that will be used to store data in queues. When exceeded, queuing to disk will be triggered. This value is dependent on the amount of physical memory available but has a minimum of 32 MB. By default, 128 or 512 MB of memory is used, depending on your operating system. If you set it lower, Storage Mirroring will use less system memory, but you will queue to disk sooner which may impact system performance.
Source The Source tab contains settings specific to the source module of Storage Mirroring. Replication Packets to 1 Mirror Packet—You can specify the ratio of replication packets to mirror packets that are placed in the source queue. Specify a larger number if you have a busy network that has heavy replication. Also, if you anticipate increased network activity during a mirror or are in a low bandwidth environment, increase this number so that the replication queue does not get too large.
will vary depending on the type of file activity and other variables. For instance, it will not affect the overall performance of large database files much (since there is a lot of data, but only a few file permissions), but may affect the performance of user files significantly (since there are often thousands of files, each with permissions). In general, the performance impact will only be noticed during mirrors since that is when the target workload is greatest.
Target The Target tab contains settings specific to the target module of Storage Mirroring. Target Mirror Capacity High Percentage—You can specify the maximum percentage of Windows system memory that can contain mirror data before the target signals the source to pause the sending of mirror operations. The default setting is 20.
Remove after the following number of days—If you are moving deleted files, you can specify a length of time, in days, to maintain the moved files. A moved file that is older than the specified number of days will be deleted. Storage Mirroring checks for moved files that should be deleted once daily at 8pm. Only the date, not the time, of the file is considered when moved files are deleted. For example, if you specify to delete moved files after 30 days, any file that is 31 days old will be deleted.
Database The Database tab identifies the Storage Mirroring database files. Folder—Specify the directory where each of the database files on this tab are stored. The default location is the directory where the Storage Mirroring program files are installed. Replication Set—This database file maintains which replication sets have been created on the server along with their names, rules, and so on. The default file name is DblTake.db.
Logging The Logging tab contains settings for various Storage Mirroring log files. Folder—Specify the directory where each of the log files on this tab are stored. The default location is the directory where the Storage Mirroring program files are installed. Messages & Alerts Maximum Length—Specify the maximum length of the client and service log files. The default size is 1048576 bytes and is limited by the available hard drive space.
Write Interval—Specify how often Storage Mirroring writes to the statistics log file. The default is every 5 minutes. Archive Preview Filename—The archive preview identifies what files would be archived based on the specified criteria. The default file name is ArchivePreview.txt. The replication set name is appended to this filename when the report is generated. Maximum Length—Specify the maximum length of the archive preview report. The default maximum length is 10485760 bytes (10 MB).
E-mail notification The E-mail Notification tab allows you to specify e-mail notification settings. When enabled, the messages logged to the Windows Event Viewer will be sent as e-mail messages to the addresses specified. The subject of the e-mail will contain an optional prefix, the server name where the Event Viewer message was logged, the Event Viewer ID, and the severity level (information, warning, or error). The text of the Event Viewer message will be displayed in the body of the e-mail message.
If desired, enable Add event description to subject to have the description of the Event Viewer message appended to the end of the subject line. This field is optional. Filter Contents—Specify which Event Viewer messages that you want to be sent via e-mail. Specify Information, Warning, and/or Error. You can also specify which Event Viewer messages to exclude based on the Event ID. Enter the Event IDs as a comma or semicolon separated list. You can indicate ranges within the list.
Error Codes You may see error codes used in the user interfaces, log files, or in response to DTCL commands, This chapter contains a complte list of Storage Mirroring error codes.
Error Code Description -131 No Storage Mirroring target identified -132 Memory is low -133 Memory is sufficient -134 Replication is pending -135 Invalid option supplied -136 Replication set rule does not exist -137 Mirror queue is full -138 Insufficient security access -139 Schedule command is invalid -140 Source path is invalid -141 Replication set is not changed -142 Insufficient source security access -143 Invalid statistics file -144 Replication set not saved -145 Connecti
Error Code Description -166 Target is no longer retrying operations -167 Restore required state is unknown -168 Not a valid failover source -169 Failover login failed -170 Feature is not supported -171 Command is not supported -172 Target queue log file error -173 Target disk is full -174 Target disk has sufficient disk space -175 Error reading from or writing to the queue log file -176 Memory-based queue is in use -177 Disk-based queue is in use -178 Restore is required -179 ID
Error Code Description -212 Failback is in progress -213 IP address placeholders on the target are unavailable -214 Target NIC was not found -215 Source module is not loaded -216 Failed to set the source state -217 Unable to ping source -218 Invalid argument -219 Recovery is busy -220 Invalid command -221 Recovery is started -222 Script failed to start -223 Script timeout met -224 No replication timeout met - connection is bad -225 Invalid path -226 Kernel module is not loaded
Error Code Description -2302 Bandwidth limiting name exists -2303 Bandwidth limit not found -2304 Bandwidth limit day is invalid -2305 Bandwidth limit lable is invalid -2401 Snapshot module is not loaded -2402 Error reading the snapshot .
Security To ensure protection of your data, Storage Mirroring offers multi-level security using native operating system security features. Privileges are granted through membership in user groups defined on each machine running Storage Mirroring. To gain access to a particular Storage Mirroring source or target, the user must provide a valid operating system user name and password and the specified user name must be a member of one of the Storage Mirroring security groups.
How Storage Mirroring security works 1. When any Storage Mirroring client machine attempts to access a source or target machine running on Windows, it will attempt to automatically logon to the source or target using the three methods below. The security credentials of the user currently logged into the Storage Mirroring client machine are sent to the Storage Mirroring source or target machine.
Clearing maintained security credentials To remove cached credentials, follow these steps. 1. To access the credentials security option, select File, Options and select the Security tab. 2. To remove the security credentials, click Clear Cached Security Credentials. 3. Click OK.
Storage Mirroring service By default, Storage Mirroring is configured to log on as the system account. If you want to select a specific account to run the service, use these instructions. 1. Modify the user account that the Storage Mirroring service is using. a. Open the Storage Mirroring service settings by selecting Start, Programs, Administrative Tools, Services and double-clicking the Storage Mirroring service. b. Select the Log On tab, select This Account and enter a valid domain account. c.
Storage Mirroring groups Storage Mirroring requires two local groups on each source and target for security. During the installation process, these groups are automatically created. The groups are assigned specific case-sensitive names: Double-Take Admin Double-Take Monitors The local administrator and the domain administrator are automatically added to the Double-Take Admin group. NOTE: If Storage Mirroring is installed on a member servers, it will use the local groups.
Windows Active Directory Active Directory, a central component of Windows, manages information about the resources in a networking environment. Active Directory strengthens network security by requiring the user account running the Storage Mirroring service to have specific privileges. Disabling Active Directory From the Management Console, select File, Options if you want to modify Active Directory registration. Under Automatic Service Discovery, you can enable or disable Active Directory Advertisement.
Index A F L activation code 20-3 Active Directory 22-6 add-ons 20-3 alternate data streams 4-3 archiving 15-1 failback 18-1 failover clusters 17-3 configurations 17-2 configuring 17-11 data 17-18 DNS 17-5 domain controllers 17-2 editing configuration 17-16 firewall 17-2 manual intervention 17-18 monitoring 17-16 NAT 17-2 overview 1-5, 17-1 removing 17-16 routers 17-2 shares Macintosh 17-9 NFS 17-10 updating 17-17 testing 17-17 WINS 17-3 Failover Control Center credentials 3-7 overview 3-7 ports 3-7 refr
O S T one-to-many configuration 1-10 one-to-one configuration 1-7, 1-8 orphan files 11-6 overview operations 1-3 product 1-1 scripts credentials 20-14 mirroring 11-5 security credentials Failover Control Center 3-7 Management Console 22-3 groups 22-5 how it works 22-2 overview 22-1 service 22-4 security by name 20-8 server properties database 20-12 e-mail notification 20-15 general 20-2 licensing 20-3 logging 20-13 network 20-5 queue 20-6 script credentials 20-14 setup 20-4 source 20-8 target 20-10 serv