Server Image Copy User’s Guide Second Edition (March 2009) Part Number: T2558-96329
© Copyright 2009 Hewlett-Packard Development Company, L.P. Hewlett-Packard Company makes no warranty of any kind with regard to this material, including, but not limited to, the implied warranties of merchantability and fitness for a particular purpose. Hewlett-Packard shall not be liable for errors contained herein or for incidental or consequential damages in connection with the furnishing, performance, or use of this material.
Table of Contents Chapter 1 Introduction .........................................................1-1 Server Image Copy and Storage Mirroring ........................................ 1-2 Resources ......................................................................................... 1-2 Chapter 2 Installing Server Image Copy ...............................2-1 Server requirements ......................................................................... 2-1 Installing or upgrading Server Image Copy ......
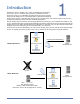
Introduction Welcome to Server Image Copy, which is dedicated to protecting your entire server. It allows you to protect a production server, known as a source, by replicating an image of the source to a target, known as the image server. The image that is replicated contains all of the source server’s data and the source server’s system state. The system state is the server’s configured operating system and the installed applications.
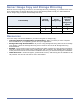
Server Image Copy and Storage Mirroring Because Server Image Copy is based on core Storage Mirroring technology, it provides some of the same functionality as Storage Mirroring. Review the following table to help you understand how Server Image Copy compares with Storage Mirroring.
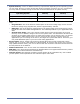
Installing Server Image Copy Review the server requirements and when your servers meet the required conditions, continue with the installation instructions. Server requirements Each server must meet minimum server requirements. Verify that each of your Server Image Copy servers meets the following requirements. Operating system for the source—Server Image Copy can protect a source server running any of the following Windows® operating system editions.
System memory—There are different memory requirements depending on the operating system you are using. Be sure you have at least the minimum amount of memory for your environment. You may want to consider having at least the recommended amount of system memory.
Installing or upgrading Server Image Copy Use these instructions to install Server Image Copy or upgrading an existing Server Image Copy installation. If you are using the same installation files as your existing Server Image Copy installation, you can modify or repair the existing installation. 1. Close any open applications. 2. Start the installation program using the appropriate instructions, depending on your media source. CD—Load the Server Image Copy CD into the local CD-ROM drive.
If you have entered an evaluation activation code, the expiration date will be displayed and you will be prompted that the source and target modules will not load after that date. Click Next to continue the installation. You must update the activation code to a valid one before the expiration date, otherwise, on the expiration date, Server Image Copy functionality will be disabled. 10. Server Image Copy relies on core Storage Mirroring to handle system memory.
Uninstalling Server Image Copy Use these instructions if you want to uninstall an existing Server Image Copy installation. If you want to use the product installation files to perform the uninstallation, you have to use the same installation files as the currently installed version. If you do not have the same installation files as the currently installed version, you will need to use the Windows Add/Remove Programs feature to uninstall the software. 1. Close any open applications. 2.
Understanding the Console The Server Image Copy console is the user interface that manages, monitors, and controls your full-server protection solutions. On the left are static navigation buttons which initiate workflows and display monitoring pages. In essence, these navigation buttons control what is displayed in the main window. When viewing the Monitor page, the main window is divided into two sections. The top pane displays overview monitoring information. The bottom pane displays detailed data.
Security credentials By default, the Server Image Copy console caches security credentials. Also by default, the cache is saved when you close the console, allowing you to reuse the credentials when you reuse the console. This setting is controlled by the Tools, Save credentials cache menu option. When the option is selected with a checkmark, the security credentials cache will be saved.
Setting Up Source Protection The Server Image Copy console makes setting up source protection easy by walking you through each of the required steps. There are also optional advanced settings that you can configure, if desired. 1. Click Protect from the left navigation pane, or select Go, Protect. If you are on the Monitor page, you can also select New activity on the toolbar and then select Protect. 2. Identify the source server that you want to protect. Server—Specify the name of the source server.
4. Identify the target image server that will store the image of the source. Server—Specify the name of the target image server. You can also click Browse to select the name from Active Directory or from a network drill-down list. User name—Specify a user that is a member of the Double-Take Admin security group on the target image server. Password—Specify the password associated with the User name you entered. Domain—If you are working in a domain environment, specify the Domain. 5.
6. By default, Server Image Copy selects your entire source for protection. It automatically excludes particular files that cannot be used during a recovery. If desired, you can exclude other files that you do not want to protect, but be careful when excluding data. Excluded volumes, folders, and/or files may compromise the integrity of your installed applications. There are some volumes, folders, and files that you will be unable to exclude, because they are required for recovery.
7. A snapshot is an image of data taken at a single point in time. Snapshots allow you to view files and folders as they existed at points of time in the past, so you can, for example, recover from cases where corrupted source data was replicated to the source image on the target image server. If desired, you can take periodic snapshots of the data on the target image server, thus protecting your source images. Enable scheduled snapshots—By default, periodic snapshots are disabled.
9. Select a location on the target image server to store the location of the source’s image. The location you specify for Path prefix will automatically have the source server name appended to it, in order to distinguish the image from other images. 10. Click Next to continue. 11. At the Protection Summary page, you can review the choices you have made and you can also set optional data transmission and e-mail notification settings.
Importing a Job You can import existing Server Image Copy jobs into the console using the following instructions. 1. From the Monitor page, select Import jobs on the toolbar. 2. Identify the import server. This is the target image server that contains the source images that you are protecting. Server—Specify the name of the target image server. You can also click Browse to select the name from Active Directory or from a network drill-down list.
Monitoring Jobs Once you have a job established or imported, you can easily monitor the status of the protection from the Monitor page. When viewing the Monitor page, the main window is divided into two sections. The top pane displays overview monitoring information, while the bottom pane displays detailed data. You can hide the details pane by clicking on the Hide details text. You can display the details pane by clicking on the Show details text.
Job Status Column Description The first unlabeled column is an icon that indicates at-a-glance the status of the job. —The black, moving circular icon indicates the console is attempting to process the job to determine the status and statistics. —The white checkmark inside a green circle indicates the job is in a good state. —The black exclamation point inside a yellow triangle indicates the job is in a warning state. —The white X inside a red circle indicates the job is in a bad state.
Detailed status Section Job properties Detailed Item Job type Job Status Time Remaining Description These detailed items display the same information as the overview status in the upper pane of the Monitor page. See the table Job Status on page 6-2 for details on these items. Source server Target server Connection properties Image Location This is the location on the target image server where the source image is stored.
Section Mirror statistics Replication statistics Detailed Item Mirror status Description Calculating—The amount of mirror data is being calculated. Mirroring—Data is being mirrored. Idle—There is no data to mirror. Verifying—Data is being verified between the source and target. Removing Orphans—Orphan files are being removed on the target. Paused—The mirror is paused. Stopped—The mirror is stopped. Unknown—The console is trying or unable to determine the mirror status.
Monitor page controls Toolbar Icon Tooltip Text Description New activity The large shield icon on the far left of the toolbar opens a small menu that lets you select an action to perform. Select Protect or Recover. Import jobs The smaller shield icon with the green circle with white plus sign allows you to launch the import jobs workflow. Stop monitoring job The smaller shield icon with the red circle with white line removes the job from the console Monitor page.
Toolbar Icon Tooltip Text Errors Description The red circle with the white X icon toggles between displaying and hiding those jobs that are in an error state. The number of jobs in the error state is also displayed on the toolbar button. To the right of all of the toolbar buttons is a summary of the number of jobs displayed by the good, warning, and error state toggle buttons. The total number of jobs available for display in this console is also displayed.
Recovering to an Existing Machine In the event the source should fail, you can use the image of the source, stored on the target image server, to quickly and easily create a new source on a physical machine or on an existing virtual machine. If you want the recovery process to automatically create a virtual machine during the recovery process, see Recovering to an Automatically Provisioned Virtual Machine on page 8-1.
Preparing your recovery server Because the recovery server becomes the original source after a recovery, the recovery server, as it exists prior to the recovery, will no longer exist after the recovery. Therefore, the recovery server is not usually an active server and will probably not have Server Image Copy installed on it. In order for the recovery process to function, Server Image Copy must be installed on the recovery server before you start the recovery process.
Recovering your data 1. There are two ways to initiate a recovery. From the Monitor page, highlight the job you want to recover and select Recover on the toolbar (the curved arrow icon). Confirm you want to recover this job and then begin with step 4. Use any of the following methods to start the recovery process and then begin with step 2. From the Monitor page, select New Activity on the toolbar (the shield icon), and then select Recover. Click Recover from the left navigation pane.
4. Select the image of the source that you want to recover. If the image is not displayed, click Browse to look for the location of the server image. Additionally, you can select an earlier snapshot of the source image if you want to recover to an earlier point-in-time. 5. Click Next to continue. 6. Identify the recovery server. This is the server that, after the recovery, will become your new source.
Server—Specify the name of the recovery server. You can also click Browse to select the name from Active Directory or from a network drill-down list. NOTE: You can select your target image server as the recovery server, but keep in mind that the image server role and any other source images will be lost. User name—Specify a user that is a member of the Double-Take Admin security group on the recovery server.
Volumes, folders, and files that are marked with a checkmark are included. If there is no checkmark, the item is excluded. Expand and collapse the directory tree and click on an item to add or remove a checkmark. Once you have configured the data to recover, click Next to continue. NOTE: The Select all and Deselect all buttons allow you to quickly select or deselect all user data on your server.
DNS Servers—Click Add and specify the IP address of a DNS server in the DNS domain. Repeat this for each DNS server in the DNS domain. If you want to remove a server, highlight the address and click Remove. IP addresses—For each IP address on the source, select an IP address on the recovery server that will take over for that source IP address. Once you have your DNS updates configured, click Test DNS to determine if your DNS updates will be successful. 12. Click Next to continue. 13.
You must correct any errors before you can enable protection. Double-click on any of the validation items to see details. Depending on the error, you may be able to click Fix or Fix All and let Server Image Copy correct the problem for you. For those errors that Server Image Copy cannot correct automatically, you will need to modify the recovery server to correct the error, or you can select a different server. You must revalidate the selected server until the validation check passes without errors.
Recovering to an Automatically Provisioned Virtual Machine In the event the source should fail, you can use the image of the source, stored on the target image server, to quickly and easily create a new source on a virtual machine that does not yet exist. Server Image Copy will automatically create the virtual machine during the recovery process. For this process to work, you must have a VMware ESX physical machine with a virtual machine, referred to in Server Image Copy as a Virtual Recovery Appliance.
2. Identify your image server that contains the image of the source you need to recover. Server—Specify the name of the target image server. You can also click Browse to select the name from Active Directory or from a network drill-down list. User name—Specify a user that is a member of the Double-Take Admin security group on the target image server. The user must also be a member of the local administrators group.
6. Identify the recovery server. This is the ESX server that will host the virtual server that, after the recovery, will become your new source. VMware ESX server host—Enable this option to recover to an automatically provisioned virtual machine hosted on an ESX server. Server—Specify the name of the ESX server. You can also click Browse to select the name from Active Directory or from a network drill-down list.
10. Choose the Virtual Recovery Appliance that will be used to create the new virtual machine. The Virtual Recovery Appliance must have both Windows and Server Image Copy installed and licensed on it. Server—Specify the name of the Virtual Recovery Appliance that exists on the ESX server.
Map replica virtual network IP to target networks—You will need to identify how you want to handle the network mapping. The Replica VM Network IP lists the IP addresses contained in the image of the original source. Map each one to a Target Network, which is a virtual network on the ESX server. Number of processors—Specify how many processors to configure on the virtual machine. The number of processors from the original source image is displayed.
Configuring Advanced Settings When configuring a protection or recovery job, you can set data transmission and e-mail notification options. For a recovery job, you can also set existing protection settings. You can access these options from the Protection Summary or Recovery Summary page of the job creation workflow. Compression To help reduce the amount of bandwidth needed to transmit Server Image Copy data, compression allows you to compress data prior to transmitting it across the network.
Route By default, Server Image Copy will select the default route for transmissions. If desired, select a different IP address on the target that will be used to receive Server Image Copy transmissions. E-mail notification E-mail notification sends specific Server Image Copy events to user-defined e-mail addresses. If you want to use e-mail notification. you will need to identify who will receive the messages, what messages they will receive, and your e-mail server configuration.
Server Setup—Specify your e-mail server configuration. Mail Server—Specify the name of your SMTP mail server. Log on to SMPT server—If your SMTP server requires a login, enable this option and specify a User name and Password. User name—Specify a user account with privileges to send e-mail messages from your SMTP server. Password—Specify the password associated with the User Name you entered.
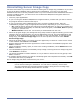
Using Firewalls If your server pairs (source and image server, image server and recovery server) are on opposite sides of a NAT or firewall, you will need to configure your hardware to accommodate Server Image Copy communications. You must have the hardware already in place and know how to configure the hardware ports. If you do not, see the reference manual for your hardware.
Server Image Copy also relies on other Microsoft Windows ports. Microsoft File Share uses ports 135 through 139 for TCP and UDP communications. Microsoft Directory uses port 445 for TCP and UDP communications. These ports must be open on your firewall. Check your Microsoft documentation if you need to modify these ports. Hardware ports You need to configure your hardware so that the Server Image Copy and Microsoft Windows ports are open.