
HP StorageWorks Storage Mirroring Reporting Center user's guide (T2558-96324, April 2009)

4 - 4
Configuring groups
You can create groups to contain nodes that represent the Storage Mirroring servers. The benefit of
creating groups is the ability to run reports against all nodes within that group.
Creating a group
To create a group:
1. Click to select a folder in the navigation tree under which you want to create a group.
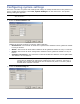
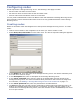
2. Select Node, New, New Group from the main menu. The Group Properties dialog box appears.
3. Enter the name of the group node in the Name field. This field is mandatory and group node
names must be unique.
4. Enter a description of the group in the Description field.
5. Click OK.
Groups appear as folders in your view. See Configuring views on page 3-5 for information about
the Storage Mirroring Reporting Center view.
Creating nodes within a group
To create nodes within a group, you can cut and paste existing nodes into the newly-created group
folder:
1. You can create new nodes inside the group folder. See Configuring nodes for more information
about creating nodes.
2. Alternatively, if you have existing nodes that you want to move into a group, select a node and
select Edit, Cut from the main menu. Select the group folder by clicking it. Select Edit, Paste
from the main menu. The node is moved from its existing location in the navigation tree to the
group folder.
Unassigning a group
To unassign a group:
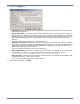
1. Select the group and select Node, Unassign Node from the main menu. The Unassign
Confirmation dialog box appears.
2. Click Yes.
Deleting a group
Unassigning a node does not delete it from Storage Mirroring Reporting Center. To delete a node, you
must delete it using the Node Editor.
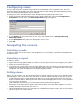
1. Select the node and select Tools, Node Editor from the main menu. The Node List dialog box
appears.
2. Click Delete. The Delete Confirmation dialog box appears.
3. Click Yes.