Replicate User’s Guide First Edition (November 2009) Part Number: T5437-96010
© Copyright 2009 Hewlett-Packard Development Company, L.P. Hewlett-Packard Company makes no warranty of any kind with regard to this material, including, but not limited to, the implied warranties of merchantability and fitness for a particul ar purpose. Hewlett-Packard shall not be liable for errors contained herein or for incidental or consequential damages in connection with the furnishing, performance, or use of this material.
Table of Contents Table of Contents 1 Storage Mirroring Replicate overview 4 TimeData continuous data protection 6 Ontrack PowerControls 7 Cargo archiving 8 Storage Mirroring Replicate requirements 9 Source server requirements 10 Repository server requirements 11 Recovery server requirements 13 TimeData requirements 15 Ontrack PowerControls requirements 16 Cargo requirements 17 Console requirements 19 Replication capabilities 20 Installation 24 Installation and upgrade notes 2
Optional protection settings 51 Compressing data for transmission for a protection job 51 Limiting bandwidth for a protection job 51 Routing transmission for a protection job 52 E-mailing repository server event messages 52 Data on the repository server 55 Viewing and retrieving data from snapshots or from a TimeData point in time 56 Viewing and retrieving Exchange data 59 Recovery 60 Installing Storage Mirroring Replicate on the recovery server 61 Recovering an entire server to an exist
Performance Monitor 158 Monitoring Performance Monitor statistics 158 Performance Monitor statistics 158 SNMP 163 Configuring SNMP on your server 163 SNMP traps 164 SNMP statistics 166 Error codes 170 Cargo archiving 177 Configuring archiving security 178 Running an archive preview report 181 Manually archiving data 183 Archiving files individually 183 Archiving groups of files based on criteria 183 Archiving data on a schedule 185 Choosing a storage location for archived files
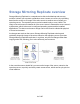
Storage Mirroring Replicate overview Storage Mirroring Replicate is a comprehensive disk-to-disk backup and recovery solution. It allows you to protect a production server, known as a source, by replicating data from the source or an image of the entire source to another server, known as a repository server. The repository server can be located locally or over a WAN.
Storage Mirroring Replicate also provides features that enhance or extend the benefits of disk-to-disk protection. ● ● ● ● TimeData continuous data protection enhances the recoverability of data by providing any-point-in-time recovery of data or entire servers. Ontrack PowerControls, an optional feature, adds Exchange data recovery allowing you to recover messages, folders, attachments, mailboxes, and so on to an Exchange Server or a .pst file.
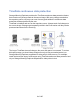
TimeData continuous data protection Storage Mirroring Replicate provides the TimeData continuous data protection feature that records every change made to the source image. With every change recorded on the repository server, recovery can occur from any point within the continuous data protection window specified by the user. TimeData is installed and runs on the repository server. It keeps track of all changes to the source image.
Ontrack PowerControls If you purchased a Storage Mirroring Replicate Repository with Ontrack PowerControls license, you can recover Exchange data including messages, folders, attachments, mailboxes, and so on to an Exchange Server or a .pst file. Ontrack PowerControls can recover Exchange data from the repository server from live data, a Storage Mirroring Replicate snapshot, or from a TimeData continuous data protection window.
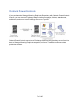
Cargo archiving Cargo reduces the amount of disk space used on a source server by identifying files on the source that have not been accessed recently and converting those files to links to the repository server. The conversion process deletes the contents of the file from the source server, creates a reparse point to the full contents of the file on the repository server, and marks the file as sparse.
Storage Mirroring Replicate requirements Each Storage Mirroring Replicate server must meet minimum requirements. Additionally, the machine where you will be running the Storage Mirroring Replicate console must also meet some basic requirements. ● ● Source server—This is the server that contains the data you will be protecting. Verify your server meets the source server requirements. Repository server—This is the server that will be protecting your source server(s).
Source server requirements This is the server that contains the data you will be protecting. ● Operating system—Storage Mirroring Replicate can protect a physical or virtual source server running any of the following operating system editions.
Repository server requirements This is the server that will be protecting your source server(s). ● Operating system—The repository server can be a physical or virtual server running any of the following operating system editions. If you are protecting an entire server, your repository server must have a same or newer operating system than the source (not including service Note: pack level). For example, you cannot protect a Windows 2008 source to a Windows 2003 repository server.
● ● ● ● ● Disk space for system state image—This is the amount of disk space on the repository server to hold the image of the source system state. You should have at least 5 GB of space on the repository server for the system state. The more applications you are running on the source, the larger the system state image will be. Therefore, you may need additional space if you source has many applications.
Recovery server requirements This is the server that will become your new source when you are recovering an entire server. This server can be an existing physical or virtual machine or Storage Mirroring Replicate can provision (automatically create) a virtual machine for you during the recovery process. ● Operating system—You have several options for your recovery server operating system.
of the original source. Since the existing virtual machine maintains its own identity, it can be reused for additional recoveries. ● System memory—There are different memory requirements depending on the system architecture you are using. Be sure you have at least the minimum amount of memory for your environment. You should consider having at least the recommended amount of system memory.
TimeData requirements In addition to the repository server requirements, the following requirements apply to the TimeData continuous data protection functionality of Storage Mirroring Replicate. ● ● ● Operating system—If your repository server is running a Windows 2003 operating system, you must have Service Pack 2 installed on the server. File system—NTFS is the only supported file system. Do no use FATx file systems on the repository server.
Ontrack PowerControls requirements Ontrack PowerControls supports recovery from the following versions of Exchange. ● Exchange Server 5.5 ● Exchange Server 2000 ● Exchange Server 2003 ● Exchange Server 2007 Ontrack PowerControls can recover from an unlimited number of Exchange servers. In addition to the repository server requirements, the storage files (.edb files) that Ontrack PowerControls will open must be accessible locally or over the network.
Cargo requirements In addition to the source and repository server requirements, the following requirements apply to the Cargo archiving functionality of Storage Mirroring Replicate. ● Operating system—The following operating system and file system requirements apply to archiving. ● ● ● ● ● ● ● ● Transactional files on Windows 2008 are not supported. Any request for a recall within a transaction will generate a sharing violation error and the recall will not occur.
● Cargo functionality—Review the following requirements, limitations, and informational notes before using the archiving feature. ● ● ● ● ● ● ● ● ● ● Archiving supports a one-to-one or many-to-one source to repository server configuration. A one-to-many protection job is not supported for archiving because if there were multiple links, the source would not know which repository server to recall from. Storage Mirroring Replicate will not archive the following file types.
Console requirements The Storage Mirroring Replicate console is used to manage your Storage Mirroring Replicate servers. ● ● Operating system—The Storage Mirroring Replicate console can be run from a source or repository server. It can also be run from a Windows XP or Vista machine. Microsoft .NET Framework—Version 3.5 Service Pack 1 is required to run the console.
Replication capabilities Storage Mirroring Replicate replicates file and directory data stored on any Windows file system (FAT, FAT32, NTFS4, and NTFS5). Replicated items also include Macintosh files, compressed files, NTFS attributes and ACLs (access control list), dynamic volumes, files with alternate data streams, sparse files, and encrypted files. Files can be replicated across mount points, even though mount points are not created on the repository server.
a. Alternate data streams are not included in the protection job size calculation. Therefore, you may see the mirror process at 100% complete while mirroring continues. b. The number of files and directories reported to be mirrored will be incorrect. It will be off by the number of alternate streams contained in the files and directories because the alternate streams are not counted. This is a reporting issue only. The streams will be mirrored correctly. c.
the amount of data contained in the mount point. b. Recursive mount points are not supported. If you select data stored on a recursive mount point, mirroring will never finish. 7. Storage Mirroring Replicate supports transactional NTFS (TxF) write operations, with the exception of TxF SavePoints (intermediate rollback points). a. With transactional NTFS and Storage Mirroring Replicate mirroring, data that is in a pending transaction is in what is called a transacted view.
The link pointing to the file/folder/volume is not mirrored or replicated to the target. 9. Short file names are not supported on FAT file systems.
Installation Review the Storage Mirroring Replicate requirements and Installation and upgrade notes before beginning your installation. You have the following installation options available. ● ● ● ● ● Installing or upgrading Storage Mirroring Replicate—Use these instructions to install or upgrade Storage Mirroring Replicate using the installation wizard.
Installation and upgrade notes Review the following installation and upgrade notes before beginning your installation or upgrade. ● ● ● ● ● Since Storage Mirroring Replicate installs device drivers, it is recommended that you update your Windows Recovery Disk, before installing or making changes to your servers. For detailed instructions on creating a recovery disk, see your Windows reference manuals. Make sure that you select the option to back up the registry when building the repair disks.
● Client Source Target Supported 5.2 5.1 5.0 No 5.2 5.1 5.1 or 5.2 Yes 5.2 5.2 5.0 or 5.1 No 5.2 5.2 5.2 Yes When performing a rolling upgrade, update the target server first. After the upgrade is complete, any sources will automatically reconnect to the target. Upgrade the source(s) when convenient.
Installing or upgrading Storage Mirroring Replicate Use these instructions to install Storage Mirroring Replicate or upgrading an existing Storage Mirroring Replicate installation. 1. Close any open applications. 2. Start the installation program using the appropriate instructions, depending on your media source. ● ● CD—Load the Storage Mirroring Replicate CD into the local CD-ROM drive. If auto-run is enabled, the installation program will start automatically.
source, repository server, or recovery server. The server requires an activation code for the service to run. 8. If desired, specify where the Storage Mirroring Replicate files will be installed. 9. Click Next to continue. Note: If you selected a Client Components Only installation type, continue with step 16 below. 10. You will be prompted to enter your activation code information.
17. During the installation, you may be prompted to add an exception to the Windows Firewall for Storage Mirroring Replicate. Click OK to add the port exception. If you Cancel the port modification, you will have to manually modify your firewall settings for Storage Mirroring Replicate processing. 18.
Installing Storage Mirroring Replicate automatically The Storage Mirroring Replicate installation program can accept command-line parameters which allow you to automate the installation or upgrade process by running an unattended, or silent, installation. The automatic process allows you to pass parameters through to the installation program instead of entering information manually during the installation or upgrade.
DOUBLETAKEFOLDER="C:\Program Files\StorageWorks\Storage Mirroring" QMEMORYBUFFERMAX=128 DISKQUEUEFOLDER="C:\Program Files\StorageWorks\Storage Mirroring" DISKQUEUEMAXSIZE=UNLIMITED DISKFREESPACEMIN=50 DTSERVICESTARTUP=1 PORT=6320 SET_FWPORT=Y In the sample DTSetup file, the server Alpha would use the parameters defined under the [Alpha] heading. The server Beta would use the parameters defined under the [Beta] heading. All other servers would use the configuration under the [Config] section.
Parameter Valid Values DoubleTakeFolder Any valid path specifying the location of the Storage Mirroring Replicate files QMemoryBufferMax Any integer representing the amount of system memory, in MB, to use for memory-based queuing DiskQueueFolder Any valid path to the location of the disk-based queue.
1. Create a temporary directory on the server. For example, create c:\dtinstall. 2. On the CD, locate the files in a subdirectory under \setup\hpsw that is appropriate for your architecture, either i386, x64, or IA64. Copy the files from that subdirectory to the temporary directory. 3. From a command prompt, remove the read-only attributes from the files in the temporary directory by using the command attrib *.* -r. 4. Make a backup copy of the default DTSetup.ini file in the temporary directory. 5.
8. Determine the exact file name of your setup file by using the command dir setup*.* from the mapped drive command prompt. Depending on how you received your software (CD or web), your setup file name will be named setup.exe or setup_ xxxx.exe where xxxx is four numbers that specfy the build number. For example, your setup file might be called setup.exe or setup_1352.exe. 9. Run one of the following case-sensitive commands from the mapped drive, depending on if you have setup.exe or setup_xxxx.
Installing TimeData continuous data protection 1. Depending on your Storage Mirroring Replicate installation selections, the TimeData installation may automatically launch immediately following the Storage Mirroring Replicate installation. If it did not start automatically or if you are installing it separately from the Storage Mirroring Replicate installation, start the TimeData installation program using the appropriate instructions, depending on your media source.
12. Click Next to continue. 13. At the Ready screen, click Install. 14. During the installation, you may be prompted to add an exception to the Windows Firewall for TimeData. Click OK to add the port exception. If you Cancel the port modification, you will have to manually modify your firewall settings for TimeData processing. 15. Click Finish to exit the installation program. If prompted, reboot your computer for the installation changes to complete.
Installing and configuring Ontrack PowerControls 1. Depending on your Storage Mirroring Replicate installation selections, the Ontrack PowerControls installation may automatically launch immediately following the TimeData installation. If it did not start automatically or if you are installing it separately from the Storage Mirroring Replicate installation, start the Ontrack PowerControls installation program using the appropriate instructions, depending on your media source.
Managing server licenses From the Replication Console, you can manage your server activation codes. The activation code is the Storage Mirroring Replicate license which is required on every Storage Mirroring Replicate server. The activation code is a 24 character, alpha-numeric code. You can change your activation code without reinstalling, if your license changes. There are different licenses available. ● ● ● Evaluation—An evaluation license has an expiration date built into the activation code.
5. Enter an activation code and click Add. Repeat for each activation code. 6. If you need to remove a code from the server, highlight it in the list and click Remove. 7. Click OK to save the settings.
Storage Mirroring Replicate console The Storage Mirroring Replicate console is the user interface that manages, monitors, and controls your backup solutions. To open the console, select Start, Programs, Storage Mirroring, Storage Mirroring Replicate, Storage Mirroring Replicate Console. On the left pane of the console are static navigation buttons which initiate workflows and display monitoring pages. In essence, these navigation buttons control what is displayed in the main window.
Importing a job If you need to manage or monitor a job created on another console or created by another user, you can import it into your console session using the following instructions. 1. From the Monitor page, select Import jobs on the toolbar. 2. Identify the import server. This is the repository server that contains the source images that you are protecting. ● ● ● ● Server—To import a protection job (source to repository server), specify the name of the repository server.
5. Click Finish to complete the import. The Monitor page will automatically appear with the imported job.
Clearing console security credentials By default, the Storage Mirroring Replicate console caches security credentials. Also by default, the cache is saved when you close the console, allowing you to reuse the credentials when you reuse the console. This setting is controlled by the Tools, Save credentials cache menu option. When the option is selected with a checkmark, the security credentials cache will be saved.
Source protection When protecting a source, you can protect the entire server, including the system state, which is the server's operating system and configured applications, or you can protect only specific data on the server. Use the instructions Protecting your source for both fullserver and data protection. At the end of the protection workflow, you will have an opportunity to configure optional protection settings for your protection job.
Protecting your source Use the following instructions to set up your source protection. 1. Click Protect from the left navigation pane. 2. Identify the source server that you want to protect. ● ● ● ● Server—Specify the name of the source server. You can also click Browse to select the name from Active Directory or from a network drill-down list. User name—Specify a user that is a member of the Double-Take Admin security group on the source.
● ● ● ● Server—Specify the name of the repository server. You can also click Browse to select the name from Active Directory or from a network drill-down list. User name—Specify a user that is a member of the Double-Take Admin security group on the repository server. Password—Specify the password associated with the User name you entered. Domain—If you are working in a domain environment, specify the Domain. 5. Click Next to continue. 6. Select what you want to protect on the source.
● ● Protect system state—This option protects the entire source, including the system state, which is the server's operating system and configured applications. If you select this option, you will be able to recover the entire source server. Protect selected data only—This option protects only the data you select. If you select this option, you will only be able to recover the data you select but not the entire source server. 7.
is where the system state information is stored. If desired, you can exclude other files that you do not want to protect, but be careful when excluding data. Excluded volumes, folders, and/or files may compromise the integrity of your applications. Volumes, folders, and files that are marked with a checkmark are included. If there is no checkmark, the item is excluded. Expand and collapse the directory tree and click on an item to add or remove a checkmark.
● ● ● ● ● ● Enable scheduled snapshots—By default, periodic snapshots are disabled. If desired, enable snapshots by selecting this option. Because Storage Mirroring Replicate uses the Microsoft Volume Shadow Copy service to create snapshots, your source and repository server must be using the NTFS file system.
11. Specify if you want to delete orphan files. An orphan file is a file that exists in the repository server’s copy of the data or source image, but it does not exist on the source. An orphan file can be created when a job is stopped and file is deleted on the source. Because of the stopped job, the delete operation does not get replicated to the repository server. Orphan files may also exist if files were manually copied into the repository server's copy of the data or source image. 12.
Optional protection settings When you are creating a protection job, you will have an opportunity to configure optional job settings when you get to the Protection summary workflow page. If you want to configure optional settings, click Configure next to the options section.
● ● Do not limit bandwidth—Storage Mirroring Replicate will transmit data using 100% bandwidth availability. Place this limit on the bandwidth—Enter a value in kilobytes per second to limit data transmission. This is the maximum amount of data that will be transmitted per second. Routing transmission for a protection job By default, Storage Mirroring Replicate will select a default route for transmissions. The default route is the first connection listed in the NIC binding order on the repository server.
inserted into the list of addresses. Each address is limited to 256 characters, and you can add up to 256 e-mail addresses. If you want to remove an address from the list, highlight the address and click Remove. If you want to remove all of the addresses from the list, click Clear. ● ● Notifications—Specify which events that you want to be sent via e-mail. You can select Error, Warning, and/or Information. Server Setup—Specify your e-mail server configuration.
● ● ● ● ● User name—Specify a user account with privileges to send e-mail messages from your SMTP server. Password—Specify the password associated with the User Name you entered. From Address—Specify the e-mail address that you want to appear in the From field of each Storage Mirroring Replicate e-mail message. The address is limited to 256 characters. Subject prefix—Specify default text that will appear on every Storage Mirroring Replicate e-mail message.
Data on the repository server The images that are stored on the repository server may be in various states. There is live data, snapshot data, and TimeData historical data. There may be times when you want to view or retrieve data from the repository server without recovering an entire server or all of the data you have protected. ● ● ● Live data—The live data can be easily be viewed and retrieved at any time on the repository server using standard file system tools like Windows Explorer.
Viewing and retrieving data from snapshots or from a TimeData point in time 1. Click View Point In Time from the left navigation pane. 2. Identify the repository server that is storing the source image(s). ● ● ● ● Server—Specify the name of the repository server. You can also click Browse to select the name from Active Directory or from a network drill-down list. User name—Specify a user that is a member of the Double-Take Admin security group on the repository server.
● ● ● Available images—Select the image of the source that contains the data you want to recover. If the image is not displayed, click Browse to look for the location of the server image. Snapshot—Select this option and choose a snapshot from the list to mount the data stored in that snapshot. If you did not enable snapshots or there were no snapshots taken on the repository server, there will be no snapshots in the list.
point-in-time strategy you selected will still be mounted automatically, but you will see a pop-up dialog box indicating where you can find the mount point on the repository server. 6. From Windows Explorer, retrieve files or folders as needed. If the files or folders you need are not in the snapshot or TimeData point in time, you can repeat the process multiple times to mount different snapshots or TimeData points in time.
Viewing and retrieving Exchange data 1. Start Ontrack PowerControls by selecting Start, Programs, Kroll Ontrack, Ontrack PowerControls for Storage Mirroring, Ontrack PowerControls for Exchange. 2. The Data Wizard will automatically open the first time Ontrack PowerControls is opened. If it is not opened, select File, Use Wizard. 3. Specify the storage files from your repository server that you want to browse.
Recovery In some cases, you can recover data or an entire server back to your original source. Additionally, you can use the source data or the image of a entire source, stored on the repository server, to quickly and easily create a new source server. Your new source can be an existing physical or virtual machine, or Storage Mirroring Replicate can automatically provision (create) a virtual machine during the recovery process.
Installing Storage Mirroring Replicate on the recovery server 1. Select Tools, Prepare Recovery Server. 2. Specify the recovery server information. ● ● ● ● Server—Specify the name of the recovery server. User name—Specify a user that has WMI and file share access on the server. Password—Specify the password associated with the User name you entered. Domain—If you are working in a domain environment, specify the Domain. 3. Click Install and monitor the status of the various installation tasks.
Recovering an entire server to an existing physical or virtual machine 1. There are two ways to begin the recovery process. ● ● Click Recover from the left navigation pane and identify the repository server that contains your source data that you want to recover. Click Next to continue. Highlight the data protection job on the Monitor page and select Recover from the toolbar. This automatically identifies the repository server that contains the source data that you want to recover. 2.
● ● ● Live data—Select this option to recover to the live data that is currently stored on the repository server. Snapshot—Select this option and choose a snapshot from the list to recover to the data stored in that snapshot. If you did not enable snapshots or there were no snapshots taken on the repository server, there will be no snapshots in the list. Specific time—Select this option and choose a specific date and time to recover the data from that point in time.
domain controller in your network, you must specify a local account in the local administrators group. ● ● Password—Specify the password associated with the User name you entered. Domain—If you are working in a domain environment, specify the Domain. 5. Click Next to continue. 6. By default, Storage Mirroring Replicate will Recover the entire server. If you only want to recover selected data, select Recover selected data only.
● ● LAN recovery—If your recovery server is on a LAN with your original source, the original source name and the IP address(es) will be applied to the recovery server. Specify which network adapters on the recovery server that you want to take over for the network adapters on the original source.
● ● ● Password—Specify the password associated with the user account you entered. DNS Servers—Click Add and specify the IP address of a DNS server in the DNS domain. Repeat this for each DNS server in the DNS domain. If you want to remove a server from the list, highlight the address and click Remove . IP addresses—For each IP address on the source, select an IP address on the recovery server that will take over for that source IP address. 10.
● Original Protection Job—Specify what to do with the original protection job if the original source is still online. If the original source is not running, these options will be discarded because they cannot be performed. These options are not available if the recovery server is the original source or the repository server. ● ● ● Delete the original protection job—The original protection job is stopped and then deleted.
Recovering an entire server to an automatically provisioned virtual machine on VMware ESX If you want Storage Mirroring Replicate to create a virtual machine on VMware ESX during the recovery process, you must have a VMware ESX host machine with an existing virtual machine. See Recovery server requirements for details on the requirements for the ESX machine and the existing virtual machine.
● ● ● ● Available images—Select the image of the source that contains the data you want to recover. If the image is not displayed, click Browse to look for the location of the server image. Live data—Select this option to recover to the live data that is currently stored on the repository server. Snapshot—Select this option and choose a snapshot from the list to recover to the data stored in that snapshot.
3. Click Next to continue. 4. Select the recovery server. This is the ESX server that will host the virtual machine that, after the recovery, will become your new source. ● ● ● ● ● Provision a new virtual machine for this recovery—Enable this option to recover to an automatically provisioned virtual machine hosted on an ESX server. Server—Specify the name of the ESX server. You can also click Browse to select the name from Active Directory or from a network drill-down list.
7. Click Next to continue. 8. Specify the volumes to create on the new virtual machine. ● ● ● Selected Data—This displays the amount of data, in gigabytes, currently on the source volume. Source Size—This displays the size, in gigabytes, of the volume on the source. Provisioned Volume—Specify the size, in gigabytes, of the volume to be created on the new virtual. 9. Click Next to continue. 10.
If the size of the datastore is identical to the size of the disk on original source and there is less than 20 MB of free space on that original source, you may run Note: out of disk space on the datastore due to differences in how the virtual disk block size is formatted. In this case, make sure that your datastore has at least 20 MB more disk space than the size of the disk on the original source. 11. Click Next to continue. 12.
13. Click Next to continue. 14. Configure the new virtual machine that will be created and will become the source after the recovery. ● ● ● ● VMware Console display name—By default, source name_VM will be used to create the new virtual machine display name. If desired, you can modify the name. Map replica virtual network IP to target networks—You will need to identify how you want to handle the network mapping.
● ● ● Wait for user intervention before recovery—Specify if you want to pause the recovery process after the original source image has been mirrored to the Virtual Recovery Appliance (the existing virtual machine), which allows you time to coordinate any other tasks. If you do not pause the recovery, after the mirror the Virtual Recovery Appliance will immediately unmount the disk(s), remove them, and start the new virtual machine.
need to make any changes to the selections you made, click Back to return to the previous pages. If you want to configure optional settings, click Configure. Once you have completed your configuration, click Finish to start the recovery. 19. Monitor the progress of the recovery mirror on the Monitor page. 20. When the recovery mirror has completed, the new virtual machine on the recovery server will automatically start to complete the recovery process.
Recovering an entire server to an automatically provisioned virtual machine on Hyper-V 1. There are two ways to begin the recovery process. ● ● Click Recover from the left navigation pane and identify the repository server that contains your source data that you want to recover. Click Next to continue. Highlight the data protection job on the Monitor page and select Recover from the toolbar. This automatically identifies the repository server that contains the source data that you want to recover. 2.
● ● ● Live data—Select this option to recover to the live data that is currently stored on the repository server. Snapshot—Select this option and choose a snapshot from the list to recover to the data stored in that snapshot. If you did not enable snapshots or there were no snapshots taken on the repository server, there will be no snapshots in the list. Specific time—Select this option and choose a specific date and time to recover the data from that point in time.
● Domain—If you are working in a domain environment, specify the Domain. 5. Click Next to continue. 6. Because you are creating a new virtual machine, you must Recover the entire server so that the system state from the original source can be used to create the new virtual. You can exclude volumes that you protected but do not want to recover, but be careful when excluding data. Excluded volumes may compromise the integrity of your applications. Volumes marked with a checkmark are included.
8. Click Next to continue. 9. Specify the volume and, if desired a folder, on the target server where the new virtual machine will be created. You can only select a volume that has enough free space available. 10. Click Next to continue. 11. Configure the new virtual machine that will be created and will become the source after the recovery. ● ● Hyper-V Manager display name—By default, source name_VM will be used to create the new virtual machine display name. If desired, you can modify the name.
● ● Number of processors—Specify how many processors to configure on the virtual machine. The number of processors from the original source image is displayed. Amount of memory—Specify the amount of memory to configure on the virtual machine. The amount of memory from the original source image is displayed. 12. Click Next to continue. 13. Specify your recovery shutdown options.
● Leave the original protection job running—The original protection job is not stopped or deleted. Keep in mind with this option that the data on the recovery server could become inconsistent or corrupted because the original source protection job could be transmitting data to the repository server and that data might get transmitted to the recovery server, depending on the progress of the recovery process . 14. Click Next to continue. 15.
Recovering data to an existing physical or virtual machine 1. There are two ways to begin the recovery process. ● ● Click Recover from the left navigation pane and identify the repository server that contains your source data that you want to recover. Click Next to continue. Highlight the data protection job on the Monitor page and select Recover from the toolbar. This automatically identifies the repository server that contains the source data that you want to recover. 2.
● ● ● Live data—Select this option to recover to the live data that is currently stored on the repository server. Snapshot—Select this option and choose a snapshot from the list to recover to the data stored in that snapshot. If you did not enable snapshots or there were no snapshots taken on the repository server, there will be no snapshots in the list. Specific time—Select this option and choose a specific date and time to recover the data from that point in time.
● ● Password—Specify the password associated with the User name you entered. Domain—If you are working in a domain environment, specify the Domain. 6. Click Next to continue. 7. Because you are working with data only, you will be unable to Recover the entire server. You can only recover the data you selected to protect. You can exclude files that you protected but do not want to recover, but be careful when excluding data.
● ● ● Wait for user intervention before recovery—This option is not available for data recovery. It is for full-server recovery jobs only. Shut down the source server from the original protection job—Specify if you want to shutdown the source server after the source data is mirrored to the recovery server. This option is not available if the recovery server is the original source. Original Protection Job—Specify what to do with the original protection job if the original source is still online.
previous pages. If you want to configure optional settings, click Configure. Once you have completed your configuration, click Finish to start the recovery. 13. Monitor the progress of the recovery mirror on the Monitor page.
Optional recovery settings When you are creating a recovery job, you will have an opportunity to configure optional job settings when you get to the Recovery summary workflow page. If you want to configure optional settings, click Configure next to the options section.
● ● Do not limit bandwidth—Storage Mirroring Replicate will transmit data using 100% bandwidth availability. Place this limit on the bandwidth—Enter a value in kilobytes per second to limit data transmission. This is the maximum amount of data that will be transmitted per second. Routing transmission for a recovery job By default, Storage Mirroring Replicate will select a default route for transmissions. The default route is the first connection listed in the NIC binding order on the repository server.
inserted into the list of addresses. Each address is limited to 256 characters, and you can add up to 256 e-mail addresses. If you want to remove an address from the list, highlight the address and click Remove. If you want to remove all of the addresses from the list, click Clear. ● ● Notifications—Specify which events that you want to be sent via e-mail. You can select Error, Warning, and/or Information. Server Setup—Specify your e-mail server configuration.
● ● ● ● ● User name—Specify a user account with privileges to send e-mail messages from your SMTP server. Password—Specify the password associated with the User Name you entered. From Address—Specify the e-mail address that you want to appear in the From field of each Storage Mirroring Replicate e-mail message. The address is limited to 256 characters. Subject prefix—Specify default text that will appear on every Storage Mirroring Replicate e-mail message.
Job monitoring Once a job is established you will want to monitor it. You can monitor the job directly from the Storage Mirroring Replicate console, or you can use several general monitoring tools that are available.
Monitoring a job through the Storage Mirroring Replicate console Once you have a job established or imported, you can easily monitor the status of the job from the Monitor page. When viewing the Monitor page, the main window is divided into two sections. The top pane displays overview monitoring information, while the bottom pane displays detailed data. You can hide the details pane by clicking on the Hide details text. You can display the details pane by clicking on the Show details text.
Column Description The first unlabeled column is an icon that indicates at-a-glance the status of the job. The black, moving circular icon indicates the console is attempting to process the job to determine the status and statistics. The white checkmark inside a green circle indicates the job is in a good state. The black exclamation point inside a yellow triangle indicates the job is in a warning state. The white X inside a red circle indicates the job is in a bad state.
Column Description received by the recovery server. ● Sever Recovery jobs—When the Job Type is Server Recovery, this is the name of the repository server. The image of the original source is being transmitted from the repository server and is being received by the recovery server. Target indicates which server is receiving mirror and replication data. ● ● Target ● ● Data Protection jobs—When the Job Type is Data Protection, this is the name of your repository server.
Column Description When mirroring, this is the estimated time remaining to complete the mirror. For various reasons, this calculation is an estimate. For example, Time some file components, like alternate data streams, cannot be included in Remaining mirror calculations, or the size of the data set may have changed after the mirror started. % Complete When mirroring, this is the estimated percentage of the mirror that is complete. For various reasons, this calculation is an estimate.
Section Detailed Item Description Update credentials toolbar button. For more details on error messages, review the log file on the server for additional information about processing on that machine. Job properties Time Remaining When mirroring, this is the estimated time remaining to complete the mirror. For various reasons, this calculation is an estimate.
Section Detailed Item Description Source server indicates which server is transmitting mirror and replication data. ● ● Job properties Source server ● ● Data Protection jobs—When the Job Type is Data Protection, this is the name of your source. The data from the source is being transmitted from the source and is being received by the repository server. Server Protection jobs—When the Job Type is Server Protection, this is the name of your source.
Section Detailed Item Description Target server indicates which server is receiving mirror and replication data. ● ● Job properties Target server ● ● Job properties Image Location Connection Total sent Properties data Data Protection jobs—When the Job Type is Data Protection, this is the name of your repository server. The data from the source is being transmitted from the source and is being received by the repository server.
Section Detailed Item Connection Target Properties status Description ● ● ● Connection Recovery Properties available ● ● Mirror statistics Mirror status Processing—The Target server is processing data. Paused—The Target server is paused. Yes—The mirror is complete and replication is continuing. The data or image is valid for recovery. No—The mirror is not yet complete, so the data or image is not yet valid for recovery. Calculating—The amount of mirror data is being calculated.
Detailed Item Section Description ● Replicating—Data is being replicated. ● Pending—Replication is pending. ● Stopped—Replication is stopped. ● Replication statistics Replication status ● ● Out of memory—Kernel memory has been exhausted. Watchdog—The Storage Mirroring service is not receiving replication operations from the Storage Mirroring driver. Unknown—The console is trying or unable to determine the replication status.
Toolbar Icon Tooltip Text Description you want to permanently delete the job, use the Delete job button. Resume The green triangle icon resumes the selected job. Stop The red square icon stops the selected job. The image of the source, at the time the job was stopped, is still available for recovery, but the image is no longer being updated with data changes from the source. If you want to use the job again, you must restart it using the Resume button.
Toolbar Icon Tooltip Text Description View details The paper with magnify glass icon toggles between displaying and hiding the details at the bottom of the Monitor page. OK The green circle with the white checkmark icon toggles between displaying and hiding those jobs that are in a good state. The number of jobs in the good state is also displayed on the toolbar button.
Monitoring log files Various Storage Mirroring Replicate components, for example the Storage Mirroring service and the Storage Mirroring Replicate console, generate a log file to gather alerts, which are notification, warning, and error messages. The log files are written to disk. Log File Description livewire.log This log records basic processing from the Storage Mirroring Replicate console. It can be found in the Storage Mirroring Replicate installation directory where the console is being run.
Monitoring event messages An event is a significant occurrence in the system or in an application that requires administrators to be notified. The operating system writes notifications for these events to a log that can be displayed using the Windows Event Viewer. Three different log files are generated: application, security, and system. 1. To access the Event Viewer, select Programs, Administrative Tools, Event Viewer. 2.
ID 1 2 3 4 5 1000 1001 Category Event Message Required Response This evaluation period has expired. Mirroring and replication have been stopped. To obtain a license, please contact your vendor. Contact your vendor to purchase either a single or site license. Info. The evaluation period expires in %1 day(s). Contact your vendor before the evaluation period expires to purchase either a single or site license. Info. The evaluation period has been activated and expires in %1 day(s).
ID Category Severity Event Message Required Response gather performance data. event occurs again. DTCounters Error The Double-Take counter DLL could not map shared memory file containing the performance data. Run the installation and select Repair. Contact technical support if this event occurs again. DTCounters Error The Double-Take counter DLL could not open the "Performance" key in the Double-Take section of the registry. Run the installation and select Repair.
ID Category Severity Event Message Required Response 4003 Service Info. Source service was successfully stopped. No action required. 4004 Service Info. Target service was successfully stopped. No action required. 4005 Service Info. Kernel was successfully stopped. No action required. Error Service has aborted due to Restart the Storage the following unrecoverable Mirroring service.
ID 4011 4012 Category Service Service Severity Error Warning Event Message Required Response Auto-reconnect has failed connecting Replication Set %1 to %2 (%3) Manually reestablish the replication set to target connection. %1 This is a placeholder message for many other messages. See the specific log message for additional details. This is a placeholder message for many other messages. See the specific log message for additional details. 4013 Service Info. %1 4014 Service Info.
ID 4021 4022 4023 Category Service Service Service Severity Event Message Required Response Info. Service has resumed a mirror to %1 (%2) for Replication Set %3, ID: %4 No action required. Info. Service has stopped a mirror to %1 for Replication Set %2, ID: %3, %4 No action required. Info. Service has completed a mirror to %1 %2 for No action required. Replication Set %3, ID: %4, %5 No action required. 4024 Service Info.
ID Category Severity Event Message Required Response update its entries. 4030 4031 4032 4033 4034 Service Service Service Service Service Error Reinstall the software, using the installation RSResource.dll has an Repair option, to install a unknown error. The product new copy of the functionality has been RSResource.dll. Contact disabled. technical support if this error persists. Error RSResource.dll could not be opened. The product functionality has been disabled.
ID 4035 4036 4037 4038 4039 Category Service Service Service Service Service Severity Error Error Error Error Error Event Message Required Response Error verifying the product name. The product functionality has been disabled. Reinstall the software, using the installation Repair option, to install a new copy of the RSResource.dll. Contact technical support if this error persists. Error verifying the vendor name. The product functionality has been disabled.
ID 4040 4041 4042 4043 4044 Category Service Service Service Service Service Severity Event Message Required Response The product code is illegal for this computer hardware. The product functionality has been disabled. Reinstall the software, using the installation Repair option, to install a new copy of the RSResource.dll. Contact technical support if this error persists. The product code is illegal for this operating system version. The product functionality has been disabled.
ID 4045 4046 4047 4048 4049 4050 Category Service Service Service Service Service Service Severity Event Message Required Response %1 value must be between 1025 and 65535. Using default of %2. Verify that the Storage Mirroring Replicate port value you are trying to use is within the valid range. If it is not, it will automatically be reset to the default value. This service failed to start because of a possible port conflict.
ID 4051 4052 4053 4054 4055 Category Service Service Service Service Service Severity Event Message Required Response Info. Service has stopped a delete orphans task to %1 (%2) for Replication Set %3, ID: %4 No action required. Info. Service has completed a delete orphans task to %1 (%2) for Replication Set %3, ID: %4 No action required. Info. Service has started a restore task to %1 (%2) for Replication Set %3, ID: %4 No action required. Info.
ID Category Severity Event Message Required Response %4 4061 Service Info. Service has stopped a verification task to %1 (%2) for Replication Set %3, ID: %4 No action required. No action required. No action required. 4062 Service Info. Service has completed a verification task to %1 (%2) for Replication Set %3, ID: %4 4063 Service Info. Bandwidth limit to %1 (%2) has changed to %3. Info. Bandwidth limit to %1 (%2) is now in the "%3" period at No action required. %4.
ID Category Severity Event Message Required Response 4068 Service Error Failed to write to a replicating volume. Reboot the source server. Contact technical support if this event occurs again. 4096 System Warning The registry parameter %2 is unknown. Delete the parameter and report this issue to technical support. Warning Failed to initialize WMI support. The last Word in the Data Window is the NT status code. No action required. Error The file system filter failed to load.
ID 4099 4099 4100 4100 Category System System Activation Key System Severity Event Message Warning The driver detected a hard link for a file on drive %2. Hard links are not supported. Changes to this file will not be replicated. Hard links are not supported. Error The driver failed to register with filter manager. Reboot the server and contact technical support if this error occurs again. The last Word in the Data window is the NT status code.
ID 4101 4110 4111 4112 4113 Category Activation Key Service Service Service Service Severity Event Message Required Response Error This service will not run on this device. Contact your sales representative for upgrade procedures. The activation code does not match the type of server you are attempting to run on. Contact your vendor for a new activation code or contact technical support. Warning The disk on the target is Target cannot write %1 due full.
ID 4120 4150 Category Service Service Severity Event Message Required Response Info. Target write to %1 was completed successfully after %2 retries. No action required. Error Target write %1 failed after %2 retries and will be discarded. See the event log or log files for error conditions. After correcting the problem, you should remirror or run a verify to resynchronize the changes.
ID Category Severity Event Message Required Response 4202 Service Info. Running %1 in band script: %2 (task %3 submitted from No action required. %4 by %5 at %6) 4203 Service Info. Completed run of in band script: %1 (exit code %2) 4204 Service Error Review the task and its Error running in band script: associated script(s) for %1 syntax errors. 4205 4206 4207 4300 Service Service Service Service No action required.
ID Category Severity Event Message Required Response successfully blocked If you need to block your target paths, contact technical support. 4303 Service Warning Blocking of target path: %1 failed. Error Code: %2 4304 Service Info. Target Path %1 has been successfully unblocked No action required. If you need to unblock your target paths, contact technical support. 4305 Service Warning Unblocking of target path: %1 failed.
ID 4401 4402 4403 4404 Category Service Service Service Service Severity Event Message Required Response Failed to delete automatic snapshot set for source %1 (%2) Connection ID: %3. Error: %4 The automatic snapshot could not deleted. This may be due to a lack of memory, the file does not exist, or another reason. The error code is the Microsoft Volume Shadow Copy error. Check your Volume Shadow Copy documentation or contact technical support.
ID 4405 4406 4407 4408 Category Service Service Service Service Severity Event Message Required Response Info. Removed snapshot schedule for source %1 (%2) connection %3. No action required. Info. Enabled snapshot schedule for source %1 (%2) connection %3. No action required. Info. Disabled snapshot schedule for source %1 (%2) connection %3. No action required. Warning %1 was unable to move some orphans for source %2 on connection ID %3. Check the %1 logs for further details.
ID Category Severity Event Message Required Response 5002 Service Info. Placeholders were modified to %1. No action required. 5100 Failover Info. Failover completed for %1. No action required. Info. IP address %1 with subnet mask %2 was added to target machine's %3 adapter. No action required. User intervention has been configured. Open the Failover Control Center and accept or decline the failover prompt. 5101 Failover 5102 Failover Warning %1 has reached a failover condition.
ID Category Severity Event Message Required Response 5109 Failover Error The public NIC on source machine %1 is not responding to a ping. The failover target did not receive an answer to its ping of the source machine. Eventually, a failover will result. Investigate possible errors (down server, network error, etc.). 5110 Failover Info. The %1 script "%2" is still running. No action required. 5200 Failback Info.. Failback completed for %1. No action required. Info..
ID Category Severity Event Message Required Response Storage Mirroring Recover Application Manager will attempt to restart the service. 5305 Monitoring Warning The application monitor has found the %1 service stopped. 5306 Monitoring Warning The application monitor has restarted the %1 service. No action required. Error The application monitor cannot contact the server %1. Verify the server is running. Verify available network communications with the server. Info.
ID 5501 5502 5503 Category Service Service Service Severity Event Message Required Response Warning This alert occurs if there is an unexpected error enabling e-mail notification during service startup. Check to see if any other errors related to e-mail E-mail notification could not notification have been be enabled (error code: logged. Also, check to %1). make sure the Windows Management Instrumentation (WMI) service is enabled. If neither of these apply, contact technical support.
ID 5504 5505 5506 5507 Category Service Service Service Service Severity Event Message Required Response Warning Could not load LocalRS.dll (for e-mail notification). This alert occurs if there is an error loading the resource DLL for the service. Typically, this is caused by a missing LocalRS.dll file. Reinstall the software, using the installation Repair option, to install a new copy of the LocalRS.dll. Contact technical support if this error persists.
ID 5508 5600 7106 7107 8100 Category Service Service RepDrv RepDrv RepDac Severity Event Message Required Response Warning An error occurred connecting to the WMI namespace. Check to make sure the Windows Management Instrumentation service is not disabled (error code %1). This alert occurs if there is an error with the Windows Management Instrumentation (WMI) service. Verify that you have it installed on the Storage Mirroring Replicate server and that it is enabled.
ID 8192 8192 8193 8196 8198 8200 Category Resources RepDrv System RepDrv Resources Resources Severity Event Message Required Response Error Driver failed to allocate Kernel memory. Replication is stopped and server must be rebooted for replication to continue. The last word in the data window is the tag of the allocation that failed. Reboot the server and contact technical support if this event occurs again. Error Kernel memory is exhausted. Replication is stopped.
ID Category Severity Event Message The last Word in the Data window is the NT status code. 9000 9100 9101 RepKap RepKap RepKap Required Response contact technical support if this event occurs again. Warning The driver has failed to process a rename operation. The driver will resend the rename operation. This message is Contact technical only a warning. If you support if this event receive this message occurs again. repeatedly, contact technical support.
ID 9102 9103 9104 9105 Category RepKap RepKap RepKap RepKap Severity Event Message Required Response Error The driver encountered an error writing to the service output buffer. Check the Event Viewer Application log for additional service information or contact technical support. The last Word in the Data window is the exception code. Check for related service messages. Contact technical support if this event occurs again.
ID 9106 9107 9108 Category RepKap RepKap RepKap Severity Event Message Required Response Error The driver encountered an error writing file security data to the service input buffer. Check the Event Viewer Application log for additional service information or contact technical support. The last Word in the Data window is the exception code. Check for related service messages. Contact technical support if this event occurs again.
ID 9109 9110 9111 9112 Category RepKap RepKap RepKap RepKap Severity Event Message Required Response Error The driver encountered an error writing an allocated range to the service input buffer. Check the Event Viewer Application log for additional service information or contact technical support. The last Word in the Data window is the exception code. Check for related service messages. Contact technical support if this event occurs again.
ID Category Severity Event Message Required Response Word in the Data window is the exception code. 9113 9114 9115 9116 RepKap RepKap RepKap RepKap Error The driver encountered an error querying a stream from the service input buffer. Check the Event Viewer Application log for additional service information or contact technical support. The last Word in the Data window is the exception code. Check for related service messages. Contact technical support if this event occurs again.
ID Category Severity Event Message Required Response Word in the Data window is the NT status code. 9117 9118 9119 RepKap RepKap RepKap Error The driver encountered an error querying for extended attributes from the service input buffer. Check the Event Viewer Application log for additional service information or contact technical support. The last Word in the Data window is the exception code. Check for related service messages. Contact technical support if this event occurs again.
ID 9120 9121 9122 9123 Category RepKap RepKap RepKap RepKap Severity Event Message Required Response Error The driver encountered an error querying for file information from the service input buffer. Check the Event Viewer Application log for additional service information or contact technical support. The last Word in the Data window is the exception code. Check for related service messages. Contact technical support if this event occurs again.
ID Category Severity Event Message Required Response Word in the Data window is the exception code. 9124 9125 RepKap RepKap 10000 RepHsm 10000 GeoCluster Error The driver encountered an error writing fsctl information to the service output buffer. Check the Event Viewer Application log for additional service information or contact technical support. The last Word in the Data window is the exception code. Check for related service messages. Contact technical support if this event occurs again.
ID Category Severity Event Message Required Response node interval specified for the resource. 10001 GeoCluster 10002 GeoCluster 10003 GeoCluster 10004 GeoCluster 10005 GeoCluster Info. Reconnect succeeded to node %1 for resource %2. Will be added as a possible No action required. owner when mirror is complete. Ensure that GeoCluster is running on all possible owners and that it can communicate on the public network.
ID Category Severity Event Message Required Response Warning The cluster notification thread failed to start on node %1 for resource %2. The resource should be taken offline and brought back online. 10007 GeoCluster Warning The user %1 has reverted a No action required. The snapshot for the %2 snapshot you selected resource on node %3. will be reverted. 10008 GeoCluster Warning The user %1 has discarded No action required. The queued data for the %2 queue you selected will resource on node %3.
ID Category Severity Event Message Required Response and selecting the appropriate option. Error The driver could not recall a file because it did not have a token for Contact technical impersonation. The security support if this event provider service should set occurs again. this token. The last Word in the Data window is the exception code. Error The driver could not access the file in the archive bin, due to a failed Contact technical impersonation attempt.
ID Category 11004 Service 11005 Service 11006 Service 11007 Service 11008 Service 11009 Service 11010 Service 11011 Service 12000 DTRecall Severity Event Message Warning Service has failed connection to the RepHSM driver. %1 Reboot the server or manually restart the RepHSM.sys driver. Service has aborted the archive operation. Verify the activation code on the source and target is valid for archiving. Reboot an unlicensed server. Warning Service has aborted the archive recall operation.
ID Category Severity Event Message Required Response required. 12001 DTRecall 12002 DTRecall 12003 DTRecall 12004 DTRecall 12005 DTRecall 12006 DTRecall The service failed to start. Check the user name and password for the Storage Mirroring Recall service to ensure validity. Reinstall the software if this event occurs again. Info. The service has stopped. This message indicates a system shutdown or the user stopped the Storage Mirroring Recall service. No action is required.
ID Category 12007 DTRecall 12288 RepDrv 16384 RepDrv 16385 RepDrv 16393 RepDrv 16395 Resources Severity Event Message Required Response Warning Service failed a periodic security update. (Error %1) This message refers to the Storage Mirroring Recall service. The operation will be performed every five minutes. Reinstall the software if this event occurs after five minutes. Error The driver encountered an error accessing a buffer from the service. Contact Contact technical technical support.
ID Category 16396 Resources 16400 RepDrv Severity Event Message Required Response Error The driver failed to create work queues for normal operation. This may have been caused by low system resources. Reboot the server and contact technical support if this error occurs again. The last Word in the Data window is the NT status code. Reboot the server and contact technical support if this event occurs again. Info. RepDrv has encountered an unexpected condition, usually caused by low kernel memory.
4. Select Enable notification. Note: Any specified notification settings are retained when Enable notification is disabled. 5. Specify your e-mail settings. ● ● ● ● ● Mail Server (SMTP)—Specify the name of your SMTP mail server. Log on to SMTP Server—If your SMTP server requires authentication, enable Log on to SMTP Server and specify the Username and Password to be used for authentication. Your SMTP server must support the LOGIN authentication method to use this feature.
You can test e-mail notification by specifying the options on the E-mail Notification tab and clicking Test. (By default, the test will be run from the machine where the Replication Console is running.) If desired, you can send the test message to a different e-mail address by selecting Send To and entering a comma or semicolon separated list of addresses. Modify the message text up to 1024 characters, if necessary. Click Send to test the e-mail notification. The results will be displayed in a message box.
Statistics Statistics logging is the process of taking snapshots of Storage Mirroring Replicate statistical data. The data can be written to a file for future use. Changes to the statistics file configuration are detected and applied immediately without restarting the Storage Mirroring service. The statistics log file created is a binary file. To view the log file, you must run the DTStat utility from the command prompt.
Viewing the statistics file The statistics log file created is a binary file. To view the log file, you must run the DTStat utility from a command prompt. From the directory where Storage Mirroring Replicate is installed, run the DTStat command.
specified IP address using the specified port number instead of to the local machine Examples ● DTStat -i 300 ● DTStat -p -i 300 -t AlphaStats.sts ● DTStat -f AlphaStats.sts -s AlphaStats.csv -start 02/02/2007 09:25 ● DTStat -server 206.31.4.51 1106 ● This command is not case-sensitive. ● Notes ● If no options are specified, DTStat will print the output to the screen at an interval of every one second.
Category Statistic Description Date/Time Stamp The date and time that the snapshot was taken. This is the date and time that each statistic was logged. By default, these are generated once a second, as long as there are statistics being generated. If mirroring/replication is idle, then DTStat will be idle as well.
Category Statistic Description RepBytesGenerated The number of replication bytes generated by the file system driver. This is the number of bytes generated during replication. In other words, this is roughly the amount of traffic being sent across the network that is generated by replication. It does not take into account TCP/IP overhead (headers and such). MirOpsGenerated The number of mirror operations transmitted to the target.
Category Statistic Description Kernel TargetOpenHandles The number of handles currently open on the target Kernel DriverQueuePercent The amount of throttling calculated as a percentage of the stop replicating limit Target PeerAddress The IP address of the source machine Target LocalAddress The IP address of the target machine.
Category Statistic Description Target Bytes In Target Disk Queue The number of bytes currently in the disk queue on the target Target TasksSucceeded The number of task commands that have succeeded on the target Target TasksFailed The number of task commands that have failed on the target Target TasksIgnored The number of task commands that have been ignored on the target autoDisConnects The number of automatic disconnects since starting Storage Mirroring Replicate.
Category Statistic Description The state of the active connection ● ● ● Connection conState ● ● 0—None. This indicates a connection has not been established. Statistics are still available for the source and target machines. 1—Active. This indicates that the connection is functioning normally and has no scheduling restrictions imposed on it at this time. (There may be restrictions, but it is currently in a state that allows it to transmit.) 2—Paused.
Category Statistic Description acknowledgement of receipt. Connection conOpsInRepQueue The number of replication operations currently waiting to be executed on the target Connection conOpsInMirQueue The number of mirror operations currently waiting to be executed on the target Connection conBytesInRepQueue The number of replication bytes remaining to be transmitted to the target Connection conOpsTx The number of operations transmitted to the target.
Category Statistic Description Connection conResentOpCount The number of operations resent because they were not acknowledged Connection conBytesInDiskQueue The number of bytes in the source disk queue Connection conBandwidthLimit The amount of bandwidth that may be used to transfer data Connection conBytesSkipped The number of bytes skipped during a difference mirror.
Performance Monitor Performance Monitor is the Windows graphical tool for measuring performance. It provides charting, alerting, and reporting capabilities that reflect both current activity and ongoing logging. Storage Mirroring Replicate statistics are available through the Performance Monitor. ● Monitoring Performance Monitor statistics ● Performance Monitor statistics Monitoring Performance Monitor statistics 1.
Object Statistic Description queue Connection Bytes in replication queue The number of replication bytes in the source queue Connection Bytes in mirror queue The number of mirror bytes in the source queue Connection Bytes received The number of bytes received by the target since the last Performance Monitor refresh Connection Bytes transferred The number of bytes transmitted from the source Connection Compressed bytes transferred The number of compressed bytes transmitted from the source Ope
Object Statistic Description Connection Tasks failed The number of task commands that have failed to execute on the source Connection Tasks ignored The number of task commands that have been ignored on the source Connection Tasks succeeded The number of task commands that have succeeded on the source Kernel Activation code failures The number of activation code failures when loading the source or target, since the last time the Storage Mirroring service was restarted on the source Kernel Double
Object Statistic Description Security Successful logins Number of successful login attempts since the last time the Storage Mirroring service was restarted Source Auto disconnects The number of automatic disconnects since the last time the Storage Mirroring service was restarted on the source Source Auto reconnects The number of automatic reconnects since the last time the Storage Mirroring service was restarted on the source Target Bytes in Disk Queue The number of bytes in the target disk qu
Object Statistic Description ignored on the target Target Tasks succeeded The number of task commands that have succeeded on the target 162 of 195
SNMP SNMP, Simple Network Management Protocol, is the Internet's standard for remote monitoring and management of hosts, routers and other nodes and devices on a network. Storage Mirroring Replicate provides an SNMP sub-agent that can be managed from an SNMP Management Console. Storage Mirroring Replicate installs two components to work with SNMP. ● ● The sub-agent is a program that installs and runs on the same machine as Storage Mirroring Replicate and gathers statistics, data, and traps.
SNMP traps The following table lists the Storage Mirroring Replicate SNMP traps.
Object Type Trap Description Connection dttrapConnectionFailed The source to target connection was not successful Connection dttrapConnectionLost The source to target connection has been disconnected Connection dttrapMemoryLimitReached The Storage Mirroring Replicate memory pool limit has been reached Connection dttrapMemoryLimitRemedied The memory pool usage is below the maximum limit specified Connection dttrapAutoReconnect Auto-reconnect needs to make a new connection Connection dttrapSchedu
Object Type Trap Description Mirroring dttrapMirrorResume Mirroring has resumed Mirroring dttrapMirrorEnd Mirroring has ended Verification dttrapVerificationStart Verification has started Verification dttrapVerificationEnd Verification has ended Verification dttrapVerificationFailure Verification has failed Restoration dttrapRestoreStarted Restoration has started Restoration dttrapRestoreComplete Restoration is complete Replication dttrapRepSetModified Sets Replication has been modified
Object Type Statistic Description General dtRepOpsGenerated The number of operations (create, modify, or delete) that have been transmitted by the replication process General dtRepBytesGenerated The number of bytes that have been transmitted by the replication process General dtFailedMirrorCount The number of operations that failed to mirror because they could not be read on the source General dtFailedRepCount The number of operations that failed to be replicated because they could not be read
Object Type Statistic Description Connection dtConnectionCount The number of active connections between machines Connection dtconIpAddress The IP address of the connected machine. If at the source, then the IP address of the target. If at the target, then the IP address of the source. Connection dtconConnectTime The duration of time since the connection was first established The state of the active connection ● ● ● Connection dtconState ● ● 0—None.
Object Type Statistic Description Connection dtconOpsInCmdQueue The number of operations (create, modify, or delete) in the retransmit queue on the source Connection dtconOpsInAckQueue The number of operations (create, modify, or delete) waiting for verification acknowledgements from the target Connection dtconOpsInRepQueue The number of replication operations (create, modify, or delete) in the queue Connection dtconOpsInMirQueue The number of mirror operations (create, modify, or delete) in the q
Error codes The following table contains error codes that you may see in the various user interfaces or in log files.
Error Code Description -120 Connection already connected -121 Mirror is not running -122 Replication set exists -123 Replication set does not exist -124 No replication set has been selected -125 Connection is replicating -126 Connection is not replicating -127 Replication set is enabled -128 Schedule is not defined -129 Replication set is changed -130 Replication set is in use -131 No Storage Mirroring Replicate target identified -132 Memory is low -133 Memory is sufficient -13
Error Code Description -144 Replication set not saved -145 Connection failed -146 Cleaner option is not enabled -147 Target mirror capacity high threshold is met -148 Target mirror capacity low threshold is met -149 New option applied -150 Target is restarted -151 Replication is out of memory -152 Write access is blocked on the volume -153 This error code could be one of two errors.
Error Code Description -167 Restore required state is unknown -168 Not a valid failover source -169 Failover login failed -170 Feature is not supported -171 Command is not supported -172 Target queue log file error -173 Target disk is full -174 Target disk has sufficient disk space -175 Error reading from or writing to the queue log file -176 Memory-based queue is in use -177 Disk-based queue is in use -178 Restore is required -179 ID the driver supplied to the service is invalid
Error Code Description -201 Monitor name exists -202 Monitor name does not exist -203 Monitor configuration exists -204 Monitor configuration does not exist -205 Monitor configuration is in use -206 Monitor configuration is not in use -207 Source is online -208 Source is offline -209 Server is not failed over -210 Server is failed over -211 Server is not being monitored -212 Failback is in progress -213 IP address placeholders on the target are unavailable -214 Target NIC was no
Error Code Description -225 Invalid path -226 Kernel module is not loaded -2201 Error communicating with e-mail server -2202 Error connecting to e-mail server -2203 E-mail notification is disabled -2204 E-mail notification is enabled -2205 E-mail notification requires Internet Explorer version 5.0 and WMI -2206 E-mail notification requires Internet Explorer version 5.
Error Code Description -2303 Bandwidth limit not found -2304 Bandwidth limit day is invalid -2305 Bandwidth limit lable is invalid -2401 Snapshot module is not loaded -2402 Error reading the snapshot .
Cargo archiving Before you begin archiving, you must configure specific archiving security. Once that is complete, you may want to generate a preview report to help you plan archiving and fine-tune your archive settings. When you are ready to begin archiving, you can archive files manually or you can schedule archiving for periodic intervals.
Configuring archiving security Before you can use Storage Mirroring Replicate archiving, you must establish a specific security configuration. This is a six step process. 1. Confirm Storage Mirroring Replicate is installed on both the source and repository server. 2. Create a new service account. (A service account is a user account that is created explicitly to provide security context for a service.) Follow steps a through f to create a new service account. a.
recommendation can be confusing. You want to enable the account, which means this option should not have a checkmark. If the option does have a checkmark, meaning the account would be disabled, file recalls will not function. f. Finish the account creation wizard. 3. Add the new service account to the local Administrators group on the source and repository server. 4. Add the new service account to the local Double-Take Recall group on the source and repository server. 5.
are functioning properly. Any success or failure messages will be included in the Storage Mirroring Replicate log file on the source.
Running an archive preview report To help you plan archiving and fine-tune your archive settings, you can generate a preview report. The archiving preview report does not actually archive any data but reports how much data would be archived based on the settings you select. 1. Open the Replication Console by selecting Start, Programs, Storage Mirroring, Storage Mirroring Replication Console. 2. Double-click your source machine in the left pane of the Replication Console to log on to it. 3.
percentage complete in the Mirror Status column of the Replication Console. 7. Click Preview to generate the report. While the preview report is being generated, you will see the Mirror Status column change to Archiving. When the preview report is complete, the Mirror Status column will change back to Idle. 8. After the preview report has been generated, locate and open the file from the location where Storage Mirroring Replicate is installed.
Manually archiving data Archiving can be performed manually anytime after an initial mirror and when another mirror is not in progress. You can archive individual files and folders, or you can archive groups of files based on archive criteria. Archiving files individually To archive files or folders individually, use the following steps. 1. Open the Replication Console by selecting Start, Programs, Storage Mirroring, Storage Mirroring Replication Console. 2.
● ● Archive files inactive for—This option specifies the age in days, based on the last accessed time, of the files that you want archived. Any file older than the age specified will be archived. Archive files when size meets or exceeds—This option specifies the size, in KB, of the files that you want archived. Any file equal to or larger than the specified size will be archived. 6.
Archiving data on a schedule Archiving can be scheduled to occur automatically at periodic intervals. 1. Open the Replication Console by selecting Start, Programs, Storage Mirroring, Storage Mirroring Replication Console. 2. Double-click your source machine in the left pane of the Replication Console to log on to it. 3. With the source highlighted in the left pane, locate in the right pane the Storage Mirroring protection job in the Replication Set column.
7. Specify the criteria that you want to apply to your protection job. All Archiving Criteria must be met at the time the scheduled archive is initiated for a file to be archived. ● ● ● Archive files when disk usage meets or exceeds—This option is a first level filter. If disk usage exceeds the specified percentage, Storage Mirroring Replicate will check the remaining criteria to determine if any files should be archived. If disk usage is not above the specified percentage, no archiving will occur.
Choosing a storage location for archived files on the repository server 1. Open the Replication Console by selecting Start, Programs, Storage Mirroring, Storage Mirroring Replication Console. 2. Double-click your source machine in the left pane of the Replication Console to log on to it. 3. With the source highlighted in the left pane, locate in the right pane the Storage Mirroring protection job in the Replication Set column.
one volume on the repository server. Specify One Per Volume to use the same volume structure on the source and repository server. Specify Centralized to Volume and specify a volume to use one volume on the repository server for archived files from all volumes on the source. 7. Click OK to save the settings.
Recalling archived files When a file has been archived, the link file is still accessible on the source. The link file has an offline file attribute associated with it. When an end-user attempts to access the link file, the contents of the file are recalled from the repository server back to the source. The file opens to the end-user as if it had always been fully on the source. If a link file is moved to a different volume on the source, the file will be recalled Note: and moved.
2. Double-click your source machine in the left pane of the Replication Console to log on to it. 3. With the source highlighted in the left pane, locate in the right pane the Storage Mirroring protection job in the Replication Set column. The name will be created from the source and repository server names and the keyword Protection or Data Protection. 4. Right-click the protection job in the right pane of the Replication Console and select Archiving, Recall All. 5.
Using firewalls Storage Mirroring Replicate can be used over a wide area network (WAN) through firewalls, but it does not support Network Address Translation (NAT) configurations. If your servers are on opposite sides of a firewall, you will need to configure your hardware to accommodate Storage Mirroring Replicate communications. You must have the hardware already in place and know how to configure the hardware ports. If you do not, see the reference manual for your hardware.
Storage Mirroring Replicate ports Storage Mirroring Replicate port information is stored in configuration files. By default, ports 80, 6320, 6330, and 6340 are used. If you are using TimeData continuous data protection, the default ports are 8080, 17001, 17101, 17201, and 17301. If desired you can modify some of these ports. However, not all of the ports can be modified. If you have to modify which ports are used, you will have to modify two configuration files.
d. Right-click the server in the left pane of the Replication Console and select Properties. e. On the Network tab, modify the Communications Port to match the IdentificationPort in the configuration files. f. Click OK. g. Repeat steps b through f for all of your Storage Mirroring Replicate servers. All of your Storage Mirroring Replicate servers and clients must have the same port configuration.
Microsoft Windows ports Storage Mirroring Replicate will use WMI (Windows Management Instrumentation) which uses RPC (Remote Procedure Call). By default, RPC will use ports at random above 1024, and these ports must be open on your firewall. RPC ports can be configured to a specific range by specific registry changes and a reboot. See the Microsoft Knowledge Base article 154596 for instructions. Storage Mirroring Replicate also relies on other Microsoft Windows ports.
Hardware ports You need to configure your hardware so that all of the above ports for both Storage Mirroring Replicate and Microsoft Windows are open. Since communication occurs bidirectionally, make sure you configure both incoming and outgoing traffic. There are many types of hardware on the market, and each can be configured differently. See your hardware reference manual for instructions on setting up your particular router.