HP StorageWorks Storage Mirroring for Linux Evaluation Guide First Edition (February 2008) Part Number: T2558-96079
© Copyright 2008 Hewlett-Packard Development Company, L.P. Hewlett-Packard Company makes no warranty of any kind with regard to this material, including, but not limited to, the implied warranties of merchantability and fitness for a particular purpose. Hewlett-Packard shall not be liable for errors contained herein or for incidental or consequential damages in connection with the furnishing, performance, or use of this material.
Table of Contents Chapter 1: Introduction ...........................................................................................................1-1 Evaluation guide overview .................................................................................................................................................................... 1-1 Storage Mirroring Operations .......................................................................................................................................
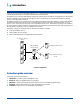
1 X Introduction Introduction Thank you for your interest in evaluating Storage Mirroring®. The purpose of this evaluation is to allow you to become familiar with the Storage Mirroring core replication and failover technology first hand. Storage Mirroring is a real-time data replication and failover software product.
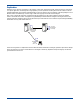
Storage Mirroring Operations Storage Mirroring performs four basic types of operations: Mirroring—The initial copy or subsequent resynchronization of selected data Replication—The on-going capture of byte-level file changes Failure monitoring and failover—The ability to monitor and stand-in for a machine, in the event of a failure Restoration—A mirror of selected data from the target back to the source Each operation is briefly described in the following sections.
Replication Replication is the real-time transmission of file changes. Unlike other related technologies, which are based on a disk driver or a specific application, the Storage Mirroring replication process operates at the file system level and is able to track file changes independently from the file’s related application. In terms of network resources and time, replicating changes is a more efficient method of maintaining a real-time copy of data than copying an entire file that has changed.
Failure monitoring/failover Failover is a process in which a target machine stands in for a failed source machine. As a result, user and application requests that are directed to the failed source machine are routed to the target machine. Storage Mirroring monitors the status of machines by tracking network requests and responses exchanged between source and target machines. When a monitored machine misses a user-defined number of requests, Storage Mirroring assumes that the machine has failed.
Restoration Restoration provides an easy method for copying replicated data from the target back to its original location on the source. The process only requires you to select the source, target, and the appropriate replication set. There is no need to select files or to remember where the data came from on the source since that information is maintained by Storage Mirroring.
2 X Resources Resources During the evaluation you have access to the same reference and online resources as licensed Storage Mirroring users. Getting Started—This reference manual is a quick reference guide for the installation and basic steps to get you going quickly with Storage Mirroring. It is available in PDF format in the /usr/share/doc/StorageMirroring directory after you have installed Storage Mirroring and on the product CD. The file is called instllnx.pdf.
3 X Storage Mirroring Setup Storage Mirroring Setup Your Storage Mirroring setup consists of multiple tasks. 1. Determining that your source and target meet the system requirements 2. Installing Storage Mirroring on the source and target 3. Configuring your Storage Mirroring installation on the source and target 4.
Configuring Your Storage Mirroring Installation After you have installed Storage Mirroring, you need to configure your installation prior to using the software. Storage Mirroring contains a DTSetup menu-driven application to provide easy access to the installation configuration. 1. Run the DTSetup command from the shell prompt. NOTE: Do not run DTSetup using the sudo command.
Troubleshooting and documentation—Use this menu option to access troubleshooting tasks and the Storage Mirroring documentation. Log file—LogViewer is a utility that gathers Storage Mirroring alerts. These alerts, which are proccessing notifications, warnings, and error messages, are written to disk and can be displayed using DTSetup or the LogViewer. Diagnostics—You may need to collect configuration data when reporting problems to technical support.
4 X Storage Mirroring Evaluation Storage Mirroring Evaluation Storage Mirroring configuration consists of creating a replication set, which defines the data on the source machine that is to be protected, and then connecting that replication set to a target machine. These two steps, creation and connection of the replication set, are the backbone of the Storage Mirroring processes.
Creating initial test data 1. Create a directory on your source server that you can use for test data. 2. Copy a significant amount (approximately 1 GB) of user data to your test directory. This will be your test data that you will be replicating to your target. NOTE: Make sure that your test data contains files that you can quickly view and edit. Creating and connecting a replication set Start the Management Console on your Windows client.
5. Specify the name of the replication set, Eval Rep Set, that you want to create. Click Next to continue. 6. A tree display appears identifying the volumes and directories available on that source machine. Select your test directory on you source. This is the data that you will be protecting for this evaluation. Click Next to continue. 7. Select the option Send all data to the same path on the target. This option keeps the directory structure on the source and target identical.
11. Click Advanced Options on the Connection Wizard summary screen, if you haven’t already done so. The Connection Wizard will close and the Connection Manager will open. Notice that there are six tabs in the Connection Manager allowing you to control various advanced aspects of Storage Mirroring. Servers—The Servers tab controls the replication set and connection options that you established in the Connection Wizard. Mirroring—The Mirroring tab controls how the mirror process will be performed.
Now that you have created a replication set on the source and connected it to the target, mirroring is initiated. Highlight your source machine on the left pane of the Management Console and you will see your connection in the right pane. For detailed information on understanding the display of the Management Console, see the Storage Mirroring User's Guide.
Monitoring the activity and completion of the initial mirror View your connection in the Management Console by highlight the source machine on the left pane. The connection will appear on the right pane. Use the horizontal scroll bar at the bottom of the right pane to view the various status columns. Pay attention to the Mirror Status column which shows the status of the mirroring operation. During the mirroring process, you will see a percentage of the mirror that has been completed.
Changing the test data to cause replication In order to test replication, you need to change the data contained in your replication set. This includes modifying existing files, creating new files, deleting files, and changing permissions and attributes. However, before changing these files, you will need to do a little bit of preparation work for the verification section. 1. Browse through the directories and files in your test directory on the source. 2.
10. Just like mirroring, you can monitor the progress of replication through the Management Console. Highlight the source machine on the left pane and the connection information will appear on the right pane. Use the horizontal scroll bar at the bottom of the right pane to view the Replication Status column. While Storage Mirroring is actively replicating, the status will be Replicating. When there is no replication activity, the status is Ready.
Verifying the changes on the target server Now that you have modified some of the files, you want to be sure that the file modifications were applied correctly. 1. Compare the directories on your source and target. Compare the directory structures and the total number of files. Look again at the four files from the previous section. Verify manually that the changes you made previously have been applied to the target copy. 2.
4. Wait until your Mirror Status has returned to Idle and then open the file DTVerify.log on your source. You will see that all of the files are reported as the same. Completion Time: 2/7/02 17:04:38:271766 Elapsed Time: 121.
Source machine and its IP addresses. Some of the failover settings are source specific and some can be set individually for each IP address on the source. Settings to configure the length of time before failover occurs Target machine information including the NIC which will assume the failover traffic and the IP addresses assigned to that NIC. Failover the IP addresses from the source to the target Allows you to insert other machines or specify an IP address instead of a machine name 6.
Monitoring failover Now that failover monitoring is configured and started, you will need to know if and when there is a problem. Since it can be essential to quickly know the status of your machines, Storage Mirroring offers various methods for monitoring the status of failover.
Initiating a failure If you want to continue with the remaining portions of this evaluation, failback and restore, then you will need to initiate a failure of your source machine. 1. Ping the source’s IP address from your client machine. 2. The Failover Control Center does not have to be running in order for failover to occur. For the purpose of this evaluation, make sure that it is running so that you can see each step of the process. 3. Disconnect the network cable on the source.
5. Highlight the failed source and click Failback. 6. You will be prompted to determine if you want the target to continue monitoring the source. Select Stop. 7. Reconnect your network cable on the source machine. Failback is now complete. If you would like, ping the source as you did in the previous section to verify that your source and target servers have reverted back to their original identities.
Restoring data These steps walk you through restoring the newer data from the target so that the source and target are again synchronized. Before beginning the restoration, you will delete one of the files on the source to confirm the restoration process. 1. Delete one of your test files from your source. 2. Open the Management Console on your client machine and double-click your target machine to log in. 3. Select Tools, Restoration Manager. 4. Select the Original Source machine.
Monitor the verification process as you did the mirror and verification. Notice that the Mirror Status column changes to Restoring while the restoration process occurs. View the status of your restoration process When the restoration is complete, the connection will automatically disconnect. After the restoration connection is disconnected, your source and target machines are synchronized. Confirm that the file you deleted has been re-created by the restoration.
5 X Conclusion Conclusion After you have evaluated the benefits of powerful data protection software from HP, you can explore other ways to enhance and optimize your NAS solution. Engage HP's Sales and Training to help you realize your full potential. HP delivers a comprehensive portfolio of services that help you assess, design, plan, and implement effective data availability and disaster recovery solutions. These solutions help you avoid costly data loss and downtime.