HP StorageWorks Storage Mirroring Enterprise Install Console Users Guide HP Part Number: T5437-96026 Published: November 2010
© Copyright 1996-2010 Hewlett-Packard Development Company, L.P. and Double-Take Software, Inc. All rights reserved. Confidential computer software. Valid license from HP required for possession, use or copying. Consistent with FAR 12.211 and 12.212, Commercial Computer Software, Computer Software Documentation, and Technical Data for Commercial Items are licensed to the U.S. Government under vendor's standard commercial license. The information contained herein is subject to change without notice.
Table of Contents Overview 3 Requirements 4 Installing Enterprise Install Console 5 Starting the Enterprise Install Console 6 Understanding the Enterprise Install Console display 7 Servers 8 Adding servers manually 9 Adding servers by cloning 12 Adding servers by importing 13 Modifying an inserted server 14 Removing an inserted server 15 Installing, upgrading, or uninstalling servers 16 Scheduled installations 18 Scheduling an installation 19 Modifying scheduled installation 21
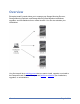
Overview Enterprise Install Console allows you to manage your Storage Mirroring Recover, Storage Mirroring Replicate, and Storage Mirroring Data Migration installations, upgrades, and uninstallations from a central location. You can also schedule your installations. Your first step will be to add the servers that you want to install, upgrade, or uninstall to the Enterprise Install Console. Then you can perform or schedule your installations, upgrades, or uninstallations.
Requirements You can install Enterprise Install Console on any 32-bit or 64-bit Windows Server, XP, or Vista machine. In order to install Enterprise Install Console, you must have the Microsoft .NET Framework version 2.0.x or 3.5.1. These versions are not included in the .NET version 4.0 release. Therefore, even if you have .NET version 4.0 installed, you will also need version 2.0.x or 3.5.1.
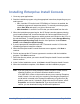
Installing Enterprise Install Console 1. Close any open applications. 2. Start the installation program using the appropriate instructions, depending on your media source. l l CD—Load the CD into the local CD-ROM drive. If auto-run is enabled, the installation program will start automatically. To manually start the program, select Start, Run and specify :\autorun.exe. Web download—Launch the .exe file that you downloaded from the web. 3.
Starting the Enterprise Install Console After Enterprise Install Console is installed, you can start the console by selecting Start, Programs, Storage Mirroring, Enterprise Install Console.
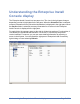
Understanding the Enterprise Install Console display The Enterprise Install Console is a two pane view. The view in the right-pane changes depending on what is highlighted in the left pane. When the Schedule folder is selected, summary information for any scheduled installations is displayed in the right pane. When the Servers folder is selected, summary information for all servers in the Enterprise Install Console is displayed in the right pane.
Servers Before you can manage any installations, upgrades, or uinstallations, you must add the servers that you want to work with to the Enterprise Install Console. You can add servers manually, you can make clones of servers that are already in the Enterprise Install Console, or you can import servers from your Storage Mirroring Recover Management Console. After a server has been inserted, you can modify or remove it.
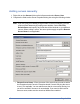
Adding servers manually 1. Right-click on the Servers folder on the left pane and select Server, New. 2. Complete the fields on the Server Properties dialog box using the following criteria. Note: If you are going to be adding a large number of servers manually, you can reduce manual data entry by setting server defaults. Select File, Edit Default Server and specify any fields that will be identical on your different servers.
l Directory containing setup.exe—Specify the location, on the Enterprise Install Console machine, where the Storage Mirroring installation files are located. You must have write access to this location so that the Enterprise Install Console can write temporary files. Therefore, if you are using a CD, copy the files from the CD to the Enterprise Install Console machine.
l l l l l l Password—Specify the password associated with the user you have entered. Install Directory—By default, the installation directory is c:\Program Files\StorageWorks\Storage Mirroring. If necessary, modify where the software will be installed or where it is currently installed if you will be performing an upgrade or uninstallation. Maximum system memory for queue—By default, 512 MB of memory will be allocated for memory-based queuing. If desired, modify this value.
Adding servers by cloning Once you have a server in the Enterprise Install Console, you can clone that server in order to add additional servers. This saves time because all of the fields on the Add Server dialog box are completed identically to the server you are cloning. You only have to modify the fields required to make the server unique. 1. To clone a server, right-click on the left pane and select Server, Clone. 2. At a minimum, you must change the Server Name.
Adding servers by importing If you have Storage Mirroring Recover running in your environment and you have created server groups through the Management Console, you can import the Management Console server group configuration file in order to populate servers in the Enterprise Install Console. This saves time because a list of multiple servers can quickly be created in the Enterprise Install Console. 1. To import a server group configuration file, select Server, Import Servers. 2. Locate the .
Modifying an inserted server After you have inserted a server in the Enterprise Install Console, you can modify any of the server settings as needed. 1. Right-click the server on the left pane and select Modify. 2. The Modify Server dialog box contains the same options as the Add Server dialog, except the Remote Server Name cannot be changed. Refer to Adding servers manually for details on each field. 3. Click OK to save the server settings.
Removing an inserted server If a server is no longer needed in the Enterprise Install Console, you can remove it by right-clicking on it in the left pane and selecting Remove.
Installing, upgrading, or uninstalling servers You can install, upgrade, or uninstall Storage Mirroring Recover, Storage Mirroring Replicate, or Storage Mirroring Data Migration on a single server, multiple servers, or all servers in the Enterprise Install Console. 1. Select the server(s) that you want to install, upgrade, or uninstall. l l l Single server—Right-click one server in the Servers folder and select Action, Install or Upgrade or select Action, Uninstall.
server that you installed, upgraded, or uninstalled will have a log file. Determine from the log file what caused the error, resolve the error, and then restart the installation or upgrade. The server Status will also show if the server needs to be rebooted, if you selected manual intervention for the reboot. Protection cannot be enabled until the server has been rebooted.
Scheduled installations Enterprise Install Console scheduling provides flexibility to plan your installations, upgrades, or uninstallation to meet your needs. You can schedule your installations, modify existing installation schedules, or remove existing installation schedules.
Scheduling an installation 1. Select the server(s) that you want to schedule. l l l Single server—Right-click one server in the Servers folder and select Action, Schedule Install. Multiple servers—Highlight the root of the Servers folder and then in the right pane select multiple servers. Use the Shift key to select contiguous servers in the list or use the Ctrl key to select non-contiguous servers in the list.
between this list and the Selected Servers list by using clicking Add and Remove. l Selected Servers—These are the servers that this schedule will be applied to. Move servers back and forth between this list and the Available Servers list by using clicking Add and Remove. l Date—Specify the date when you want the scheduled installation to start. l Time—Specify the time when you want the scheduled installation to start. 3. Once you have your schedule configured, click OK to save the settings.
Modifying scheduled installation After you have scheduled a server for installation, you can modify the schedule as needed. 1. Right-click the server on the left pane and select Action, Schedule Install. 2. The Configure a Schedule dialog box contains the same options as when you created the schedule. Refer to Scheduling an installation for details. 3. Click OK to save the schedule settings.
Removing a scheduled installation If you want to remove a schedule before it is executed, right-click the schedule item under the Schedule folder and select Remove.
Index D display 7 I installing Enterprise Install Console 5 scheduling 19 servers 16 L logs directory 16 M Microsoft .
importing 13 modifying 14 overview 8 removing 15 U uninstalling 16 upgrading 16 Index Page 24 of 24