
HP StorageWorks Storage Mirroring Enterprise Install Console (T2558-96094, April 2008)


4
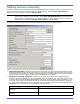
z Temporary path on remote server—Specify a location, on the server you are adding, that will
be used as temporary storage during the installation, upgrade, or uninstallation. The drive you
specify must exist on the server, although if the directory does not exist, Enterprise Install
Console will create it for you.
z Activation Code—Specify the Storage Mirroring activation code that will be used on the server
you are adding.
z Addon Code—If you are using a Storage Mirroring add-on component, specify the add-on
activation code for the component.
z Username—Specify the user that will be used to install Storage Mirroring on the server you are
adding. The user must have administrator privileges on the server you are adding so that the
installation, upgrade, or uninstallation can be performed.
z Password—Specify the password associated with the user you have entered.
z Install Directory—By default, the Storage Mirroring installation directory is C:\Program
Files\StorageWorksStorage Mirrroing
. If necessary, modify where Storage Mirroring
will be installed or where it is currently installed if you will be performing an upgrade or
uninstallation.
z Maximum system memory for queue—By default, Storage Mirroring will allocate 128 MB of
memory for memory-based queuing. If desired, modify this value. If you are using a 64-bit
operating system, you should increase this value to at least 512 MB.
z Disk queue folder—By default, Storage Mirroring will maintain disk-based queues in the
C:\Program Files\StorageWorksStorage Mirrroing directory. If desired, modify
where the disk-based queues will be located. For best results and reliability, you should select a
dedicated, non-boot volume.
z Maximum disk space for queue—By default, Storage Mirroring will use an unlimited amount of
disk space for disk-based queuing. If desired, modify the amount of disk space that will be used
for disk-based queuing.
z Minimum free space—By default, Storage Mirroring will maintain 50 MB of free space in the
Disk queue folder. If desired, modify the amount of disk space that will always remain free. The
Minimum free space should be less than the amount of physical disk space minus the
Maximum disk space for queue.
z Service Listen Port—By default, Storage Mirroring sets the Service Listen Port for TCP
communications to 1100. If desired, select a different port number. Valid port numbers are
between 1024 and 65535.
z Heartbeat Transmit Port—By default, Storage Mirroring sets the Heartbeat Transmit Port for
broadcast UDP communications to 1100. If desired, select a different port number. Valid port
numbers are between 1024 and 65535.
z Status Listen Port—By default, Storage Mirroring sets the Status Listen Port for directed UDP
communications to 1105. If desired, select a different port number. Valid port numbers are
between 1024 and 65535.
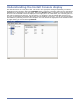
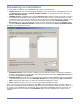
After you have completed the entries on the Add Server dialog box, click OK to save the settings and
insert the server into the Install Console.
CD installation for an Itanium operating
system
Location_where_CD_was_copied\DblTake\ia64
Web download for any operating system Unzip the file from the web to a temporary location,
but do not launch the setup from the unzipped files.
Specify this temporary location as the Directory
containing setup.exe.
NOTE: If the Username and Password fields are protected from editing, the Enterprise
Install Console has detected FIPS compliant algorithms for encryption, hashing, and
signing. In this case, the user account executing the Enterprise Install Console must
have administrative rights on the server you are adding.
NOTE: The Maximum disk space for queue and Minimum free space settings work in
conjunction with each other. For example, assume your queues are stored on a 10 GB
disk with the Maximum disk space for queue set to 10 GB and the Minimum free
space set to 500 MB. If another program uses 5 GB, Storage Mirroring will only be
able to use 4.5 GB so that 500 MB remains free.
Storage Mirroring Files Path to Setup