
HP StorageWorks Storage Mirroring Enterprise Install Console (T2558-96094, April 2008)


1
Introduction
Welcome to Storage Mirroring Enterprise Install Console. Enterprise Install Console allows you to
manage your Storage Mirroring installations, upgrades, and uninstallations from a central location.
In this document, you will find the following information.
z Installing Enterprise Install Console on page 1
z Starting the Install Console on page 1
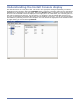
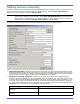
z Understanding the Install Console display on page 2
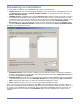
z Adding servers manually on page 3
z Adding servers by cloning on page 5
z Adding servers by importing on page 5
z Modifying server settings on page 5
z Removing a server on page 5
z Installing, upgrading, or uninstalling Storage Mirroring on page 6
z Scheduling an installation on page 7
z Modifying scheduled installation on page 8
z Removing a scheduled installation on page 8
Installing Enterprise Install Console
You should install Enterprise Install Console on a Windows XP machine or a Windows Server operating
system. Do not install it on a 64-bit operating system or on 32-bit Windows Vista.
In order to install Enterprise Install Console, you must have the Microsoft .NET Framework version
2.0 installed. If you have an Internet connection, the Enterprise Install Console installation will
download and install Microsoft .NET Framework version 2.0. If you do not have an Internet
connection, you will have to download the Microsoft .NET Framework version 2.0 files from the
Microsoft web site from another server, and then copy the setup to your Enterprise Install Console
machine and run it manually.
1. Close any open applications.
2. Start the installation program by launching the setup.exe file that you received.
3. If you are prompted to install Microsoft .NET Framework version 2.0, follow the installation
prompts to install the software.
4. When the Enterprise Install Console Welcome screen appears, click Next to continue.
5. Select the directory where you want to install Enterprise Install Console and click Next to
continue.
6. At the Confirm Installation screen, click Next to install Enterprise Install Console.
7. When the installation completes, click Close to exit the installation program.
Starting the Install Console
After Enterprise Install Console is installed, you can start the console by selecting Start, Programs,
Storage Mirroring, Enterprise Install Console.
NOTE: If you are going to be using Enterprise Install Console to install to 64-bit operating
systems, you must have Windows Installer version 3.01.4000.1823 or later on the
machine where you are running Enterprise Install Console. You can verify your version
by checking the properties of msi.dll which is located in the system32 subdirectory of
system root. (By default, system root is C:\windows.) Right-click the file in Explorer,
select Properties, and view the Version tab. If you do not have the correct version, you
can download it via the Microsoft Update tool.