Enterprise Install Console First Edition (May 2008) Part Number: T2558-96094
© Copyright 2008 Hewlett-Packard Development Company, L.P. Hewlett-Packard Company makes no warranty of any kind with regard to this material, including, but not limited to, the implied warranties of merchantability and fitness for a particular purpose. Hewlett-Packard shall not be liable for errors contained herein or for incidental or consequential damages in connection with the furnishing, performance, or use of this material.
Introduction Welcome to Storage Mirroring Enterprise Install Console. Enterprise Install Console allows you to manage your Storage Mirroring installations, upgrades, and uninstallations from a central location. In this document, you will find the following information.
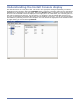
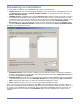
Understanding the Install Console display The Install Console is a two pane view. The view in the right-pane changes depending on what is highlighted in the left pane. When the Schedule folder is selected, summary status for any scheduled installations is displayed in the right pane. When the Servers folder is selected, summary status for all servers in the Install Console is displayed in the right pane. For each folder, the summary pane on the right is divided into sections.
Adding servers manually In order to manage your Storage Mirroring installations from the Install Console, you have to insert the servers that you want to manage into the Install Console. Select Server, New Server or right-click on the left pane and select Server, New. NOTE: If you are going to be adding a large number of servers manually, you can reduce manual data entry by setting server defaults. Select File, Edit Default Server and specify any fields that will be identical on your different servers.
Storage Mirroring Files z Path to Setup CD installation for an Itanium operating system Location_where_CD_was_copied\DblTake\ia64 Web download for any operating system Unzip the file from the web to a temporary location, but do not launch the setup from the unzipped files. Specify this temporary location as the Directory containing setup.exe.
Adding servers by cloning Once you have a server in the Install Console, you can clone that server in order to add additional servers. This saves time because all of the fields on the Add Server dialog box are completed identically to the server you are cloning. You only have to modify the fields required to make the server unique. See Adding servers manually on page 3 for an explanation of each server setting.
Installing, upgrading, or uninstalling Storage Mirroring You can install, upgrade, or uninstall Storage Mirroring on a single server, multiple servers, or all servers in the Install Console. z z z Single server—If you are installing or upgrading, highlight one server in the Servers folder and select Action, Install or Upgrade or right-click and select Action, Install or Upgrade.
Scheduling an installation You may want to schedule your installations for a more convenient time. z z z Single server—If you are scheduling an installation for a single server, highlight that server in the Servers folder and select Action, Schedule Install, or right-click the server and select Action, Schedule Install. Multiple servers—Highlight the root of the Servers folder and then select the servers you want to schedule for installation on the right pane of the Install Console.
Modifying scheduled installation After you have scheduled an installation, you can modify the settings as needed. Highlight the schedule in the left pane and select Action, Schedule Install, or right-click the schedule in the left pane and select Modify. See Scheduling an installation on page 7 for an explanation of each setting. Removing a scheduled installation If you want to remove a schedule before it is executed, right-click the schedule in the left pane and select Remove.