HP StorageWorks Storage Mirroring Application Manager user’s guide Storage Mirroring Application Manager Part number: T2558-96085 Seventh edition: January 2008
Legal and notice information © Copyright 2004–2008 Hewlett-Packard Development Company, L.P. Hewlett-Packard Company makes no warranty of any kind with regard to this material, including, but not limited to, the implied warranties of merchantability and fitness for a particular purpose. Hewlett-Packard shall not be liable for errors contained herein or for incidental or consequential damages in connection with the furnishing, performance, or use of this material.
Contents About this guide . . . . . . . . . . . . . . . . . . . . . . . . . . . . . . . . . . . . . . . . . . . . . . . . . . . . . . . . . . vii Related documentation . . . . . . . . . . . . . . . . . . . . . . . . . . . . . . . . . . . . . . . . . . . . . . . . . . . . . . . . . . . . . . . . . vii User’s guide . . . . . . . . . . . . . . . . . . . . . . . . . . . . . . . . . . . . . . . . . . . . . . . . . . . . . . . . . . . . . . . . . . . . . . vii Application notes . . . . . . . . . . . . . . . . . .
Resources (cluster only) . . . . . . . . . . . . . . . . . . . . . . . . . . . . . . . . . . . . . . . . . . . . . . . . . . . . . . . . . . . . . Method to monitor for failover . . . . . . . . . . . . . . . . . . . . . . . . . . . . . . . . . . . . . . . . . . . . . . . . . . . . . . . . Failover monitoring options . . . . . . . . . . . . . . . . . . . . . . . . . . . . . . . . . . . . . . . . . . . . . . . . . . . . . . . . . . Failover trigger . . . . . . . . . . . . . . . . . . . . . . . . . . . . . . .
6 Protecting a File Server . . . . . . . . . . . . . . . . . . . . . . . . . . . . . . . . . . . . . . . . . . . . . . . . . . . 55 File server configuration workflow . . . . . . . . . . . . . . . . . . . . . . . . . . . . . . . . . . . . . . . . . . . . . . . . . . . . . . . . Select a task. . . . . . . . . . . . . . . . . . . . . . . . . . . . . . . . . . . . . . . . . . . . . . . . . . . . . . . . . . . . . . . . . . . . . . . . Select a domain . . . . . . . . . . . . . . . . . . . . . . . . . . . . . .
Advanced settings . . . . . . . . . . . . . . . . . . . . . . . . . . . . . . . . . . . . . . . . . . . . . . . . . . . . . . . . . . . . . . . . . . . Replication set rules . . . . . . . . . . . . . . . . . . . . . . . . . . . . . . . . . . . . . . . . . . . . . . . . . . . . . . . . . . . . . . . . Failover/failback scripts. . . . . . . . . . . . . . . . . . . . . . . . . . . . . . . . . . . . . . . . . . . . . . . . . . . . . . . . . . . . . Items to failover. . . . . . . . . . . . . . . . . . . . . . .
About this guide This document describes how to use the Storage Mirroring® Application Manager interface to create and validate your application configuration. Related documentation Before you begin to configure your solution, make sure that you have complete documentation for your operating system, application, and Storage Mirroring.
Document conventions and symbols Table 1 Document conventions Convention Element Medium blue text: Figure 1 Cross-reference links and e-mail addresses Medium blue, underlined text (http://www.hp.
Product warranties For information about HP StorageWorks product warranties, see the warranty information website: http://www.hp.com/go/storagewarranty Subscription service HP strongly recommends that customers sign up online using the Subscriber's choice web site: http://www.hp.com/go/e-updates.
HP StorageWorks Storage Mirroring Application Manager user’s guide x
1 Introduction This document describes how to use the Storage Mirroring® Application Manager interface to create and validate your application configuration. The Application Manager lets you quickly configure protection for an application without requiring you to have advanced knowledge of either Storage Mirroring or your application. The Application Manager works by gathering information about your source and target environments, then configuring Storage Mirroring to protect the source.
Using the Storage Mirroring Application Manager with Exchange in clustered environments The Storage Mirroring Application Manager can be used in the following cluster configurations with Exchange 2003: • Standalone source to clustered target • Clustered source to standalone target • Multi-node cluster to another multi-node cluster NOTE: Cluster protection is not supported in Storage Mirroring Application Manager for Exchange 2000.
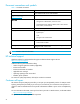
SharePoint SQL 2000 SQL 2005 One : One Yes Yes Many : One No No One : Many No No Cascaded (chained) No No Cluster : Cluster No No Cluster : Standalone No No Standalone : Cluster No No WSS Yes Yes MOSS 2007 Yes Yes Single forest Yes Yes Multiple forest No No Parent > child Yes Yes Child > child Yes Yes Source : Target Topology Cluster Support Application Configurations Domain Topology File server Windows 2000 Windows 2003 One : One Yes Yes Many : One No No
Windows 2000 Windows 2003 Parent > child No No Child > child No Yes, as long as the child domain has a DNS server. If the DNS server resides in the parent domain, then validation will fail. Requirements The Storage Mirroring Application Manager will run from any client (or server) on any Microsoft® Windows® operating system that has access to the domain in which the servers are located.
• If the DNS server is running Windows Server™ 2000, you must have the DNS Windows Management Instrumentation (WMI) Provider installed on the source’s primary DNS server to allow the DFO to modify DNS resource records during failover. To download the DNS WMI Provider, use the following link: ftp.microsoft.com/reskit/win2000/dnsprov.
• The Exchange configurations on the source and target servers must be identical for the following components: • Storage groups • Location of storage groups (log and data files) • Log file prefixes • Database locations (log and data files) • Message Transfer Agent (MTA) location • Queue paths • In a parent\child domain, at least one domain controllers in the child domain must designated as a global catalog server.
File server requirements If you are using the Storage Mirroring Application Manager for file servers, your system must meet the following requirements: • Two licensed copies of Storage Mirroring version 4.5.2 or later NOTE: Hewlett-Packard strongly recommends that the target server be a dedicated standby server which does not host any critical applications. During failback for file servers, the Server service is re-started, which could also re-start any dependent services.
Readme files The following readme files contain additional reference information related to the Storage Mirroring Application Manager: • Readme_Application_Manager.htm—The readme file contains information about known issues and workarounds in the current release of the Application Manager. • Readme_DFO.htm—The DNS failover utility (DFO.exe), which is called in the failover scripts, automatically updates DNS resource records in order to seamlessly redirect network clients.
2 Navigating the user interface The Application Manager interface is designed to guide you through the process of configuring protection for your servers. The default configuration parameters have been selected to be appropriate for most configurations; however, you may need to modify them for your specific environment. Any changes you make to non-machine specific configuration settings (such as Missed Packets) will become the default the next time you run the Application Manager.
For the initial setup, the Storage Mirroring Application Manager only needs to be installed on one system. For managing failover and failback, the Application Manager should be run from either the target server or an administrative workstation. The Storage Mirroring Application Manager installation requires an active internet connection. This is necessary in order to download the Microsoft Admin Pack and SQL server backward compatibility (SQLDMO) files. In addition, if you do not have .
Menu options Based on the current protection status and/or failover state, the Protection, Monitoring, and Failover/Failback menu options will be updated to display the available command. If the Application Manager is not in a state that will allow any of these options to be executed, the corresponding menu option(s) will be grayed out (disabled).
Changing Storage Mirroring Application Manager preferences To change display preferences for the Storage Mirroring Application Manager, select Tools, Options. The Options dialog box will appear. Service Listen Port—Enter the value for the Storage Mirroring port to be used for Application Manager communication. The default port is 1100. You can also change the port through the Storage Mirroring Management Console.
Using the online help To view additional information about a task in the Storage Mirroring Application Manager interface, from the Help menu, click View Online Help. This will launch the online help file in your internet browser. To search for information about a topic, use tabs on the left pane: • The Contents tab provides a table of contents for the help file. Click a topic to view the topic in the right pane. • The Index tab provides a list of terms.
14 Navigating the user interface
3 Protecting an Exchange Server Exchange configuration workflow To configure protection for your Exchange servers using Application Manager, you will complete the following steps: 1. Install Exchange on the source server and apply any Exchange service packs or patches. Use the default installation options for Exchange. 2. Install Exchange on the target, placing it in the same Exchange organization as the source and verifying that the installation location for the target is the same as the source.
Select a task To protect an Exchange server, open the Application Manager (Start, Programs, Storage Mirroring, Application Manager), then on the Tasks area on the left pane, select Protect Exchange Server. The Manage Exchange page will appear in the right pane. Make sure that the Setup tab is in view. NOTE: You can also launch Storage Mirroring Application Manager for Exchange by using the command line /EXCHANGE option (DTAM /EXCHANGE).
You may enter a user name for a different domain by entering a fully-qualified user name. The fully-qualified user name must be in the format NetBIOS domain name\username or username. If you enter a non-qualified name, the default domain will be used. NOTE: When the Storage Mirroring Application Manager launches, it selects the forest root automatically.
NOTE: If you select a target that is monitoring a connection that has met a failover condition and requires manual intervention, a prompt will appear, asking if you want to initiate failover. Enter server login information After you select a server for the first time, you will be prompted to enter a user name and password to use for logging in to the selected server. The login account MUST be a member of the Double-Take Admin local security group for the selected server.
Failover settings The Failover tab includes options that will be applied during Exchange failover. Failover enabled Select the Failover enabled option to enable or disable failover for the selected source/target pair. Failover type Failover Type indicates what name resolution method will be used to redirect users to the target Exchange server in the event of a source failure. By default, DNS Failover is selected. DNS failover DNS Failover is the recommended method for failover.
After you select the DNS Failover option, click Configure. The Configure DNS Failover window will appear. In the top portion of the window, you can add additional DNS server IP addresses. Type the IP address into the DNS Server field, then click Add. The list box under the DNS Server entry field contains all DNS IP addresses for the source and target servers. The label after the DNS IP address indicates whether the DNS IP address belongs to the source, target, or both.
NOTE: If you are running Windows Server 2000 on the primary DNS server hosting zones or domains that contain source and/or target resource records, you must have the DNS WMI Provider installed on that DNS server. The Dynamic updates setting for the DNS zone should be set to Secure only. Otherwise, you must disable dynamic registration on the source server in order to prevent the source from reclaiming its DNS record.
After you select the Identity Failover option, click Configure. The Configure Identity Failover window will appear. Enter the following information for Identity failover: • Source IP—Select the source IP address(es) to be monitored for failover. • Target NIC—Select the target NIC to be used when failover occurs. • Target IP Addresses—This area displays the IP address(es) of the selected target NIC.
stopped on the target for replication to occur properly. When you are finished entering services, click Add to return to the Failover configuration window. To remove a service, select one or more services, then click Remove. You can only remove services that you added manually using the Application Manager. Services will be started in the displayed order (top-to-bottom starting with the left column) and shutdown in reverse order (bottom-to-top starting with the right column).
NOTE: In a cluster environment, make sure to include a “cushion” to account for the time it takes for the cluster to failover. • Monitor Interval (sec)—(Default = 5) How often the monitor checks the source machine availability. • Missed Packets (sec)—(Default = 5) How many monitor replies can be missed before assuming the source machine has failed.
In a cluster, the route should be set to the name of the Exchange virtual server (EVS) dependent IP. Protected storage groups The Protected storage groups area displays the storage groups, mailbox, and public folder stores. Select the Exchange storage groups that you want to protect. By selecting individual storage groups to protect, you can reduce the amount of data being replicated and filter out storage groups that do not need to be protected or failed over.
Advanced settings The Advanced tab includes advanced configuration options. Replication set rules A replication set defines what directories/files are to be protected by Storage Mirroring. By default, Application Manager selects all of the necessary directories/files to protect Exchange based on your source server configuration.
To remove a rule, select one or more rules, then click Remove. You can only remove rules that you added manually through the Application Manager. Rules that are automatically added by Application Manager cannot be removed or changed through the Application Manager interface. NOTE: If you want to protect the Badmail folder, you will need to manually add it to the replication set.
Force AD replication (Default = selected) When selected, replication is initiated from the domain controller with which the source or target server communicates. This will be done each time the Exchange Failover utility (exchfailover.exe) is executed from within the failover/failback scripts. For more information about using the Exchange Failover utility, see ”Using the Exchange Failover (EFO) Utility” on page 121. Disable Force AD Replication if you do not want Active Directory changes to be replicated.
• Create Connection—(Default = Selected) Application Manager will create the appropriate connection between the source and target using the automatically-generated replication set. This should only be disabled if you would like to verify the replication set that is created by Application Manager prior to connection. • Create Failover Monitor—(Default = Selected) Application Manager will create a failover monitor on the target to monitor the source for failure.
30 Protecting an Exchange Server
4 Protecting an Exchange Cluster with a Like-Named Cluster This section describes the process used to configure protection for an Exchange 2003 cluster with a like-named (also known as a “standby”) cluster. When you protect a cluster with a like-named cluster, the Storage Mirroring Application Manager moves the EVS (Exchange virtual server) location from the source cluster to the target cluster.
NOTE: The server name will be appended with the suffix “(like-named)” 3. After you select a like-named cluster for the target, you will need to configure the like-named cluster. After you select the target server, the Like-named cluster setup dialog box will appear. 4. Enter the following information: • Target Cluster—Enter the name of one of the target nodes, then click Connect. • Network—Select the NIC to which you will assign the IP.
NOTE: You can not de-select a storage resource that exists on both the source and target. If the drive letters on the source and target do not match, then not all required data will be selected automatically. You will need to select it manually. The selected storage resources must be in the same group. 5. When you are finished, click OK to return to the Manage Exchange window. 6. On the Manage Exchange window, click Configure to open the Configure Protection window, then select the Failover tab. 7.
8. If you want to modify DNS configuration options, click Configure. The Configure DNS Failover window will appear. 9. On the Configure DNS window, you can modify the TTL value for the DNS record. You can also specify the user credentials needed to modify DNS. When you are finished, you can click Test to test the DNS configuration for the selected DNS server(s), or click OK to return to the Configure Protection window.
NOTE: Three scripts are automatically generated by the Application Manager during configuration. The scripts are copied to the Storage Mirroring installation directory on the specified server using the administrative share for that server’s drive. Failover Script—A post-failover script (post_failover_LN.txt) is executed after the core failover processes have completed on the target server. The primary function of the post-failover script is to start the resources on the target.
NOTE: When you bring the source cluster online, an identical network name will still be active on the target. Because of this, when the source cluster tries to bring up the EVS on the source, the network name resource will fail and consequently the group will not come online on the source. You should allow the source cluster to finish trying to bring the resources online before using the Application Manager to failback.
5 Protecting a SQL Server SQL configuration workflow To configure protection for your SQL servers using Application Manager, you will complete the following steps: 1. Install SQL on the source server and apply any SQL service packs or patches. Use the default installation options for SQL. 2. Install SQL on the target, verifying that the installation location for the target is the same as the source. Apply any SQL service packs or patches.
If you have previously configured protection for a source/target pair, the Manage SQL page will be populated with information about the protected pair. Select a domain The Domain Name on the main window will be populated automatically with the domain where the Application Manager client resides. If you want to change the domain, type in a domain name for a trusted domain that the Application Manager client can connect to, then press Tab or click on another field.
You may enter a user name for a different domain by entering a fully-qualified user name. The fully-qualified user name must be in the format NetBIOS domain name\username or username. If you enter a non-qualified name, the default domain will be used. Select source and target servers If this is your first time to select a SQL server to protect, you may need to click the Advanced Find button to add servers to the Source Server and Target Server fields.
Add or manage servers If the servers you need do not appear, click the Advanced Find button, or select Actions, Manage SQL Servers. The Manage SQL Servers window will appear. To discover all servers in the domain, click the Search button. The Discovered Servers list will be populated with all servers that the Application Manager can discover that reside in the domain.
security group for the selected server. For more information about permissions, see ”Recommended Credentials” on page 101. You may enter a user name for a different domain by entering a fully-qualified user name. The fully-qualified user name must be in the format domain\username or username@domain. If you enter a non-qualified name, the DNS domain will be used. Entering the credentials for the logged-on user may be valid.
Failover settings The Failover tab includes options that will be applied during SQL failover. Failover enabled Select the Failover Enabled option to enable or disable failover for the selected source/target pair. Failover type Failover Type indicates what name resolution method will be used to redirect users to the target SQL server in the event of a source failure. By default, DNS Failover is selected. DNS failover DNS Failover is the recommended method for failover.
After you select the DNS Failover option, click Configure. The Configure DNS Failover window will appear. In the top portion of the window, you can add additional DNS server IP addresses. Type the IP address into the DNS Server field, then click Add. The list box under the DNS Server entry field contains all DNS IP addresses for the source and target servers. The label after the DNS IP address indicates whether the DNS IP address belongs to the source, target, or both.
NOTE: If you are running Windows Server 2000 on the primary DNS server hosting zones or domains that contain source and/or target resource records, you must have the DNS WMI Provider installed on that DNS server. The Dynamic updates setting for the DNS zone should be set to Secure only. Otherwise, you must disable dynamic registration on the source server in order to prevent the source from reclaiming its DNS record.
After you select the Identity Failover option, click Configure. The Configure Identity Failover window will appear. Enter the following information for Identity failover: • Source IP—Select the source IP address(es) to be monitored for failover. • Target NIC—Select the target NIC to be used when failover occurs. • Target IP Addresses—This area displays the IP address(es) of the selected target NIC.
To remove a service, select one or more services, then click Remove. You can only remove services that you added manually using the Application Manager. Services will be started in the displayed order (top-to-bottom starting with the left column) and shutdown in reverse order (bottom-to-top starting with the right column). To re-arrange the order in which services are started/stopped, first add any additional services.
Connection settings The Connection tab includes options that will be applied to the specified source/target connection. Route This setting identifies the Target IP Address that the Storage Mirroring data will be transmitted through. You should only change this setting if you want to select a different route for Storage Mirroring traffic. On a machine with more than one NIC, this increases the flexibility of configuring Storage Mirroring activity.
NOTE: If you are protecting SQL named instances, both the source and target SQL Servers must have named instances with the exact same name installed prior to configuring protection. When using named instances, all named instances will appear in the Protected Databases area. You can either de-select an entire instance, or select specific databases within each instance. By default, the TcpPort on the source named instance will be different than the TcpPort on the target named instance.
NOTE: When using Database Only mode, any SQL Server replication configured on the protected databases must be configured by the administrator on the target after failover. If you select Database Only protection mode, you can select a non-system database and map it to a unique path on the target. NOTE: You must first select the database in order for the Target Path commands to be visible. Select the database you want to re-map, then click the ellipse button.
NOTE: If Database-Only protection mode is used to protect SQL Server, attempting to attach a replicated SQL database(s) on the target server after failover can fail when done outside of the Application Manager. The Storage Mirroring service account (typically the target's LocalSystem account) is the account used to attach/detach databases on failover/failback.
NOTE: All the database filenames (*.mdf, *.ldf, and *.ndf) must either be: • Uniquely named (for example, accounting1.mdf and accounting2.mdf), or • Uniquely located on the target (for example, c:\Source3\accounting1\accounting1.mdf and c:\Source4\accounting2\accounting2.mdf) Mirror type The following options specify what files you want sent from the source to the target during a mirror: • Full—Copies all of the directories and files in the replication set to the target machine.
Replication set rules A replication set defines what directories/files are to be protected by Storage Mirroring. By default, Application Manager selects all of the necessary directories/files to protect SQL based on your source server configuration. These include the SQL application data and transaction logs, tempdb files, and SQL error logs. By default, the Application Manager-generated replication set will be named sqldag01__.
• Restore Script—A post-restore script (post_restore_sql.txt) is not executed automatically, though it is provided on the source to perform actions that are generally required after data has been restored from the target to source after a failover/failback. The primary function of this script is to restart SQL services on the source server. By default, Application Manager generates all the required scripts for you automatically based on your system configuration.
When you have finished configuring the optional protection options, continue to the section ”Validate the Configuration” on page 87. NOTE: If you close the Storage Mirroring Application Manager prior to enabling protection, your changes will not be saved. You must enable protection in order to save your configuration settings for a source/target pair.
6 Protecting a File Server File server configuration workflow To configure protection for your file servers using Application Manager, you will complete the following steps: 1. Install Storage Mirroring on the source and target file servers. See the Storage Mirroring Getting Started guide for more information. 2. ”Install the Storage Mirroring Application Manager” on page 9 3. ”Select a task” on page 55 4. ”Select a domain” on page 56 5. ”Select source and target servers” on page 57 6.
If you have previously configured protection for a source/target pair, the Manage File Server page will be populated with information about the protected pair. Select a domain The Domain Name on the main window will be populated automatically with the domain where the Application Manager client resides. If you want to change the domain, type in a domain name for a trusted domain that the Application Manager client can connect to, then press Tab or click on another field.
You may enter a user name for a different domain by entering a fully-qualified user name. The fully-qualified user name must be in the format NetBIOS domain name\username or username. If you enter a non-qualified name, the default domain will be used. Select source and target servers You can either type the source and target server names into the Source Server and Target Server lists, or you can click the Advanced Find button and add the servers.
NOTE: If you first select a target that is monitoring a connection that has met a failover condition and requires manual intervention, then select the protected source server, a prompt will appear, asking if you want to initiate failover. Add or manage servers If the servers you need do not appear, click the Advanced Find button. The Manage Servers window will appear. To discover all servers in the domain, click the Search button.
Configure protection settings If you do not need to change the configuration settings, continue with ”Validate the Configuration” on page 87. If you have already enabled protection for a connection and need to change the configuration parameters, you will first need to disable protection, as described in ”Disable protection” on page 90. To change the default configuration parameters, click Configure from the main Application Manager window, or select Actions, Configure Protection from the menu.
After you select the DNS Failover option, click Configure. The Configure DNS Failover window will appear. In the top portion of the window, you can add additional DNS server IP addresses. Type the IP address into the DNS Server field, then click Add. The list box under the DNS Server entry field contains all DNS IP addresses for the source and target servers. The label after the DNS IP address indicates whether the DNS IP address belongs to the source, target, or both.
NOTE: If you are running Windows Server 2000 on the primary DNS server hosting zones or domains that contain source and/or target resource records, you must have the DNS WMI Provider installed on that DNS server. The Dynamic updates setting for the DNS zone should be set to Secure only. Otherwise, you must disable dynamic registration on the source server in order to prevent the source from reclaiming its DNS record.
After you select the Identity Failover option, click Configure. The Configure Identity Failover window will appear. Enter the following information for Identity failover: • Source IP—Select the source IP address(es) to be monitored for failover. • Target NIC—Select the target NIC to be used when failover occurs. • Target IP Addresses—This area displays the IP address(es) of the selected target NIC.
stopped on the target for replication to occur properly. When you are finished entering services, click Add to return to the Failover configuration window. To remove a service, select one or more services, then click Remove. You can only remove services that you added manually using the Application Manager. Services will be started in the displayed order (top-to-bottom starting with the left column) and shutdown in reverse order (bottom-to-top starting with the right column).
Connection settings The Connection tab includes options that will be applied to the specified source/target connection. Route This setting identifies the Target IP Address that the Storage Mirroring data will be transmitted through. You should only change this setting if you want to select a different route for Storage Mirroring traffic. On a machine with more than one NIC, this increases the flexibility of configuring Storage Mirroring activity.
• Checksum—(Default) This option compares the date, time, and size, and for those files that are different, a checksum calculation comparison is performed. A checksum calculation is a formula applied to blocks of data to determine if the binary make-up of the block is identical. If the checksums on the source and target machine are the same, the block is skipped. If the checksums on the source and target machine are not the same, the block on the source is sent to the target.
To add a replication set rule, click Add. In the Add Repset Rule window, enter the rule path (the directory that you want to protect or exclude), select whether to include/exclude the path, and whether the directory should be recursive or non-recursive, then press Enter. When you have entered all of your replication set rules, click Add to return to the Advanced configuration tab.
The scripts can be overwritten by certain operations during setup. For example, any changes to configuration options done in the Application Manager will overwrite previous script changes. If you want to make permanent changes to a script, you must modify the appropriate .txt file within the Storage Mirroring Application Manager installation directory. If there is more than one client machine that will be configuring failover, the change must be made to all the appropriate .
NOTE: If you close the Storage Mirroring Application Manager prior to enabling protection, your changes will not be saved. You must enable protection in order to save your configuration settings for a source/target pair.
7 Protecting a SharePoint Server SharePoint configuration workflow The Application Manager can be used to extend the target web front-end into the source SharePoint configuration. The SharePoint databases will be protected by default. Source front-end web server Internet Information Services WSS 3.0 or MOSS 2007 Target database server and front-end web server Internet Information Services Microsoft SQL Server (default or named instance) WSS 3.
9. ”Select a task” on page 70 10.”Select a domain” on page 71 11.”Select SharePoint front end” on page 72 12. ”Select source and target servers” on page 72 13.(Optional) ”Configure protection settings” on page 74 14.”Validate the Configuration” on page 87 To protect your SharePoint server, you will complete the following steps: 1. ”Enable protection” on page 89 2. ”Monitor protection status” on page 90 In the event of a failure, you will need to perform some additional tasks.
If you have previously configured protection for a source/target pair, the Manage SharePoint page will be populated with information about the protected pair. Select a domain The Domain Name on the main window will be populated automatically with the domain where the Application Manager client resides. If you want to change the domain, type in a domain name for a trusted domain that the Application Manager client can connect to, then press Tab or click on another field.
You may enter a user name for a different domain by entering a fully-qualified user name. The fully-qualified user name must be in the format NetBIOS domain name\username or username. If you enter a non-qualified name, the default domain will be used. Select SharePoint front end Enter the name of the server that functions as the SharePoint front end, then click Get Config to load that server’s configuration information into the Application Manager.
NOTE: If you first select a target that is monitoring a connection that has met a failover condition and requires manual intervention, then select the protected source server, a prompt will appear, asking if you want to initiate failover. Add or manage servers If the servers you need do not appear, click the Advanced Find button, or select Actions, Manage SQL Servers. The Manage SQL Servers window will appear. To discover all servers in the domain, click the Search button.
security group for the selected server. For more information about permissions, see ”Recommended Credentials” on page 101. You may enter a user name for a different domain by entering a fully-qualified user name. The fully-qualified user name must be in the format domain\username or username@domain. If you enter a non-qualified name, the DNS domain will be used. Entering the credentials for the logged-on user may be valid.
Failover settings The Failover tab includes options that will be applied during SharePoint failover. Failover enabled Select the Failover Enabled option to enable or disable failover for the selected source/target pair. Failover type Failover Type indicates what name resolution method will be used to redirect users to the target SharePoint server in the event of a source failure. By default, DNS Failover is selected. DNS failover DNS Failover is the recommended method for failover.
After you select the DNS Failover option, click Configure. The Configure DNS Failover window will appear. In the top portion of the window, you can add additional DNS server IP addresses. Type the IP address into the DNS Server field, then click Add. The list box under the DNS Server entry field contains all DNS IP addresses for the source and target servers. The label after the DNS IP address indicates whether the DNS IP address belongs to the source, target, or both.
NOTE: If you are running Windows Server 2000 on the primary DNS server hosting zones or domains that contain source and/or target resource records, you must have the DNS WMI Provider installed on that DNS server. The Dynamic updates setting for the DNS zone should be set to Secure only. Otherwise, you must disable dynamic registration on the source server in order to prevent the source from reclaiming its DNS record.
After you select the Identity Failover option, click Configure. The Configure Identity Failover window will appear. Enter the following information for Identity failover: • Source IP—Select the source IP address(es) to be monitored for failover. • Target NIC—Select the target NIC to be used when failover occurs. • Target IP Addresses—This area displays the IP address(es) of the selected target NIC.
To remove a service, select one or more services, then click Remove. You can only remove services that you added manually using the Application Manager. Services will be started in the displayed order (top-to-bottom starting with the left column) and shutdown in reverse order (bottom-to-top starting with the right column). To re-arrange the order in which services are started/stopped, first add any additional services.
Connection settings The Connection tab includes options that will be applied to the specified source/target connection. Route This setting identifies the Target IP Address that the Storage Mirroring data will be transmitted through. You should only change this setting if you want to select a different route for Storage Mirroring traffic. On a machine with more than one NIC, this increases the flexibility of configuring Storage Mirroring activity.
NOTE: If Override Generated Rules is selected on the Advanced tab, this control will be disabled. To refresh the tree view to show new source directories or files that may have been added or removed, select the logical node, then click the Refresh button. If a node in the volumes branch is selected, then the items under that node will be refreshed.
Replication set rules A replication set defines what directories/files are to be protected by Storage Mirroring. By default, Application Manager selects all of the necessary directories/files to protect SharePoint based on your source server configuration. These include the SharePoint application data and transaction logs, tempdb files, and SharePoint error logs. By default, the Application Manager-generated replication set will be named SharePointdag01_.
• Restore Script—A post-restore script (post_restore_SharePoint.txt) is not executed automatically, though it is provided on the source to perform actions that are generally required after data has been restored from the target to source after a failover/failback. The primary function of this script is to restart SharePoint services on the source server. By default, Application Manager generates all the required scripts for you automatically based on your system configuration.
• Create Failover Scripts—(Default = Selected) Application Manager will automatically generate the failover/failback scripts and copy them to the appropriate server. This should be disabled only if you have customized your script files and do not want them to be overwritten. • Create Connection—(Default = Selected) Application Manager will create the appropriate connection between the source and target using the automatically-generated replication set.
• TCP Port—The TCP port to be used for communicating with the target web server. • Config Database Server—Name of the Microsoft SQL Server that hosts the configuration database. • Config Database Name—Name of the configuration database for the production SharePoint web front-end server. • SharePoint Admin Name—Account used to install and configure SharePoint on the production SharePoint web front-end server. This should be entered as a fully-qualified domain name (domain\username).
86 Protecting a SharePoint Server
8 Validate the Configuration Click Validate, or select Actions, Validate, to ensure that the source and target servers are configured correctly for failover. A description of the validation activity being performed is displayed in the status bar at the bottom of the Application Manager window, along with status progress indicator. When validation completes, the status progress indicator is removed.
88 Validate the Configuration
9 Enabling Protection for a Server Based on the current protection status, the Enable/Disable Protection button (on both the Setup and Monitor tabs) and menu options will be updated to display the available actions. If the Application Manager is not in a state that will allow protection to be enabled, the Enable/Disable Protection button and menu option will be grayed out (disabled).
Any connection that has been built by Application Manager will be recognized as a valid connection, regardless of the connection state. Disable protection You can disable an existing Application Manager-generated source/target connection monitor within the Application Manager. You must disable protection before you can change any of the Application Manager configuration parameters. 1.
Monitoring Status Description Failing over Failover from the source to the target is in progress Failed over Target has assumed source role Failing back Failback from the target to the original source is in progress Protection detail states The following table identifies the possible mirror status states. Mirror Status Calculating size Idle Mirroring Paused Removing orphans Verifying Restoring Transmitting (Unknown) The following table identifies the possible replication status states.
The following table identifies the possible target status states. Target Status Online Mirroring Mirroring Stopped Re-mirror required Retrying Paused Pausing Restore Required Replicating Snapshot reverted Target path unblocked Target path blocked (Unknown) (Unsupported) Verify target data viability (Exchange only) After you have configured your servers, you can use the Storage Mirroring Application Manager to run a test that verifies that the database on the target is viable for failover.
You can verify the target stores at any time following the successful completion of a mirror. When you select Actions, Verify Target Data, the following window will appear: The Database Verification window includes the following controls and indicators: • Status—The overall status of the database verification. Click on the status description for more information. • Results—Displays the status of the target Exchange Stores and Storage Groups.
NOTE: Two sample scripts for moving users (moveUserSrctoTgt.vbs and moveUserTgttoSrc.vbs) are installed in the Samples subfolder where the Storage Mirroring Application Manager is installed. You will need to modify these scripts for your environment. To verify the target data, click the Test button. You will see the History window updated as the test proceeds. The Status field will display “Starting test” while preparing the target.
10 Failover, Failback, and Restoration If you selected DNS failover, you can use the Application Manager to automate failover, failback, and restoration. If you selected Identity failover, you will need to use the manual processes described in ”Identity failover, failback, and restoration” on page 97. If an error occurs during failover or failback, a message box will appear. You can use the Actions menu to launch the failover and failback log files.
Initiating manual failover To initiate a manual failover, select Actions, Failover, or click the Failover button on the Monitoring tab. The Initiate Failover box will appear. Select either Immediate Failover (to begin failover immediately and not wait for the queues to empty), or Graceful failover (to wait for the target queue to empty before failing over). The queues could contain any messages or data recently sent to the target from the source.
To initiate failback, click the Failback button, or select Actions, Failback. The Initiate Failback window will appear. On the Initiate Failback window, select the following failback options: • Restore target data prior to failback—Select this option if you want to restore any modified data from the target back to the source prior to beginning the failback. • Enable Compression—Select this option to enable compression of data that is transmitted from the target to the source.
If DNS failover was selected, the clients will have to wait for the IP cache to expire, or type in “ipconfig /flushdns” in a command window. This time can be adjusted by lowering the TTL (Time to Live) setting within your DNS server’s configuration. For more information, refer to your DNS server documentation. Failback and restoration If your source experiences a failure, such as a power, network, or disk failure, your target machine will stand in for the source while you resolve the source machine issues.
6. Do not select Continue or Stop at this time. First, reconnect the source to the network. 7. After the source is available on the network, select Continue (to restart monitoring) or Stop to disable monitoring. 8. To begin the restoration process, open the Storage Mirroring Management Console on the target (Start, Programs, Storage Mirroring, Management Console). 9. Login to the source machine by double-clicking on it. 10.
100 Failover, Failback, and Restoration
A Recommended Credentials Storage Mirroring Application Manager Credentials Proper rights must be assigned to the account that is entered when the Application Manager prompts for credentials. If these credentials are not properly assigned, you will be prompted to enter alternate credentials before protection can be enabled. 1. The user must be a member of the “Power Users” group on the client machine. 2. The user must be a member of both servers’ local “Double-Take Admin” group. 3.
Assigning the user to the local servers’ Administrators group The user running the Application Manager must have access to both the servers' administrative shares and have rights to modify the SPN permissions. The target's machine account needs to be added to the source's Active Directory computer object for the purpose of updating the SPNs during failover and failback. The administrative shares are used to manage the configuration files and failover scripts on the source and target.
6. Click the Edit Limits button under Access Permissions. 7. Add the user to the list and grant them allow rights on both attributes: • Local Access • Remote Access 8. Click OK to return to the Properties window. 9. Click the Edit Defaults button under Access Permissions. 10.Add the user to the list and grant them allow rights on both attributes: • Local Access • Remote Access 11.Click OK to return to the Properties window. 12. Click the Edit Limits button under Launch and Activation Permissions. 13.
1. Run WBEMTEST. 2. Click the Connect button. 3. Verify the correct namespace is listed (for example, \\DNSServerName\root\microsoftDNS). 4. In the Credentials section, enter the user name and password. 5. Click the Connect button. 6. If the user has sufficient rights, the buttons located under IWbemServices will become available. Assigning Full Control on the WMI DNS Namespace Following validation, there will be a message stating the DNS WMI provider cannot be contacted.
6. In Name, type the name of the user you want to add to the group. If you want to validate the user or group names that you are adding, click Check Names. 7. Click OK to close all open dialog boxes. Manually set SPN update permissions The Write servicePrincipalName permission on the source computer account in Active Directory must be assigned to the account that will modify the SPNs.
2. Right-click on the organization name (at the top of the tree) and select Delegate Control. 3. The Exchange Delegation Tool will open. Click Next. 4. If the user is not listed as Exchange Full Administrator under Users of Groups, click Add. You must explicitly add the domain user’s login name as an Exchange Full Administrator. 5. Click Next to continue. 6. Click Finish to exit.
For SQL, you should first configure all permissions as described in ”Storage Mirroring Application Manager Credentials” on page 101. In addition, the user must have SQL Server System Administrator permission. In order to operate the Application Manager for setup and to manage failover and failback for SQL, the following permissions are required: • The user must be assigned the “System Administrator” role on the SQL server in order to query and Administer SQL.
108 Recommended Credentials
B Rebuilding the Source Rebuilding the original Exchange source The following steps guide you through rebuilding a source with the same name and IP address as the original source. 1. Install Windows on the source, if necessary, configuring it as a Windows 200x member server with the same name and IP address as the original source.
NOTE: Because the Exchange disaster recovery installation is configured for tape backup recovery, informational messages such as the following may appear; however, they do not apply to this configuration and can be disregarded: “Use Exchange Admin Snap-in to ensure that you have a valid Exchange Server Object for this server for which you are running setup in recovery mode.” “After setup has completed, restore your databases from backup, then reboot your machine.
4. Continue the failback and restoration process.
112 Rebuilding the Source
C Exchange and SQL Failover with Blackberry If you are using a standalone Blackberry server with Exchange or SQL, complete the following steps so that the Blackberry server will recognize when the server that has the BESAdmin account has been failed over. 1. Prior to failing over, shut down the Blackberry server. 2. After failover, bring the Blackberry server back up. 3. Open a command prompt on the Blackberry server and cd to C:\Program Files\Research In Motion\BlackBerry Enterprise Server\Utility. 4.
114 Exchange and SQL Failover with Blackberry
D Using the DNS Failover (DFO) Utility The DNS Failover utility (dfo.exe), which is part of the Exchange Failover utility installation, can be used in the failover and failback scripts to delete and add host and reverse lookup entries so that the source host name will resolve to the target IP address. For example, the following command could be executed from a command line or included in a batch file: “c:\Program Files\StorageWorks\Storage Mirroring\dfo.
Options (continued) • /failback—Denotes a failback procedure, performed after a failed source is recovered or restored (required for modify on failback) • fbswitch (optional)—By default, the DFO utility will only failback records in the dfo_failback_config.dat file. fbswitch allows you to enter a search criteria to identify the records to change back, even if they are not in the configuration file. fbswitch is also used if the dfo_failback_config.
General Examples • dfo /dnssrvname mydns.mydomain.com /srcname mysource.mydomain.com /srcip 206.31.4.10 /verbose Lists all resource records on the specified DNS server that match the source criteria • dfo /dnssrvname mydns.mydomain.com /srcname mysource.mydomain.com /srcip 206.31.4.10 /tarip 210.11.12.
118 Using the DNS Failover (DFO) Utility
E Using the Target Data Verification (TDV) Utility There are several options available in the Target Data Verification utility for performing a verification of the target data. The functions in this utility allow you to use a command line interface to perform the same target data verification tests that you can using the Application Manager interface. These options and the full command syntax are described in the following table.
120 Using the Target Data Verification (TDV) Utility
F Using the Exchange Failover (EFO) Utility There are several options available in the Exchange Failover utility for configuring Exchange for failover and failback. These options and the full command syntax are described in the following table.
Options (continued) • u username:password—(Optional) User with Active Directory permissions • nopublicfolders—(Optional) Do not move the public folders • onlypublicfolders—(Optional) Only move the public folders • noexchangeab—(Optional) Do not fail back the ExchangeAB SPNs for Small Business Server • noquerybaseddistgroups—(Optional) Do not update the Active Directory properties for query-based distribution groups on failover/back.