
HP StorageWorks SSL1016 Tape Autoloader Rack Installation Instructions (April 2003)

© Hewlett-Packard Company, 2003.
Hewlett-Packard Company makes no warranty of any kind with regard to
this material, including, but not limited to, the implied warranties of
merchantability and fitness for a particular purpose. Hewlett-Packard shall
not be liable for errors contained herein or for incidental or consequential
damages in connection with the furnishing, performance, or use of this
material.
This document contains proprietary information, which is protected by
copyright. No part of this document may be photocopied, reproduced, or
translated into another language without the prior written consent of
Hewlett-Packard. The information contained in this document is subject to
change without notice.
Hewlett-Packard Company shall not be liable for technical or editorial
errors or omissions contained herein. The information is provided “as is”
without warranty of any kind and is subject to change without notice. The
warranties for Hewlett-Packard Company products are set forth in the
express limited warranty statements accompanying such products. Nothing
herein should be construed as constituting an additional warranty.
hp StorageWorks
SSL1016 tape autoloader
rack
installation
instructions
WARNING: Before you begin, make sure that the rack
is sufficiently stable. If provided, lower the rack leveler
feet and make sure any required stabilizers are installed.
If provided, extend the rack anti-tip device. Failure to
extend the anti-tip device could result in personal injury or
damage to the tape autoloader if the rack tips over.
CAUTION: To prevent damage to the the tapes and the
tape drives, position the autoloader so that no cooling
vents are located directly in front of the unit; this helps
minimize the amount of foreign debris entering the tape
path.
CAUTION: Do not remove the top cover of the
autoloader during the installation process. Removing the
top cover could result in damage to the autoloader. It
also causes the autoloader chassis to bow and prevents
correct installation.
CAUTION: Make sure that the rack and all equipment
mounted in the rack have a reliable ground connection.
Verify that the total current of the rack components does
not exceed the current rating of the power distribution unit
or outlet receptacles.
!
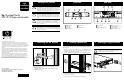
2 Installing Optional Rails
1
AC power plug
2
Fan
3
Manual magazine eject
slot
4
Ethernet connector
5
Switches (factory use only)
6
SCSI connectors
7
Manual magazine eject
slot
Front View Rear View
1
Left magazine
2
Mail slot
3
Status LEDs
4
Right magazine
5
Function keys
6
LCD
7
On/Off button
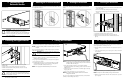
1 Measuring with the Template
Use the template that shipped with the library to mark the location of the clip nuts
and mounting hardware on the mounting rails of the rack.
1
1. Install two clip nuts into each front rail of the rack in the hole locations
marked using the template.
2. Install two clip nuts into each back rail of the rack in the hole locations
marked using the template.
1
7
2
6
3 4
5
22
1
4 53 6 7
If there are no devices installed below the autoloader, use the optional
installation rails to help support the autoloader during installation. Otherwise,
proceed to step 3.
1. Install four clip nuts at the front of the rack, two on each rail. Install the first
clip nuts two holes below the bottom autoloader clip nut. Install the second
clip nuts two holes below the first clip nuts.
2. Insert one optional mounting rail into the rack with the support ledge facing in.
1
2
3
3. Hook the curved tabs around the rear rail of the rack 1.
4. Align the rail so that the holes are over the previously installed clip nuts 2.
5. Secure with two screws 3.
6. Attach the other optional mounting rail using steps 2 through 5.
3 Attaching the Support Brackets
Attach the two support brackets to the rear of the autoloader, tightening the
screws until snug.
CAUTION: Be sure the support brackets are aligned
straight with the sides of the autoloader for proper
installation into the U-channel brackets.
Warnings and Cautions
HP StorageWorks
SSL1016 tape autoloader Installation Instructions
Third Edition (April 2003)
Part Number: 273558-003
273558- 003