
HP StorageWorks Scalable File Share System Installation and Upgrade Guide Version 2.2
Configuring the storage5–14
2. Create the virtual disks, as shown in the following example. In this example, three virtual disks are
created on the first array in the system, one to be used as a service LUN and two to be used as OST
LUNs. Note that this is only an example; it is likely that your LUN configuration will be different:
sssu> select system HSV01
HSV01> ADD FOLDER "\Virtual Disks\sfs"
HSV01> ADD VDISK "\Virtual Disks\sfs\service1" SIZE=1 REDUNDANCY=VRAID5
GROUP="\Disk Groups\Group 1" PREFERRED_PATH=PATH_A_BOTH
HSV01> ADD VDISK "\Virtual Disks\sfs\ostA" SIZE=250 REDUNDANCY=VRAID5
GROUP="\Disk Groups\Group 1" PREFERRED_PATH=PATH_A_BOTH
HSV01> ADD VDISK "\Virtual Disks\sfs\ostB" SIZE=250 REDUNDANCY=VRAID5
GROUP="\Disk Groups\Group 2" PREFERRED_PATH=PATH_B_BOTH
In this example, two of the virtual disks are named ostA and ostB. This indicates that they will be
used as OST LUNs. However, assigning a number (for example, ost1) at this stage is not appropriate
since OST numbers are not assigned until you use the create filesystem command later in the
installation process.
The two OST virtual disks on the array must be in different disk groups, and preferred to different
controllers (the PREFERRED_PATH setting). This is demonstrated in the above example, where the
ostA virtual disk is created in disk group Group 1, and preferred to controller A, while the ostB
virtual disk is created in disk group Group 2, and preferred to controller B.
Repeat these steps until you have created all of the virtual disks (on all of the arrays) that you need for use
as LUNs in the HP SFS system. Record this information in the EVA4000 array worksheet for each array (see
Table B-9 in Appendix B).
Proceed to Chapter 6 to install and configure the servers.
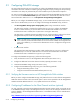
5.2.5 Configuring EVA4000 storage using the Command View EVA Web
interface
To configure the EVA4000 storage using the Command View EVA Web interface, perform the following
tasks:
1. Connect to the Microsoft Windows server using a Web browser (see Section 5.2.5.1).
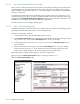
2. Record EVA4000 array WWIDs (see Section 5.2.5.2).
3. Configure disk groups (see Section 5.2.5.3).
4. Create virtual disks (see Section 5.2.5.4).
Use the checklist in Table C-4 in Appendix C to verify that you have performed all of the tasks, in the correct
order.
The instructions for configuring your storage assume that you have planned your storage configuration
according to the guidelines described in Section 5.1.2 and Section 5.1.3.
Before continuing with the tasks described in this section, ensure that the storage arrays have been
initialized, as described in Section 5.2.3.
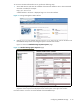
5.2.5.1 Step 1: Connecting to the Microsoft Windows server using a Web browser
The Command View EVA Web interface provides a convenient way of viewing the status of EVA4000 arrays
and managing the arrays from any point on your network. Before you can proceed, you must know the IP
address and administrator password of the Microsoft Windows server where Command View EVA is
installed. Command View EVA can run on a Microsoft Windows-based server or an HP OpenView Storage
Management Appliance.