
HP StorageWorks Scalable File Share System Installation and Upgrade Guide Version 2.2
Configuring the storage5–12
5.2.4.2 Step 2: Identifying EVA4000 array WWIDs
When you later install and configure the HP SFS system (as described in Chapter 6), the system discovers
which EVA4000 arrays are connected to the system’s servers. The system can identify arrays using their
WWID. In addition, as described in Section 5.1.1, the system assigns a unique number to each EVA4000
array as it is discovered. To understand the relationship between the WWID, the array number, and the
array itself when you are configuring the storage, you need to identify the WWID of each array.
You can identify the WWIDs using one of the following methods. Record this information in the EVA4000
array worksheet for the array (see Table B-9 in Appendix B):
• View the WWID of the EVA4000 arrays on the LCD display of each controller.
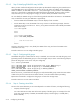
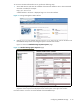
• Use the SSSU utility to view the WWID of an array, as shown in the following example, where the
system has two arrays, and the show WORLD_WIDE_NAME command is used to identify the WWID
of the HSV01 array:
sssu> show system
HSV01
HSV02
sssu> select system HSV01
HSV01> show WORLD_WIDE_NAME
.
.
.
5000-1fe1-5000-7050
.
.
.
HSV01>
Connect to each of the arrays in turn, identify the WWID of the array, and record its WWID on the
worksheet for the array.
Proceed to Section 5.2.4.3 to configure the disk groups.
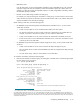
5.2.4.3 Step 3: Configuring disk groups
One default disk group is created when an array is initialized. You must create a second disk group, and
(optionally) rename the default disk group to a more meaningful name, as shown in the following example
(where the disk groups on the HSV01 array are configured):
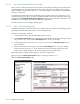
sssu> select system HSV01
HSV01> SET DISK_GROUP "\Disk Groups\Default Disk Group" NAME="Group 1"
HSV01> SET DISK_GROUP "\Disk Groups\Group 1" OCCUPANCY_ALARM=90
SPARE_POLICY=SINGLE
HSV01> ADD DISK_GROUP "\Disk Groups\Group 2" DEVICE_COUNT=14
SPARE_POLICY=SINGLE OCCUPANCY_ALARM=90
Review the DEVICE_COUNT field in the disk groups to verify that both disk groups contain the same number
of disks. If they do not contain the same number of disks, correct the situation before proceeding
Repeat these commands to configure the disk groups on each of the storage arrays.
Proceed to Section 5.2.4.4 to create virtual disks.
5.2.4.4 Step 4: Creating virtual disks
The size of the virtual disks that you can create depends on a number of factors, including the following:
• Capacity of the disk group.
You cannot allocate more than 90% of the total capacity of the disk group. For example, if the disk
group has a total capacity of 350GB, the available capacity in the disk group is 315GB (that is,
90% of 350GB).