
HP StorageWorks Scalable File Share Release Notes - Version 2.2-1


Documentation updates and corrections 1–15
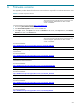
# lsof /data
COMMAND PID USER FD TYPE DEVICE SIZE NODE NAME
su 5384 root cwd DIR 83,106 294912 393217 /data/user1
csh 10993 user2 cwd DIR 83,106 4096 52428801 /data/user2/bonnie
ssh 16408 user2 cwd DIR 83,106 4096 52428801 /data/user2/bonnie
csh 22513 user3 cwd DIR 83,106 4096 39682049
/data/user3/bids/noaa/runs/0128
res 31820 user3 cwd DIR 83,106 12288 39649281
/data/user3/bids/noaa/runs/0096
110510208 31847 user3 cwd DIR 83,106 12288 39649281
/data/user3/bids/noaa/runs/0096
110510208 31850 user3 cwd DIR 83,106 12288 39649281
/data/user3/bids/noaa/runs/0096
mpirun 31950 user3 cwd DIR 83,106 12288 39649281
/data/user3/bids/noaa/runs/0096
srun 31951 user3 cwd DIR 83,106 12288 39649281
/data/user3/bids/noaa/runs/0096
bash 32572 user1 cwd DIR 83,106 294912 393217 /data/user1
3. Unmount all Lustre file systems on the client node that you are going to upgrade, as follows:
• If the client node is at HP SFS Version 1.1 or earlier, use the lconf --cleanup command to
unmount all file systems as shown in the following example, where the data file system is
unmounted:
# /usr/sbin/lconf --ldapurl ldap://south.my.domain.com --config data --node
client_tcp --cleanup
• If the client node is at HP SFS Version 2.2-0 or later, use one of the following commands to
unmount all file systems:
• If your system is configured for XC availability, use the sfsumount -a command as
follows:
# sfsumount -a
• On all other systems, use the service sfs stop command as follows:
# service sfs stop
4. Remove all of the existing HP SFS RPM files on the head node in the order in which they were
installed, as shown in the following example:
NOTE: In the example shown here, the python-ldap package is removed. This package
needs to be removed only on HP Integrity systems. Omit this command on all other systems.
# rpm -ev lustre-modules-version_number \
lustre-lite-version_number \
python-ldap-version_number \
hpls-lustre-client-version_number \
hpls-diags-client-version_number
5. Reboot the head node.
6. Install the new HP SFS client software on the head node, using the instructions provided in Steps 1
through 4 in Section 2.2.1.
7. When you have finished upgrading the software on the client node, verify that the client node is
configured as described in Section 2.4. Note that the /etc/lustre/lustre.cfg file on the client
node is not used on the client node in HP SFS Version 2.2. See Chapter 3 for information on mounting
and unmounting file systems on client nodes.
8. Reboot the head node.
9. If you are using XC Availability you must re-enable it before proceeding. Run the
transfer_to_avail command to re-enable availability. For details on how to use this command
see the HP XC System Software Administration Guide.