
HP P6000 Continuous Access Implementation Guide (T3680-96431, August 2012)
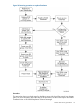
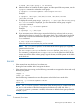

Figure 57 Disk Group Hardware Failure window
4. Click Start Resolution Process.
After a prompt for confirmation, a list of failed DR groups is displayed.
5. One at a time, select the affected DR groups and click Delete, then OK to confirm the deletion.
Deleting a DR group removes the relationship between the virtual disk members; it does not
delete data from the virtual disks as they remain intact on source and destination systems.
6. If the failover has not occurred, use HP P6000 Command View to navigate to each DR group
on the destination array and fail over if possible. See “Unplanned failover” (page 108).
Once a DR group is failed over, the DR group will be deleted automatically. If failover occurred
during Step 2, the DR group must be deleted manually.
7. (Optional) Repair your hard drives on the failed array. Delete the virtual disks which were
part of the original source DR group.
For more information, see the EVA User Guide for your array model and the HP P6000
Command View Software Suite User Guide.
8. Refresh the new source array and re-create the DR groups.
9. After normalization occurs between the source and destination arrays, fail over the DR groups
using the procedure in “Planned failover” (page 105).
Disk group hardware failure on the destination array
A hardware failure on a destination array causes the DR group to become inoperative.
Action summary: Delete the DR groups on the source array that replicated to the failed disk group,
repair the failed disk group on the destination array, re-create your DR groups on the source array,
and make host presentations at the destination array.
Failover and recovery procedures 115