
HP StorageWorks XP Performance Advisor Software v4.6 Install Guide (T1789-96096, July 2010)
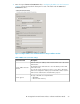
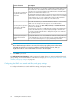
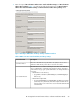
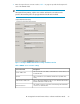
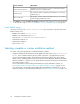
Table Of Contents
- HP StorageWorks XP Performance Advisor Software Installation Guide
- Contents
- 1 Overview of XP Performance Advisor
- 2 Understanding the XP Performance Advisor installation prerequisites
- Installation checklist for installing XP Performance Advisor
- Initial XP Performance Advisor setup prerequisites
- Management station prerequisites
- Verifying the supported configurations for XP Performance Advisor
- Getting the fully qualified domain name or IP address of your management station
- Determining the authentication type for XP Performance Advisor
- Creating 1 GB of free disk space
- Choosing a system where Oracle is not installed
- Configuring a Loopback Adapter or static IP address
- Switching the IIS Admin service to manual start mode
- Assigning port 80 for XP Performance Advisor
- Disabling the UAC on a Windows Vista management station
- Configuring firewall settings on a Windows XP Professional management station
- Configuring the web browser proxy server settings
- Assigning GUIDs for command devices on a Windows host
- XP Performance Advisor host agent prerequisites
- Verifying the supported configurations for XP Performance Advisor host agents
- Configuring settings on Windows and UNIX hosts
- Creating and presenting command devices to hosts
- Mapping command devices from virtual servers
- Verifying host connectivity to a command device
- Configuring SSL settings for the XP Performance Advisor host agents
- 3 Installing XP Performance Advisor
- Beginning the XP Performance Advisor installation
- Launching the XP Performance Advisor checklist
- Complying with the End User License Agreement
- Retaining or selecting a different database location
- Enabling IPv6 on your management station
- Implementing the authentication method
- Selecting complete or custom installation method
- Completing the XP Performance Advisor installation and next steps
- 4 Installing the XP Performance Advisor host agents
- 5 Understanding the XP Performance Advisor upgrade prerequisites
- 6 Upgrading XP Performance Advisor
- 7 Upgrading XP Performance Advisor host agents
- 8 Using XP Performance Advisor
- 9 Modifying or repairing XP Performance Advisor
- 10 Removing XP Performance Advisor
- 11 Troubleshooting XP Performance Advisor installation related issues
- Troubleshooting installation issues
- Troubleshooting configuration issues
- Troubleshooting web client issues
- Installation error messages
- 12 Support and other resources
- A Installing a Loopback Adapter
- B Stopping and starting host agent services
- Glossary
- Index

DescriptionScreen elements
Select this check box to use SSL when communicating with the LDAP server.
Ensure that SSL is also enabled on the LDAP server before selecting this
check box. If not selected, it might result in authentication and authorization
failures for XP Performance Advisor users.
By default, XP Performance Advisor supports the simple (clear-text password)
authentication mechanism with the LDAP server, wherein SSL is not enabled
for the LDAP server. To secure communications between XP Performance
Advisor and the LDAP server, enable SSL on the LDAP server.
Use SSL when communicat-
ing with the LDAP server
check box
Select this check-box if you want XP Performance Advisor to connect to the
LDAP server as anonymous for the purpose of user authentication.
If this mode is chosen, the User's DN, Password, and Confirm Password
text boxes are disabled.
An anonymous connection is established when logging into XP Performance
Advisor. The LDAP directory is searched (anonymously) to determine the
user's DN, and then authentication is attempted using the user's DN and
the supplied password.
Use anonymous login when
connecting to the LDAP
server check box
Specify the details of a user account that has read and search permissions
on the LDAP directory. This account will be used to search the LDAP directory
for user entries and lookup the user group membership information.
User DN, Password, and
Confirm Password text
boxes
IMPORTANT:
Ensure that the DNs provided are correct and do not have any spelling errors in their names.
If the DNs provided are incorrect, the installation will still complete. However, later you
might not be able to connect to the LDAP server due to the wrong DN.
2. Click Next to proceed.
The Authentication Configuration window appears for LDAP, where you must provide the filter and
group settings. For more information on the next set of steps, see “Configuring the LDAP user search
and filter, and group settings” on page 54.
Configuring the LDAP user search and filter, and group settings
To configure the LDAP user search and filter settings, and group settings:
Installing XP Performance Advisor54