
HP StorageWorks XP Performance Advisor Software v4.6 Install Guide (T1789-96096, July 2010)
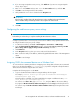
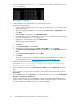
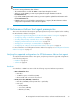
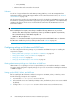

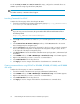
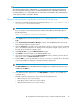
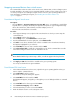
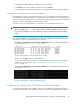
Table Of Contents
- HP StorageWorks XP Performance Advisor Software Installation Guide
- Contents
- 1 Overview of XP Performance Advisor
- 2 Understanding the XP Performance Advisor installation prerequisites
- Installation checklist for installing XP Performance Advisor
- Initial XP Performance Advisor setup prerequisites
- Management station prerequisites
- Verifying the supported configurations for XP Performance Advisor
- Getting the fully qualified domain name or IP address of your management station
- Determining the authentication type for XP Performance Advisor
- Creating 1 GB of free disk space
- Choosing a system where Oracle is not installed
- Configuring a Loopback Adapter or static IP address
- Switching the IIS Admin service to manual start mode
- Assigning port 80 for XP Performance Advisor
- Disabling the UAC on a Windows Vista management station
- Configuring firewall settings on a Windows XP Professional management station
- Configuring the web browser proxy server settings
- Assigning GUIDs for command devices on a Windows host
- XP Performance Advisor host agent prerequisites
- Verifying the supported configurations for XP Performance Advisor host agents
- Configuring settings on Windows and UNIX hosts
- Creating and presenting command devices to hosts
- Mapping command devices from virtual servers
- Verifying host connectivity to a command device
- Configuring SSL settings for the XP Performance Advisor host agents
- 3 Installing XP Performance Advisor
- Beginning the XP Performance Advisor installation
- Launching the XP Performance Advisor checklist
- Complying with the End User License Agreement
- Retaining or selecting a different database location
- Enabling IPv6 on your management station
- Implementing the authentication method
- Selecting complete or custom installation method
- Completing the XP Performance Advisor installation and next steps
- 4 Installing the XP Performance Advisor host agents
- 5 Understanding the XP Performance Advisor upgrade prerequisites
- 6 Upgrading XP Performance Advisor
- 7 Upgrading XP Performance Advisor host agents
- 8 Using XP Performance Advisor
- 9 Modifying or repairing XP Performance Advisor
- 10 Removing XP Performance Advisor
- 11 Troubleshooting XP Performance Advisor installation related issues
- Troubleshooting installation issues
- Troubleshooting configuration issues
- Troubleshooting web client issues
- Installation error messages
- 12 Support and other resources
- A Installing a Loopback Adapter
- B Stopping and starting host agent services
- Glossary
- Index

Mapping command devices from virtual servers
The command devices that are visible to the virtual servers, VMware ESX, or Microsoft Hyper-V, must
be made available to the virtual or guest operating platforms residing on these virtual servers. This is
one of the prerequisites for installing host agents on these virtual or guest operating platforms. For
more information on installing host agents, see “Installing XP Performance Advisor host
agents” on page 71.
From Microsoft Hyper-V virtual server
Prerequisite:
• Select the Action >> Insert Integeration Services Setup Disk option. It is mandatory to install all the
required drivers or packages needed by the Hyper-V virtual system to support integrated storage
devices like SCSI devices, Fibre Channels, Host Bus Adapters, and so on.
• Ensure that the virtual machine is shutdown.
Procedure:
1. In the Hyper-V Manager screen, right-click the virtual machine to which you want to map the
command devices.
2. Select Settings from the drop down list.
3. In the Settings screen, click Add Hardware in the left pane.
4. From the Add Hardware list in the right pane, select SCSI Controller.
5. Click Add. A new device called the SCSI controller is added for the selected virtual machine,
and appears highlighted for your reference.
6. Select Hard Drive for the new SCSI controller and click Add.
7. Select Physical hard disk to enable the command devices list. All the command devices visible
to the Microsoft Hyper-V virtual server are available in this list.
NOTE:
Ensure that the hard disk you want to map is offline, or it will not appear in the drop down list.
8. Click Apply and OK. The hard disk is available to the guest operating system.
You can proceed with the host agent installation.
From VMware ESX virtual server
1. In the VMware Infrastructure Client screen, right-click the guest operating platform where you
want to map the command devices.
2. Select Edit Setting from the pop menu.
The Virtual m/c Properties dialog box appears.
3. Select Hard Disk from the list and click Add.
The Add Wizard appears, and guides you through the process of adding hard disks or command
devices.
4. Select Hard Disk as the device type and click Next>.
5. Select Raw Device Mappings and click Next>.
6. Select the LUN that you want to use and click Next>.
7. Retain the default selections on the subsequent screens.
Understanding the XP Performance Advisor installation prerequisites38