HP StorageWorks XP Performance Advisor Software Installation Guide This guide describes how to install and configure HP StorageWorks XP Performance Advisor Software (XP Performance Advisor). This guide is intended for users and HP service providers who have knowledge of the HP StorageWorks XP disk arrays hardware and software, and storage systems. For the latest release information on this product, see the HP StorageWorks XP Performance Advisor Software Release Notes.
Legal and notice information © Copyright 2002, 2010 Hewlett-Packard Development Company, L.P. Confidential computer software. Valid license from HP required for possession, use or copying. Consistent with FAR 12.211 and 12.212, Commercial Computer Software, Computer Software Documentation, and Technical Data for Commercial Items are licensed to the U.S. Government under vendor's standard commercial license. The information contained herein is subject to change without notice.
Contents 1 Overview of XP Performance Advisor .................................................... 9 XP Performance Advisor resources ................................................................................................. 9 Installation work flow ................................................................................................................. 12 Upgrade work flow ...................................................................................................................
RADIUS Authentication ........................................................................................................ Selecting complete or custom installation method .......................................................................... Selecting components to install (custom installation) ................................................................ Completing the XP Performance Advisor installation and next steps ..................................................
10 Removing XP Performance Advisor .................................................. 107 Removing the XP Performance Advisor host agent ........................................................................ 107 Removing the XP Performance Advisor management station .......................................................... 108 Post removal instructions ..........................................................................................................
Figures 1 XP Performance Advisor setup ................................................................................... 10 2 XP Performance Advisor installation work flow ............................................................ 12 3 XP Performance Advisor upgrade work flow ................................................................ 14 4 XPInfo –i command .................................................................................................
Tables 1 XP Performance Advisor utilities ................................................................................. 13 2 HP StorageWorks XP Performance Advisor and host agents installation checklist .............. 16 3 Large XP disk array configurations ............................................................................. 21 4 LDAP server connection settings ................................................................................
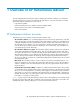
1 Overview of XP Performance Advisor The HP StorageWorks XP Performance Advisor Software (XP Performance Advisor) is a web-based application that collects, monitors, and displays the performance of your XP disk arrays.
Figure 1 XP Performance Advisor setup . Additionally, the XP Performance Advisor also provides XPWatch, XPSketch, and XPInfo. For a brief description of these tools, see Table 1 on page 13. Installation work flow In a typical installation, you need to install XP Performance Advisor on the management station followed by the host agents on the respective hosts. To install XP Performance Advisor and the host agents, complete the following steps: 1. 2. 3. 4. 5. 6. 7. 8.
HP StorageWorks XP Performance Advisor Software Installation Guide 11
Figure 2 XP Performance Advisor installation work flow . In “Installation work flow” on page 12, the CLUI, XPWatch, XPSketch, and XPInfo are additional utilities provided with XP Performance Advisor. Table 1 on page 13 provides a brief description of these utilities. The HP StorageWorks XP Performance Advisor Software Installation Guide covers only the end-to-end installation or upgrade of the XP Performance Advisor, and host agents.
IMPORTANT: The CLUI, XPWatch, XPSketch, and XPInfo are available in the Tools folder on XP Performance Advisor Installation disk 2. Table 1 XP Performance Advisor utilities XP Performance Advisor tools Description XPWatch XPWatch is a command-line utility provided with XP Performance Advisor. It is designed for focused troubleshooting and can capture data as frequently as every 10 seconds.
10. Verify whether you are able to perform configuration and performance data collections using the upgraded version of XP Performance Advisor. In addition to an installation checklist, XP Performance Advisor also provides an upgrade checklist that guides you through the upgrade process. Before proceeding with the upgrade, ensure that you have completed the appropriate prerequisites and tasks mentioned in the checklist.
2 Understanding the XP Performance Advisor installation prerequisites This chapter describes the prerequisites to install the XP Performance Advisor software and the host agents, and explains the installation checklist. For more information, see Table 2 on page 16. To upgrade an existing version of XP Performance Advisor, see Table 7 on page 84.
Sections in the HP StorageWorks XP Performance Advisor and Host Agents Installation Checklist The prerequisites and tasks provided in the installation checklist are organized as follows: • Before installing XP Performance Advisor: This section lists the tasks and prerequisites you must complete before starting the XP Performance Advisor installation process on your management station. • Installing XP Performance Advisor: This section directs you to the XP Performance Advisor installation wizard.
Verify if JRE v5.0 Update 14 (minimum) or later is installed (JRE v6.0 Update 18 is the maximum supported), and the JAVA path is pointing to the installed location on your management station. For more information, see the Software section in “Verifying the supported configurations for XP Performance Advisor” on page 23. Get the fully-qualified domain name or IP address of your management station.
Map the command devices to the guest operating platforms, if these operating platforms are residing on the virtual servers. For more information, see “Mapping command devices from virtual servers” on page 38. Configure your web browser to not use any web proxy servers. For more information, see “Configuring the web browser proxy server settings” on page 31. Installing XP Performance Advisor Install XP Performance Advisor on your management station.
Installing the XP Performance Advisor host agents Install the XP Performance Advisor host agents. At this point, return to the respective XP Performance Advisor host agents installation procedures for the host agents you want to install. For more information, see “Installing XP Performance Advisor host agents” on page 71. IMPORTANT: After installing the XP Performance Advisor host agents, return to this checklist to complete the remaining prerequisites and tasks to use XP Performance Advisor.
1. Collecting information about the XP disk arrays you will be monitoring on page 20 2. Determining the management station and host requirements on page 20 3. Preparing your XP disk arrays and determining their data collection schedules on page 22 Collecting information about the XP disk arrays you will be monitoring 1. Determine the number of logical devices (LDEVs) for each of the XP disk arrays. 2. Determine how frequently you want to access data from the XP disk arrays.
2. Increase the management and host agent configuration based on the number of LDEVs you require and collection frequencies you want to set. The following items can help you estimate the configuration you will need.
• 10055 XP Disk Array details: • LDEVs = 1703 • PORTs = 96 • Dkc_Collection_frequency = 300 seconds (5 * 60) • Ldev_Collection_frequency = 600 seconds (10 * 60) • Port_Collection_frequency = 600 seconds (10 * 60) Free_Space on 10055 array = [(86400/600) *1703 * 0 .0002] + [(86400/ 600) * 96 * 0.00008] + [(86400/300) * 0.0002] = 49.04 + 1.1 + 0.05 = 50.
• Five host agents (three XP disk arrays per host) • 15 XP disk arrays (2000 LDEVs per XP Disk Array) • Collect performance data every 2 minutes for all the resources in your XP disk arrays • Collect configuration data every week, during the weekend • Use stagger schedule – Yes Determining the coexistence with other storage products The following configurations are supported for XP Performance Advisor: • HP StorageWorks Command View XP Advanced Edition (Command View XP Advanced Edition or Command View XP A
• Software on page 24 • Web browser on page 25 • Firmware on page 25 Hardware Your management station must meet the following hardware requirements: • DVD drive • 3 GHz CPU (minimum) • 2 GB RAM (minimum), 4 GB RAM for complex configuration and multiple XP disk arrays, or multiple XP disk arrays • 10 GB free space on hard drive (minimum), 32 GB free disk drive space (for cache swap space and database) (NTFS) • Ethernet LAN card connected to the network • VGA graphics display with 256 colors (21-inch SVGA gr
Java HotSpot(TM) Server VM (build 1.5.0.14 jinteg:07.25.08-11:41 IA64, mixed mode) For the list of supported Windows operating systems and JRE versions, see the HP StorageWorks XP Performance Advisor Software OS Support Matrix. This document also specifies the Windows operating systems that are supported as guest operating platforms on the VMware ESX, Citrix XEN, and Microsoft Hyper-V virtual servers.
Ensure that the check box for Internet Protocol Version 6 (TCP/IPv6) is selected under the Networking tab. Either IPv6 or IPv4 is used for communication between the management station and its host, based on whether you select IPv6 or IPv4 while installing the host agent. Determining the authentication type for XP Performance Advisor You must select an authentication type based on the current setup of your management station.
Windows Domain based Authentication The Windows Domain based Authentication is required if you want to implement the domain-based authentication for administrators and user domain groups residing on the same or different domains. Only users belonging to the domain groups are given privileges to log in to XP Performance Advisor. By default, XP Performance Advisor refers to these groups as HP Storage Admins and HP Storage Users.
RADIUS server implementation RADIUS authentication mechanisms Microsoft Active Directory with Internet Authentication Service (IAS) for Windows platform • PAP: Password Authentication Protocol • CHAP: Challenge Handshake Authentication Protocol To implement RADIUS Authentication, your system administrator must add a RADIUS Vendor-Specific Attribute (VSA) to the user profile on the RADIUS server.
1. Select Start > Run and type services.msc in the command line. The Services dialog box appears. 2. Right-click the Oracle database services: Oracle PADB service and Oracle Listener service, and select Stop from the drop down list. 3. Select Start > Run and type appwiz.cpl in the command line. 4. Remove Oracle from the list of programs. 5. Go to :\Program Files and delete the folder for Oracle. 6. Reboot your management station, so that Oracle is completely removed.
netstat -o -n -a | findstr 0.0:80 You can expect an outcome similar to the following: TCP 0.0.0.0:80 0.0.0.0:0 LISTENING 804 The last column of the output from the above command is the process identifier (PID), denoted by . In the example output, the PID is 804. If another application’s service is using port 80, XP Performance Advisor is installed but the HP StorageWorks XP Performance Advisor Tomcat service does not start.
4. 5. If you are using SSL Apache Server (HTTPS), click Add Port. If you are not using SSL Apache Server, skip to step 8. Enter HTTPS in the Name text box, enter 443 in the Port number text box, and click TCP. 6. 7. Click OK to save changes and close the window. Verify whether the HTTPS box is checked on the Exceptions tab.
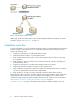
2. From a command line, run the XPInfo –i, to display the list of all the command devices (see Figure 4 on page 32). Figure 4 XPInfo –i command . 3. Create a GUID on the command devices to perform data collection. Complete the following steps: a. Log in to the XP Performance Advisor host agent as an administrator or as a member of the Administrators group. b. Open the Computer Management console by clicking Start > Run > compmgmt.msc, and press Enter. c.
NOTE: To ensure accurate performance data collection: • The command device on which the GUID is created must always be mounted. • When you create a GUID, you must request updated host agent information under the Host Information tab. • If you delete a GUID partition and recreate it, you must request the updated host information under the Host Information tab.
• Linux (250 MB) • Ethernet LAN card connected to the network Software For the list of supported Windows and UNIX operating platforms, see the HP StorageWorks XP Performance Advisor Software OS Support Matrix. For document download location, see “Related documentation” on page 126.
Setting up a Linux host Before installing the XP Performance Advisor host agent on a Linux host, ensure that the following prerequisites are completed: 1. 2. You must have a root or superuser access to the host. Configure the root or superuser account to allow remote access via the FTP services by completing the following steps: a. Run the /usr/sbin/ntsysv command and enable wu-ftpd b. Edit /etc/pam.d/ftp by commenting out the line with #: auth required /lib/security/pam_listfile.
For the XP24000/XP20000/XP12000/XP10000 disk arrays, configure the command devices as SLPR0 to report full Storage Logical Partition (SLPR) data. NOTE: For further assistance, contact HP technical support. Launching Command View XP AE Complete the following steps before launching the XP RWC: 1. Launch the Command View XP AE Device Manager by typing http://:23015/ DeviceManager/ into a browser window.
CAUTION: The volume designated as the command device is used only by the disk array and is blocked from the user. Because the volume you select as a command device becomes unavailable to the host, HP recommends that you use a volume that does not contain data or mounted files. The command device can be any device that is accessible to the host. Creating a command device using XP RWC for XP1024/XP128 disk arrays 1.
Mapping command devices from virtual servers The command devices that are visible to the virtual servers, VMware ESX, or Microsoft Hyper-V, must be made available to the virtual or guest operating platforms residing on these virtual servers. This is one of the prerequisites for installing host agents on these virtual or guest operating platforms. For more information on installing host agents, see “Installing XP Performance Advisor host agents” on page 71.
The Ready to Complete dialog box displays your current selection. 8. Click Finish. If you want to modify the current selection, click Back. The new hard disk is added to the Hardware list. You can proceed with the host agent installation. Verifying host connectivity to a command device Command devices must be created and presented to your host to establish connectivity between your host agent and the XP Disk Array before you begin the host agent installation.
is that it does not need a Certificate Authority (CA) signed certificate. The client takes the public key from the server and stores it in a keystore, and then places the keystore in the JRE’s trusted site list. This enables the XP Performance Advisor host agent to establish a SSL connection to secure the data transfer. To enable SSL on a XP Performance Advisor host agent: 1. Navigate to the bin folder in the JRE location defined by your JAVA_HOME variable. 2.
9. To retrieve the public key from the XP Performance Advisor management station and create a keystore, type: <%JAVA_HOME%>\bin\javaC InstallCert :443 Example of a DNS, abc.domain.company.net. The following status messages appear while InstallCert creates the Keystore: Loading KeyStore /opt/java6/jre/lib/security/cacerts... Opening connection to abc.domain.company.net:443... Starting SSL handshake... javax.net.ssl.SSLHandshakeException: sun.security.validator.
10. When prompted to select the certificate to be added to the trusted keystore, look through the list of certificates displayed and enter the serial number of the certificate you want to add. For example, enter 1 if you want the first certificate in the list to be added to the trusted keystore. If you do not want to proceed, type q to quit. Enter certificate to add to trusted keystore or 'q' to quit: [1] 1 [ [ Version: V3 Subject: CN=abc.domain.company.
13. When prompted to select the certificate to be added to the trusted keystore, look through the list of certificates displayed and enter the serial number of the certificate that you want to add. If you do not want to proceed, type q to quit. Enter certificate to add to trusted keystore or 'q' to quit: [1] q KeyStore not changed 14. Modify the paxp_service.properties to use SSL. Replace http with https and the IP address of the management station with its fully-qualified domain name. ManagementStation.
Understanding the XP Performance Advisor installation prerequisites
3 Installing XP Performance Advisor This chapter describes the process of installing XP Performance Advisor on a management station.
3. The installation wizard verifies whether Microsoft .NET Framework v2.0 or later is installed on your management station, and does one of the following: • If Microsoft .NET Framework v2.0 or later is installed, the XP Performance Advisor Welcome installation window appears. The installation window framework consists of the following: • Title pane: Displays the title of the current installation window, which also indicates the install step that you perform.
Figure 7 XP Performance Advisor Welcome installation window . Read through the instructions displayed on the Welcome installation window. • To proceed with the installation, you must complete a set of installation prerequisites and tasks provided in a checklist that appears when you click Launch Checklist. For more information, see “Launching the XP Performance Advisor checklist” on page 47.
Advisor. For more information on the checklist, see “Installation checklist for installing XP Performance Advisor” on page 15. • The upgrade checklist appears, if the installation wizard has detected an existing version of XP Performance Advisor. This checklist guides you through the upgrade of XP Performance Advisor. For more information on the checklist, see “Upgrade checklist for upgrading XP Performance Advisor” on page 83.
Figure 8 Database Location Specification installation window . • If disk space is not available on the default , the installer suggests another drive location on your management station, where the database can be placed. • You can also select another folder location on the default or a different drive, and the folder location for your XP Performance Advisor database. To manually select a different location: 1.
NOTE: • Both the XP Performance Advisor and host agents must communicate using the same protocol, either IPv4 or IPv6. • Enabling IPv6 in an IPv4 only environment, that is, on a management station configured with only an IPv4 interface, does not make XP Performance Advisor unusable. In such cases, XP Performance Advisor uses IPv4 as the communication protocol for all its communications.
XP Performance Advisor Native Authentication By default, XP Performance Advisor uses Performance Advisor Native Authentication to authenticate and authorize all users. If the XP Performance Advisor verifies that the management station is not in a domain or if you select Performance Advisor Native Authentication, and click Next, you are taken to the Choose Setup Type installation window, where you can select either the complete or custom installation method.
Click Next to proceed. The Choose Setup Type installation window appears. For more information on the next set of steps, see “Selecting complete or custom installation method” on page 58. LDAP Authentication In this authentication method, you must configure the following settings to implement LDAP authentication. XP Performance Advisor uses these settings to connect to the LDAP server, and to authorize and authenticate its users: • LDAP server and connection settings.
1. Enter the required Server and Connection values. “Configuring the LDAP server and connection settings” on page 53 provides the description for each of the fields under the Server and Connection sections. Figure 9 Configure LDAP Server and Authentication Settings installation window . Table 4 LDAP server connection settings Screen elements Description Network name (or IP address) and Port # of the LDAP server to be used for authentication.
Screen elements Use SSL when communicating with the LDAP server check box Description Select this check box to use SSL when communicating with the LDAP server. Ensure that SSL is also enabled on the LDAP server before selecting this check box. If not selected, it might result in authentication and authorization failures for XP Performance Advisor users.
1. Enter the required XP Performance Advisor User Search and Filter Settings and XP Performance Advisor Group Settings. Table 5 on page 55 provides the description for the XP Performance Advisor User Search and Filter Settings and XP Performance Advisor Group Settings fields. Figure 10 Configure LDAP Filter and Group Settings installation window .
Screen elements Description Group Base DN box Base DN in the LDAP DIT for all the groups. This is the path in the LDAP directory where all groups are located. XP PA Administrators Group DN box Distinguished names of the XP Performance Advisor Administrators in the LDAP directory. XP PA Users Group DN box Distinguished names of the XP Performance Advisor Users groups in the LDAP directory.
1. Enter the required server connection values. Table 6 on page 57 provides the description for each of the RADIUS fields. NOTE: Among the following settings, only the server address and shared secret values must be provided. The remaining values are pre-populated and should not be modified. Figure 11 Configure RADIUS Authentication Settings installation window .
2. Screen elements Description Confirm Shared Secret box Confirm the shared secret to be used when communicating with the RADIUS server for user authentication. Retry Count box The maximum number of authentication attempts for a user to log in (default value: 3). Timeout Value box The duration of time (in milliseconds) before timing out on an authentication attempt. (Default value: 3000). Click Next to proceed. The Choose Setup Type installation window appears.
IMPORTANT: • After installing XP Performance Advisor, the host agents, CLUI, XPWatch, XPSketch, and XPInfo are available in the :\HPSS\pa\tomcat\webapps\pa\tools folder on your management station. • The XP Performance Advisor host agents (.tar files) are also available on XP Performance Advisor Installation disk 2. From the HA folder, copy the operating platform specific XP Performance Advisor host agent .tar file that you want to install to the respective host and double click the .
You can also use %PADB_Home% at Start > Run to locate the padb folder on your management station. It works if the PADB_HOME environment variable is configured on your management station. • Check the available free space on all the disk volumes in your management station. Click Check Space to view the free space available on all the disks volumes in your management station.
2. Click the down arrow for the XP Performance Advisor host agent that you want to install. Figure 12 Configure Custom Setup installation window . A pop-up dialog box appears displaying the different installation types. 3. Select the type of installation that you want. The following installation options are available: This feature will be installed on the local drive. This feature and all the sub features, will be installed on the local drive.
Selecting XP Performance Advisor tools To select the XP Performance Advisor tools that you want to install: 1. Click the + sign or the down arrow beside the Tools menu to view the following XP Performance Advisor tools: • • • • 2. XPSketch XPWatch XPInfo CmdLineUserInterface By default, CmdLineUserInterface (CLUI) software is copied to the location where XP Performance Advisor is installed. Repeats steps 2 and 3 from the procedure for Selecting XP Performance Advisor host agents on page 60.
• • • • HP HP HP HP StorageWorks StorageWorks StorageWorks StorageWorks XP XP XP XP Performance Performance Performance Performance Advisor Advisor Advisor Advisor Database Listener Security Tomcat Tomcat Monitor To confirm whether the above-mentioned services have started, see “Confirming the XP Performance Advisor services” on page 63. If you want to view the XP Performance Advisor installation log, select the Show the Windows Installer Log check box. The PA_Install.
2. If XP Performance Advisor is installed, the status of the following services are in the Started mode.
5. Enter the following details for the user in the pop-up window that appears: a. Name of the new user and a brief description about the user profile. b. A password for the user account. c. Enter the password again in the Confirm Password box. d. Assign the user to a group. The Group list displays Administrators, StorageAdmins (read and write access), and Users (read access). These are the only groups available for XP Performance Advisor Native Authentication. 6. Click OK.
Launching XP Performance Advisor IMPORTANT: • Ensure that Adobe Flash Player and Flash Player Plugin, v10.0.0 or later are installed on the system from where you want to access XP Performance Advisor, otherwise the following error is displayed when you type http:// or / pa in your IE browser window: Alternate HTML content should be placed here. This content requires the Adobe Flash Player. Download both Adobe Flash Player and Flash Player Plugin, v10.0.
2. Enter your user name and password. XP Performance Advisor authenticates your credentials based on the authentication type you selected while installing XP Performance Advisor. Your site or system administrator will have information on the authentication type configured on the management station. For more information on authentication types, see “Implementing the authentication method” on page 50.
2. Generate a permanent license: a. Access the Hewlett-Packard Authorization Center (HPAC) license key website, http:// webkey.external.hp.com/ from your IE browser. b. Click Generate a License Key in the Main Menu section. c. Enter the registration number in the Registration Number or Product Authorization Key box. Ensure that the registration number is the same as that mentioned in the product entitlement certificate. d. Click Next >> and provide the following details: e.
3. Add the permanent license to XP Performance Advisor: a. Log in to XP Performance Advisor. For more information, see “Launching XP Performance Advisor” on page 66. b. In the XP Performance Advisor Home screen, click License in the left pane. The License screen appears. c. Click Browse in the Add New License File section. d. Navigate to the folder where the license (.dat) file is stored. e. Select the license that you want to add and click Open. The license file appears in the File Name box. f.
• If license violation was detected for one or more monitored XP disk arrays, and XP Performance Advisor was in the license expiry violation duration, it continues to be in that state until you generate a permanent license for the monitored XP disk arrays.
4 Installing the XP Performance Advisor host agents This chapter describes the process to install XP Performance Advisor Windows and UNIX host agents.
2. In the XP Performance Advisor Home screen, click Support in the title pane. Figure 13 XP Performance Advisor Support screen - Downloading host agent software . 3. Navigate to the Host Agents section. A list of host agents for supported operating platforms is provided. 4. Click the link for the host agent you want to select and download the host agent .tar file to your host. 5. Navigate to the XPInfo section and download the XPInfo software. 6. FTP both the XP Performance Advisor host agent .
8. Install or upgrade the XP Performance Advisor host agents on the respective operating system hosts.
Enabling the Windows host agent for IPv6 Enable your XP Performance Advisor Windows host agent to use IPv6 as the communication protocol, if the XP Performance Advisor is also enabled for IPv6. Ensure that both the XP Performance Advisor and host agents communicate using the same protocol, either IPv4 or IPv6. 1. Select Enable IPv6 to activate the IPv6 setting for your host agent. You can enable IPv6 for the host agent in addition to IPv4.
1. Click Test Validity to verify if the DNS or IP address of the management station that you provided on the Connection Settings installation window is valid. If the installer displays the following message, it indicates that you must verify and provide a valid DNS or IP address: The DNS or IP address entered for your management station is incorrect. 2. Click Test Connectivity to verify if the command devices are configured and presented to the host.
more information, see Modifying XP Performance Advisor Windows host agent program features on page 104. • Custom installation method: In this installation method, you can select if you want to install the real-time component, based on whether you want to view real-time data for your XP disk arrays. By default, the real-time component is installed on your host. If you decide to install the real-time component later, start the XP Performance Advisor setup.
Completing the Windows host agent installation and next steps NOTE: This section is also applicable for the upgrade process. Click Install on the Ready to Install window for the installation wizard to proceed with the XP Performance Advisor Windows host agent installation (or upgrade), based on the settings that you selected. After the installation (or upgrade) completes, a command prompt window appears displaying the message that the host agent services have started.
2. If the XP Performance Advisor Windows host agent has been installed, the status of the following services are in the Started mode: • HP XP Performance Advisor Hostagent • HP XP Performance Advisor Realtime Server Figure 15 Services dialog box - Confirming Windows host agent major services . The HP XP Performance Advisor Realtime Server appears only if you have chosen the real-time component while installing the host agent.
Executing the UNIX host agent installer IMPORTANT: Before proceeding with the installation, use XPInfo to verify whether the connectivity to the command device is established. If you are performing an upgrade, the connectivity to the command device must already exist. For more information, see “Verifying host connectivity to a command device” on page 39. To execute the UNIX host agent installer: 1. Telnet to the remote host as a root user. 2.
Completing the UNIX host agent installation and next steps NOTE: This section is also applicable for the upgrade process. The XP Performance Advisor UNIX host agent is installed based on the settings that you selected on the previous installation windows. After the installation (or upgrade) completes, a command prompt window appears displaying the message that the host agent services have started. Press any key to close the command prompt window.
If the UNIX host agent or real-time service does not start automatically, type the following commands at the prompt to manually start the host agent and real-time services: • /opt/xppa/hostagent/sbin/xppa start • /opt/xppa/realtime/xprealtime start Verifying if the host agents appear in XP Performance Advisor NOTE: This section is also applicable for the upgrade process.
Installing the XP Performance Advisor host agents
5 Understanding the XP Performance Advisor upgrade prerequisites This chapter describes the prerequisites to upgrade the XP Performance Advisor software and the host agents, and explains the upgrade checklist. For more information, see Table 7 on page 84. To install XP Performance Advisor, see Table 2 on page 16.
• Before upgrading XP Performance Advisor: This section lists the tasks and prerequisites that you must complete before starting the XP Performance Advisor upgrade process on your management station. • Upgrading XP Performance Advisor: This section directs you to the XP Performance Advisor installation wizard. • After upgrading XP Performance Advisor: This section lists the post-upgrade tasks and prerequisites you must complete before upgrading the XP Performance Advisor host agents.
Verify if you have received the product license entitlement certificate for XP Performance Advisor. For more information, see “Viewing product license entitlement certificate for existing customers” on page 67. Launch XP Performance Advisor and log in using your credentials. IMPORTANT: Install Adobe Flash Player on the system from where you will access XP Performance Advisor. Download Adobe Flash Player and Flash Player Plugin, v10.0.0 or later from the following location: http://get.adobe.
Using XP Performance Advisor If it is not running, launch XP Performance Advisor and log in using your credentials. For more information, see “Launching XP Performance Advisor” on page 66. Start collecting the configuration and performance data for your XP disk arrays. For more information, see “Using XP Performance Advisor” on page 97. Determining the current version of XP Performance Advisor To upgrade to XP Performance Advisor v4.6, you must have one of the following versions, v3.5, v3.5.1, v3.5.2, v4.
1. Upgrade the current version (v3.2 or later versions) to v3.5 or v3.5.2, which also includes the migration of the current data using the XP Performance Advisor database migration utility (XPPA_DMU_v1.1.0.zip). To download this utility, see HP Business Support Center: http://h20000.www2.hp.com/bizsupport/TechSupport/SoftwareIndex.jsp?lang=en&cc=us& prodNameId=3185423&prodTypeId=18964&prodSeriesId=64823&swLang=8&taskId=135& swEnvOID=181.
Understanding the XP Performance Advisor upgrade prerequisites
6 Upgrading XP Performance Advisor This chapter describes upgrading the current version of XP Performance Advisor to its latest version.
Verify the XP Performance Advisor functionality for historic data Verify the XP Performance Advisor functionality for historic data by plotting charts, and see if you are able to view the previous set of collections. To plot the performance graphs: 1. Log in to XP Performance Advisor. For more information, see “Launching XP Performance Advisor” on page 66. 2. Click Charts in the left pane. The DKC or model numbers of individual XP disk arrays monitored by XP Performance Advisor are displayed.
4. Select the metrics for which you want to plot performance graphs. If you have selected a combination of resources from different resource types, only the metrics related to the selected resources are displayed in the Choose Metrics box. The performance graphs of the resources are automatically displayed in the Chart Work Area for the selected metric. 5. Select the duration for when you want to view the performance data points in the Chart Work Area.
2. Configure the following settings on the Email Settings screen: SMTP Server Settings • IP address or host name of the SMTP server. The default SMTP server IP address is localhost. • Related port number (accepts only numbers). The default port address is 25. XP Performance Advisor uses the above settings to dispatch email notifications to the intended recipients when alarms or reports are generated, or performance data collection fails.
• Location of the XP Disk Array for which the report is generated. This information is useful if the XP Disk Array is located in a different site, away from the management station. Data Collection Email Settings • A valid destination email address, as specified under Alarm Email Settings. • An appropriate subject text for the data collection failure notifications.
Upgrading XP Performance Advisor
7 Upgrading XP Performance Advisor host agents This chapter describes upgrading the XP Performance Advisor Windows and UNIX host agents.
Upgrading the XP Performance Advisor UNIX host agents IMPORTANT: If you are upgrading an XP Performance Advisor LINUX host agent, remove the existing version of the host agent and install the latest version. For more information, see Removing a UNIX host agent on page 108. For UNIX host agent upgrade, see “Installing the XP Performance Advisor UNIX host agents” on page 78.
8 Using XP Performance Advisor After installing the XP Performance Advisor and host agents, you can start collecting configuration and performance data for your XP disk arrays. You can initiate configuration data collection for only one XP Disk Array at a time, and select only one command device through which you can collect data for the XP Disk Array.
5. Click Request Info. The Request Info button is enabled only when you select the host agent records. Use the Shft or Ctrl key to select multiple host agents. The request is executed in the subsequent data collection cycle. After XP Performance Advisor retrieves the latest information from the host, the Status changes to Received for the host agent record in the Host Information table. The latest time stamp is displayed under Updated.
3. Select Collection Period as Recurring. NOTE: To collect configuration data once, select One Time as the collection period. Figure 18 Configuration Data Collection . 4. Retain the Collection Type as OutBand (default selection), if you want XP Performance Advisor to directly collect data from an XP Disk Array through its SVP. The IP Address is automatically displayed for an XP Disk Array, if you have already registered the SVP with the respective management station.
The selected schedule type and frequency appear under Frequency. After the configuration data is collected for the specified frequency, the Collection Status shows Done, and the Last Collection displays the updated time stamp when XP Performance Advisor completes receiving the latest configuration data. The latest configuration data for an XP Disk Array is automatically updated in XP Performance Advisor.
5. In the respective resource type lists, select the check boxes for resources to collect their performance data. The following resource type lists are displayed: • • • • • • • DKC Port RAID Groups THP Groups Snap Groups CA Journal Groups External RAID Groups NOTE: • Selecting a ThP, Snapshot, or XP Continuous Access Journal volumes also provides the respective volume pool information.
7. Select the check box for Stagger Schedule if you want to stagger the data collection time at different intervals. The Stagger Schedule ensures that the load on the management server at any point is balanced, because data collection occurs for all XP disk arrays at varied points of time in the day and not every 15 minutes of the hour. 8.
9 Modifying or repairing XP Performance Advisor After installing XP Performance Advisor or the host agents, you can structure the settings that you selected during the installation.
3. Click Install on the Ready to Repair window. The setup program transfers and removes application files (as appropriate) to, and from the destination folder, and configures XP Performance Advisor. When prompted for the second disk, insert the XP Performance Advisor Installation disk 2 in the DVD drive, and click OK to continue. 4. When the repair is done, the Installation Complete window appears. Click Finish to close the installation wizard.
3. Click Install on the Ready to Repair the Program window. The setup program transfers and removes application files (as appropriate) to, and from the destination folder, and configures the XP Performance Advisor. When prompted for the second disk, insert the XP Performance Advisor Installation disk 2 in the DVD drive, and click OK to continue. 4. When the repair is done, the Installation Complete window appears. Click Finish to close the installation wizard.
Modifying or repairing XP Performance Advisor
10 Removing XP Performance Advisor To remove XP Performance Advisor, you must first remove the host agent from each host, and then remove XP Performance Advisor from the management station. IMPORTANT: Ensure that the following are completed before you proceed: • No other user is accessing the folders in the \HPSS (%HPSS_HOME%) directory on the management station and \Program Files\XPPA\ hostagent directory on the respective hosts.
4. Click OK to proceed or click Cancel. The installer starts gathering the required information. This might take few minutes. The installer then prompts you to remove the XP RMLIB functions. 5. Click Yes to continue removing XP RMLIB. If you are sure that the XP RMLIB functions are being shared by some other application, click No to retain the XP RMLIB components. Removing a UNIX host agent To remove the host agent from hosts other than Windows, complete the following steps: 1.
To remove the XP Performance Advisor management station: 1. From the Control Panel in Windows, click Add/Remove Programs. 2. Click HP StorageWorks XP Performance Advisor. 3. Click Change. 4. Click Next. 5. Select Remove, and click Next. 6. Click Remove again. 7. Click Finish. A message appears indicating that uninstallation was successful. 8. Reboot the management station to ensure that the XP Performance Advisor services are completely removed.
Removing XP Performance Advisor
11 Troubleshooting XP Performance Advisor installation related issues This chapter discusses the following: • • • • “Troubleshooting installation issues” on page 111 “Troubleshooting configuration issues” on page 113 “Troubleshooting web client issues” on page 119 “Installation error messages” on page 122 Each of the troubleshooting scenarios described in the above-mentioned sections have a description of the issue, cause, action to be taken, results, and next steps.
• If a previous version of XP Performance Advisor has been removed, verify whether the Oracle folders and services for XP Performance Advisor have been removed. For more information, see “Choosing a system where Oracle is not installed” on page 28. After installation, verify whether the XP Performance Advisor service has started and try to launch XP Performance Advisor. For more information, see “XP Performance Advisor post-installation steps” on page 62 and “Launching XP Performance Advisor” on page 66.
• Ensure that the host agent version you download from the XP Performance Advisor Support screen is supported by the respective host specific operating platform. For more information, see HP StorageWorks XP Performance Advisor Software OS Support Matrix. For document download location, see “Related documentation” on page 126. After the issue is resolved, resume and complete the installation.
Host agents are not seen in XP Performance Advisor after an install or upgrade The XP Performance Advisor Windows or UNIX host agent might not appear under the Host Information tab (Array View > Host Information) in XP Performance Advisor after they are installed or upgraded on the respective hosts. Following are the typical causes: • An incorrect management station DNS or IP address is specified in the host agent paxp_service.
On a UNIX host, look for the host agent version displayed in the PerformanceAdvisor.log file. This file is located in the /opt/xppa/hostagent/log folder. If you have logged into XP Performance Advisor, the host agent version is also displayed in the Host Information table under HA Version. For more information, see “Requesting host update” on page 97.
Advisor” on page 23 and “Verifying the supported configurations for XP Performance Advisor host agents” on page 33. • Creating GUIDs on Windows hosts. For more information, see “Assigning GUIDs for command devices on a Windows host” on page 31. • Understanding how to create configuration and performance data collections. For more information, see “Collecting configuration data” on page 98 and “Collecting performance data” on page 100.
However, you can also increase or decrease the heap size value based on the maximum heap size that your system supports. For more information, refer to your operating system guide to know the maximum configurable heap size value. To modify the heap size value on a UNIX host agent: 1. Stop the UNIX host agent services. • To stop the HP XP Performance Advisor Hostagent service, type /opt/xppa/hostagent/ sbin/xppa stop in the command prompt window.
5. Start the Windows host agent services. Follow the steps (a and b) mentioned under stopping the Windows host agent services. Click Start in the drop down lists to start the HP XP Performance Advisor Hostagent service and HP XP Performance Advisor Realtime Server service. Checking std*out.log file size The std*out.log file is created after an installation or upgrade process.
not displayed. It is regardless of logging in as a default administrator or as a user who is granted administrator privileges. Resolution Enter the fully qualified domain name ([servername].[domain name]) or the IP address of the management station in the http URL - http:///pa or http:/ //pa. You can also access XP Performance Advisor over a secure connection https://[server name].
• Download Adobe Flash Player and Flash Player Plugin, v10.0.0 or later from the following location: http://get.adobe.com/flashplayer/. After the issue is resolved, log in to XP Performance Advisor and start collecting configuration and performance data for your XP disk arrays. For more information, see “Using XP Performance Advisor” on page 97. You can also see the chapter on collecting configuration and performance data in the HP StorageWorks XP Performance Advisor Software User Guide.
1. Configure the JAVA_HOME variable to the JRE folder location on your management station: a. Right-click My Computer and select Properties. b. Under the Advanced tab, select Environment Variables. c. Under System Variables, click New and enter JAVA_HOME followed by the JRE location. For example: JAVA_HOME C:\Program Files\Java\jre 1.5.0_17\ d. Click OK e. Select Path in the System Variables list, insert a semi colon followed by %JAVA_HOME%\ bin.
1. 2. 3. 4. 5. In Internet Explorer, go to Tools > Internet Options. Under the General tab, select Delete Cookies > Delete Files > Clear History. Under the Privacy tab, set the vertical slider to Block all Cookies. Click Apply. Close IE and launch XP Performance Advisor. Installation error messages This section describes the error messages that you might see when installing XP Performance Advisor.
Error Title Error Description Solution or Workaround To switch the IIS Admin service to Manual mode: IIS Admin service is running on this management station. The installation wizard has detected that IIS Admin service is running on this management station. The IIS Admin service must be set to Manual mode for the installation wizard to proceed. 1. Go to Start > Run and type Services.msc in the command line. 2. Double click IIS Admin service in the Services window. 3.
Error Title Error Description Solution or Workaround The entered user group does not exist in the domain provided. The installation wizard has detected that the user group does not exist on your management station. This group must be created for the installation wizard to proceed. Create the domain user group on your management station if you want to implement Domain authentication method.
12 Support and other resources Contacting HP For worldwide technical support information, see the HP support website at: http://www.hp.com/support.
http://www.hp.com/support/storagedocsurvey. Thank you for your time and your investment in HP storage products.
Document Conventions and Symbols Table 9 Document conventions Convention Element Blue text: Table 9 Cross-reference links and e-mail addresses Blue, underlined text: http://www.hp.
Support and other resources
A Installing a Loopback Adapter IMPORTANT: The procedures provided here for installing the Loopback Adapter on different Windows versions are directly taken from the Oracle documentation. For the latest information on Loopback Adapter, see the Oracle website: http://download.oracle.com/docs/html/B10130_02/reqs.htm. When you install a Loopback Adapter, it assigns a local IP address for your computer.
Subnet Mask 255.255.0.0 Installing a Loopback Adapter on Windows 2000 Windows 2000 reports on the first network adapter installed. This means that if you install additional network adapters after you install the Loopback Adapter, you need to remove and reinstall the Loopback Adapter. The Loopback Adapter must be the last network adapter installed on the computer. To install a Loopback Adapter on Windows 2000: 1. From the Start menu, select Settings, then Control Panel. 2.
• domainname is the name of the domain. For example: 10.10.10.10 mycomputer.mydomain.com mycomputer 18. Check the network configuration: NOTE: Domain name is optional. a. Open System in the Control Panel, and select the Network Identification tab. In Full computer name, make sure you see the host name and the domain name, for example, sales.us.mycompany.com. b. Click Properties. In Computer name, you should see the host name, and in Full computer name, you should see the host name and domain name.
14. Under the General tab, select Internet Protocol (TCP/IP), and click Properties. 15. In the Properties dialog box, click Use the following IP address and do the following: a. IP Address: Enter a non-routable IP address for the Loopback Adapter. Oracle recommends the following non-routable addresses: • 192.168.x.x (x is any value between 0 and 255) • 10.10.10.10 16. 17. 18. 19. b. Subnet mask: Enter 255.255.255.0. c. d. e. Record the values you entered, which you will need later in this procedure.
4. 5. 6. 7. 8. In The wizard can help you install other hardware window, select Install the hardware that I manually select from a list, and click Next. From the list of hardware types, select the type of hardware you are installing window, select Network adapters, and click Next. In the Select Network Adapter window, do the following: a. Manufacturers: Select Microsoft. b. Network Adapter: Select Microsoft Loopback Adapter. c. Click Next.
Installing a Loopback Adapter
B Stopping and starting host agent services The following table lists the steps to start, stop, or restart a Windows or UNIX host agent service: Table 10 Start, stop, and restart host agent services Windows host agent UNIX host agent To stop the host agent service (HP XP Performance Advisor Hostagent): 1. Go to the Services window. 2. Right-click HP XP Performance Advisor Hostagent. 3. Click Stop in the drop down list. Stopping services This command stops the host agent services.
Stopping and starting host agent services
Glossary ACP Array Control Processor. ACP handles the transfer of data between the cache and the physical drives held in the DKUs. ACPs work in pairs, providing a total of eight SCSI buses. Each SCSI bus associated with one ACP is paired with a SCSI bus on the other ACP pair element. In the event of an ACP failure, the redundant ACP takes control. Both ACPs work together by sharing the load. On XP models, such as the XP10000, this function is handled by the disk adapter on the MIX board.
CLPR contains cache and parity groups, and is available on the XP12000, XP10000, and later generations of XP disk arrays. NOTE: CLPR0 always exists (cannot be deleted) and is a pool area for cache and parity groups that are not yet assigned to other CLPRs. CV Command View XP. The HP StorageWorks Command View XP Software is replaced by the HP StorageWorks Command View XP Advanced Edition software. CV AE Command View XP Advanced Edition.
• OPEN-V: User-defined custom size Inband data collection A method of collecting configuration data for an XP Disk Array using a command device that is presented to a host operating system. JRE Java Run time. HPAC Hewlett-Packard Authorization Center Hewlett-Packard Authorization Center license key website (http:// webkey.external.hp.com/), where you generate a license for a specified internal raw disk capacity of your XP Disk Array. LDAP Lightweight Directory Access Protocol.
• RAID1 array groups consist of 4 HDDs (2D+2D) or 8 HDDs (4D+4D). • RAID5 array groups include a parity disk, but also consist of 4 HDDs (3D+1P) or 8 HDDs (7D+1P). • RAID6 array groups are made up of 8 HDDs (6D+2P). RML XP RAID Manager Library (RMLIB). The XP RML or XP RMLIB is an API library that enables third party software products to directly operate some of the functions on the XP subsystem. RWC XP Remote Web Console.
The XP Tiered Storage Manager software is used to perform migration, where data stored on one volume is moved to another volume. XP Tiered Storage Manager software moves data on predefined set of volumes to another set of volumes with the same characteristics. For more information, see the manuals set provided for XP Tiered Storage Manager software on the HP Manuals page. UAC User Access Code.
Glossary
Index Removing XP Performance Advisor host agent, 107 management station, 107 post install instructions, 107 C conventions document, 127 text symbols, 127 S D Disk space requirements, 21 document conventions, 127 related documentation, 126 documentation HP website, 126 providing feedback, 125 H help obtaining, 125 Host agent Windows, Linux, UNIX, , HP technical support, 125 I Installing XP Performance Advisor Host agent, 45 Management station, 45 XP Performance Advisor tools, 45 L Loopback Adapter Rem