
hp StorageWorks NAS e7000 v2 Maintenance and Service Guide

Removal and Replacement Procedures
46 NAS e7000 v2 Maintenance and Service Guide
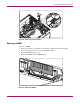
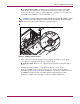
7. Close the rear access panel.
8. Reinstall the server in the rack.
Configuring the Memory
Configuring the servers memory system of the server requires configuring both hardware and
software. To configure the memory:
1. Choose one of the following memory configurations:
■ Standard memory (Advanced ECC)
■ Online spare memory
■ Single board mirrored memory
■ Hot-plug mirrored memory
For a discussion of how to determine the memory technology best suited for your
requirements, refer to the Advanced Memory Protection white paper on the HP website at
www.hp.com.
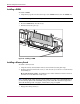
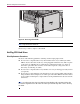
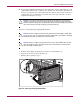
2. Remove the memory board. Refer to “Removing a Memory Board” in this chapter.
3. Install the required DIMMs based on your desired memory configuration. Be sure to
follow all DIMM installation requirements. Refer to “DIMM Installation Requirements”
in this chapter for your desired memory configuration.
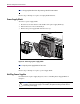
4. Install the memory board. Refer to “Installing a Memory Board” in this chapter.
5. Configure the DIMMs:
a. Power on the server.
b. Press the F9 key to enter RBSU.
c. Select Advanced Options.
d. Change POST Speed Up to disable (to test the replaced memory).
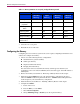
Table 11: Memory LED States on a Properly Configured Memory Board
LED Memory Configuration
Advanced ECC
(Standard
Memory)
Online
Spare
Memory
Single-Board
Mirrored
Memory
Hot-Plug
Mirrored
Memory
Memory Status Green Green Green Green
DIMMs 1-8, if
populated
Green Green Green Green
Online Spare
Status
Off Green Off Off
Mirroring Status Off Off Green Green
Online Spare text* Off Green Off Off
Ready to Hot Plug Off Off Off Green
*If two memory boards are installed, the online spare text is only illuminated for the memory
board in slot 1.