
HP StorageWorks Advanced Web Tools 7.4.X Administrator Guide (AA-RVHFC-TE, September 2005)


Advanced Web Tools 7.4.x administrator guide 61
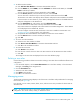
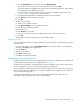
4. To add zone alias members:
a. Click Add Zone Alias Members in the Zone Alias Members task bar.
b. Click the WWNs tab, select WWNs, and click Add NWwn to add the node WWN, or click Add
PWwn to add the port WWN.
You can also type a WWN in the Any WWN box and click Add.
c. Click the Domain, Port tab, select the domains or ports, and click Add.
You can also enter a domain and port in the Any Domain and Port boxes and click Add.
The Domains in the Fabric area displays all the domains and ports that are available to be added
to the zone alias. As each domain or port is added, it disappears from the list of available domains
and ports and appears in the Members list.
d. Click the iSCSI Names tab, select names, and click Add iSCSI Name.
You can also enter an iSCSI name in the Any iSCSI Name box and click Add.
Only iSCSI initiators are displayed. Each iSCSI initiator has a WWN assigned to it. These WWNs
are not displayed in the WWNs tab, however.
You must configure a CHAP secret for the devices in the zone to establish communication. See
”Configuring CHAP” on page 100 for more information.
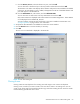
e. Verify that the Zone Alias Members to be added list contains the correct members.
f. Click the Remove button to remove members, if necessary.
g. Click OK.
5. To remove zone alias members:
a. Select the zone alias members to delete.
b. Click Remove Zone Alias Members in the Zone Alias Members task bar.
c. Click Yes in the Confirmation window.
6. To rename the zone alias:
a. Click Rename in the task bar.
b. Enter the new name for the zone alias in the New name box of the Rename Zone Alias window.
c. Click OK.
The changes to the zone alias are displayed in the zone alias drill-down page.
Deleting a zone alias
Use the following procedure to delete a zone alias. Deleting a zone alias does not affect the effective zone
configuration.
1. From the Switch Explorer, click the Zone Administration icon in the fabric toolbar, or from the Switch
Manager, click Zoning in the navigation bar.
2. Click the Zone Aliases tab.
3. Select the zone alias to delete.
4. Click Delete in the task bar.
5. Click Yes in the confirmation window.
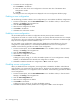
Managing zones
The Zones tab in the Zoning page displays a list of the zones in the fabric and provides tasks for managing
those zones (see Figure 22).
From this tab, you can create, rename, delete, clone, and save zones. The procedures for these tasks are
described next.
NOTE: An asterisk at the end of a zone name indicates that the zone is a member of the effective zone
configuration. You cannot rename, modify, or delete these zones.