
HP StorageWorks Advanced Web Tools 7.4.X Administrator Guide (AA-RVHFC-TE, September 2005)


Advanced Web Tools 7.4.x administrator guide 49
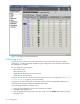
5. Select the maximum distance for the port-specific long-distance setting.
Use the Max Distance setting to allocate enough full-size frame buffers on a particular port to support
a long-distance link up to 300 km. This port-specific setting overrides any switch-wide BB_CREDIT
setting.
• Normal (L0): Reconfigure the port to be a regular switch port. Switch-wide BB_CREDIT setting will
be used at this port.
• 10 km (LE): This level supports distances up to 10 km at both 1-Gbit/sec and 2-Gbit/sec speeds.
• 25 km (L0.5): This level supports distances up to 25 km at both 1-Gbit/sec and 2-Gbit/sec speeds.
• 300 km (LS): This level supports distances up to 300 km at both 1-Gbit/sec and 2-Gbit/sec speeds.
NOTE: If you are creating a long-distance ISL from the MP Router running XPath OS to a switch running
Fabric OS 4.4.x or 3.2.x, you must set VC translation link initialization to 0 on the Fabric OS switch. VC
translation link initialization is set to 1 by default in these Fabric OS versions, but it is not supported in
XPath OS. For details on setting this option to 0, see Fabric OS documentation for the
portCfgLongDistance command.
6. Click Next.
7. Enter the fabric ID.
This is the ID of the edge fabric that connects to the EX_Port. EX_Ports connected to the same edge
fabric must have the same fabric ID. Note that this does not require any switch in the edge fabric to be
configured with a fabric ID.
8. Select the interoperability mode: Brocade Native mode, McDATA Fabric mode, or Open (open fabric)
mode.
9. Click Finish.
If the port is not stopped, the Confirm Potential Disruption window opens, notifying you that the port is
stopped before the configuration changes are applied.
10.Click Yes to disable the port and apply the configuration changes.
11.Click Close to close the Edit Port Configuration window.
The edit configuration operation continues even if you close the window before the port is configured.
After the configuration changes have been applied, the port is automatically restarted.
Configuring a Gigabit Ethernet port with FCIP
NOTE: The FCIP feature is available only when a license for this feature is installed.
1. Select GigE with FCIP for the port mode and then click Next.
2. Enter values for the IP address, subnet mask, and gateway, and then click Next.
3. Select the link cost:
•Click Dynamic Link Cost to automatically set the link cost based on port speed (for a 1-Gbit/sec
ISL, the link cost is 1000; for a 2-Gbit/sec ISL the link cost is 500).
•Click Custom Link Cost to specify a static cost for the link. Enter the static link cost in the Custom
Link Cost box.
The cost of a link is used to determine the least-costly path for a frame from the source to the
destination switch.
4. Specify the FCIP values. Select from the following:
• Enable FCIP Tunneling. Select this option to enable the Fibre Channel over IP ISL. FCIP tunneling
allows the transparent interconnection of geographically distributed Storage Area Network (SAN)
islands through an IP-based network. If the tunnel is not enabled, IP-level debugging can still be
performed. See the HP StorageWorks XPath OS 7.4.x command reference guide for more
information about FCIP Tunneling.