
HP StorageWorks Advanced Web Tools 7.4.X Administrator Guide (AA-RVHFC-TE, September 2005)


Advanced Web Tools 7.4.x administrator guide 47
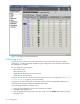
4. Highlight the port entry in the resulting table.
NOTE: You can select more than one port to configure at a time, if you configure multiple ports to have
the same values. The configuration is then changed for all the selected ports.
Clicking the port name displays a port drill-down page with additional information about the port; you
do not need to open the drill-down page, however, to configure the port.
5. Click Edit Configuration in the task bar.
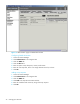
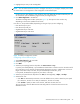
The Edit Port Configuration window opens (see Figure 18). The options in this window vary,
depending on the licenses installed on the switch.
From here on, the procedure differs, depending on the type of port you are configuring:
• Fibre Channel port U_Port
• Fibre Channel port EX_Port
• Gigabit Ethernet port with FCIP
• Gigabit Ethernet port with iSCSI
Figure 18 Edit Port Configuration window
Configuring a Fibre Channel U_Port
1. Select Fibre Channel for the port mode.
2. Select the port type: U_Port.
3. Click Next.
4. Select the port topology from the drop-down list: Point to Point or Loop.
In point-to-point mode (default), a port autodetects whether there is another switch on the other end of
the connection (in such, case the port automatically becomes an E_Port) or whether there is a host or
target on the other end (in such case, the port automatically becomes an F_Port).
In loop mode, the MP Router supports only one device in the loop.
5. Select the port speed from the drop-down list: Auto (for autonegotiate), 1 Gbps, or 2 Gbps.
6. Select the link cost:
•Click Auto to automatically set the link cost to the default link cost, which is based on port speed
(for 1-Gbit/sec, the link cost is 1000; for 2-Gbit/sec, the link cost is 500).
•Click Custom to specify a static cost for the link, and enter the static link cost.
The cost of a link is used to determine the least-costly path for a frame from the source to the
destination switch.