
HP StorageWorks Advanced Web Tools 7.4.X Administrator Guide (AA-RVHFC-TE, September 2005)

Advanced Web Tools 7.4.x administrator guide 33
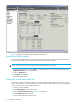
5. Select the date from the drop-down calendar or manually enter the date in the format mm/dd/yyyy.
6. Enter the time in the format hh:mm.
7. Select AM or PM.
8. Select the continent or ocean that is closest to your location from the TimeZone Region drop-down list.
9. Select the country or city that has your time zone from the Location drop-down list.
10.Click OK.
Configuring Ethernet management ports
The MP Router provides two 10/100 Mbit/sec Ethernet ports capable of being configured as a single IP
address or as two unique IP addresses.
If you configure the Ethernet ports with unique IP addresses, when the switch is joined to a fabric, the
switch must have a virtual Ethernet IP identity for routing. If you change the IP address, the virtual IP
address does not automatically change. You can handle this by setting a virtual management IP address
for the switch.
The virtual management IP address is used as the single identity of the switch.
You must configure at least one of the Ethernet ports; this management IP address need not be the same as
the virtual IP address. If management port 2 is not set, the virtual management IP address is the same as
the management port 1 IP address.
You can launch Advanced Web Tools using any of the management or virtual management IP addresses.
Configuring IP and mask information
1. Access the Switch Manager.
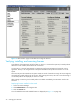
2. Click Administration in the navigation bar.
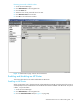
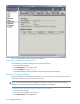
3. Click the Network Config tab (see Figure 12).
4. Click Edit.
The Edit Ethernet Management Ports dialog box opens.
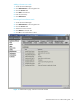
5. Click the management ports you want to change (virtual management port, management port 1, and
management port 2).
6. For each management port you are editing:
a. Enter a valid IP address and subnet mask.
b. Enter a valid gateway address (not applicable for the virtual management port).
c. Select when the changes are to take effect (either immediately or after the next reboot) from the
drop-down list.
7. Click OK.