
HP StorageWorks Advanced Web Tools 7.4.X Administrator Guide (AA-RVHFC-TE, September 2005)


Advanced Web Tools 7.4.x administrator guide 31
3 Managing the MP Router
This chapter provides procedures for managing the MP Router. It contains the following sections:
• Managing MP Routers with Advanced Web Tools, next
• Viewing switch information, page 31
• Opening a Telnet window, page 32
• Setting the switch date and time, page 32
• Configuring Ethernet management ports, page 33
• Verifying, installing, and removing licenses, page 34
• Managing user accounts, page 36
• Enabling and disabling an MP Router, page 37
• Renaming an MP Router, page 38
• Setting the domain ID, page 38
• Rebooting the MP Router, page 38
• Physically locating a switch using beaconing, page 39
• Updating the MP Router firmware, page 39
• Viewing SNMP information, page 41
Managing MP Routers with Advanced Web Tools
You can monitor and manage MP Routers through both the Switch Explorer and the Switch Manager. Most
of the management tasks are performed through the Switch Manager, using the Application Platform page
and the Administration page.
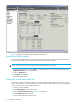
Click Application Platform in the Switch Manager navigation bar to access the Application Platform page.
Figure 3 on page 16 shows the Application Platform page with the Summary tab selected. Click
Administration in the Switch Manager navigation bar to access the Administration page. These pages,
and the tasks you can perform from them, are described in more detail in the following sections.
Viewing switch information
You can view switch information from either the Switch Explorer or the Switch Manager.
Viewing switch information through the Switch Explorer
1. Select the switch or MP Router in the fabric tree.
The Switch View displays a color-coded representation of the switch. The color of the Status, Fan, Temp,
and Power buttons indicates the general status of these components. The Switch Information View
displays general information about the switch (see Figure 2 on page 14).
2. Click the Status button to display the overall switch status.
3. Click the Info button to display general switch information.
4. Click the Fan, Temp, and Power buttons to display detailed state information about the fans,
temperature sensors, and power supplies, respectively.
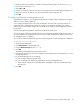
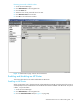
Viewing switch information through the Switch Manager
1. Click Application Platform in the navigation bar.
2. Click the Summary tab to display general information about the MP Router (see Figure 3 on page 16).
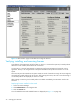
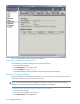
3. Click the Details tab to display information about the hardware components (see Figure 11 on
page 32). To refresh the display for the temperature and fan status, click the corresponding Refresh
button.