
HP StorageWorks 1500/1510i Modular Smart Array chassis replacement instructions (364862-002, December 2006)
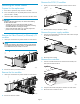


Remove the MSA from the rack
1. RemovethedecorativebezelfromthefrontoftheMSAbygrasping
the outside edges and pulling with sufficient force to disengage
the retaining clips.
15642
2. Loosen the thumbscrews securing the MSA to the front of the rack,
and then slide the MSA out of and away from the rack.
Installing the replacement chassis
Record the serial numbers of the two chassis
IMPORTANT:
Depending on the MSA model and firmware version, the serial
number of the original chassis may automatically be transferred
to the replacement chassis. For continued service and support
from HP authorized service personnel, the serial number of the
original chassis must also be physically recorded on the label of
the replacement chassis.
The product label is located on the side of the MSA chassis.
15641
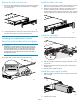
Install the MSA i
ntherack
1. Slide the MSA in
totherack,andthensecuretheMSAtothefront
of the rack, usi
ng the thumbscrews on the front of the MSA.
2. Attach the decorative bezel on the front of the MSA by aligning
the pins and re
taining clips on the back of bezel with the
corresponding locations on the front of the chassis. Then, with even
pressure, pu
sh firmly on the bezel until the retaining clips engage.
15649
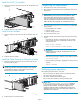
Install the controllers
1. Press the controller thumb latch and rotate the latch handle out.
1
2
15493
2. Slide the controller into the chassis and then push firmly to ensure
agoodseat.
3. Rotate the latch handle inward, pressing until it is flush against
the front panel.
4. Installtheothercontrollerorblank.
Install the power supply modules
1. Sl
ide the module into the chassis power supply slot until the latch
cl
icks into place.
15646
2. Install the other module.
Page 3