
HP StorageWorks Disk Drive Modular Smart Array Replacement Instructions (April 2004)

Page 2
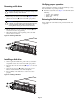
Removing a disk drive
Caution: Do not remove more than one disk drive at a
time from the enclosure. Doing so will impact cooling of the
enclosure and may cause data loss.
1. Push in the port-colored ejector button (1, Figure 2) and
pull the release lever (2) down to the full open position.
Caution: Rotating media can make the disk drive difficult
to handle. To avoid dropping and damaging the disk drive,
wait approximately 30 seconds for the media to stop
rotating before removing the drive from the enclosure.
2. Pull the disk drive part way out of the enclosure (3) and
wait for the media to stop spinning.
3. When the media has stopped spinning, remove the disk
drive from the enclosure.
Figure 2: Removing a disk drive
Installing a disk drive
1. On the replacement disk drive, push in the ejector button
and pull the release lever down to the full open position.
2. Insert the drive into the enclosure (1, Figure 3) as far as it
will go.
3. Close the release lever (2) until it engages the ejector
button, and the disk drive seats in the backplane.
4. Press in firmly on the disk drive to ensure it is seated
properly.
Figure 3: Installing a disk drive
Verifying proper operation
After replacing the disk drive, check the following to verify
that the disk drive is operating normally:
■ Disk drive status indicators (Figure 1) should indicate the
following:
— Activity - On or flashing
— Online - On or flashing
—Fault - Off
Returning the failed component
Please follow the return instructions provided with the new
component.
2
3
1
0004a
1
2
0005a