
Enterprise Volume Manager (Multi-OS) Version 2.0D Network Administration Guide


Enterprise Volume Manager (Multi-OS) Network Administration Guide 7–7
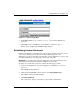
Starting EVM and Controlling Access
8. Click OK to change the account password; click Erase to clear all entries and
return to step 6 to continue.
Clicking OK changes the old password for the default account name to the new
password.
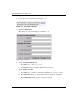
9. Repeat this procedure, as required, for managing passwords on the other default
accounts.
10. Return to the OSM Account Login Page and log in again to access the OSM
Home Page.
Browsing to EVM
The EVM GUI can be accessed from computers that are not part of the EVM network.
Any computer connected to the Internet can browse to an EVM network, if the user
has the proper permissions (see “Establishing Password Control” on page 7–4).
When browsing to an EVM network, HP recommends using the following steps:
1. Start a browser (see “Starting a Web Browser” on page 7–7).
2. Verify browser settings, if applicable (see “Setting Up the Netscape
Communicator Browser Font Size for UNIX” on page 7–8).
3. Browse to the EVM network (see “Browsing to the EVM Network” on page 7–9).
4. Add the EVM network website as a favorite or bookmark for future reference.
Starting a Web Browser
From the desktop or Start menu, start a browser. Both Microsoft Internet Explorer and
Netscape Communicator browsers are supported.
See Table 5–12 on page 5–13 for supported browser versions.
Setting the Browser to Automatically Check for Updated Pages
After opening the browser, set the browser to automatically check for updated pages.
NOTE: Depending upon the browser version in use, the named text in the following procedures
may differ.
For Internet Explorer browsers, use the following procedure to establish this setting:
1. Choose Tools > Internet Options.